T-Fal FR50AD50 Manuel utilisateur
- Catégorie
- Friteuses
- Taper
- Manuel utilisateur

Triple Basket deep fryer
www.t-fal.ca
EN
FR
ES

2
IMPORTANT SAFEGUARDS
When using electrical appliances, basic safety precautions should always
be followed, including the following:
1. Read all instructions before using.
2. Do not touch hot surfaces. Use handles or knobs.
3. To protect against electric shock, do not immerse cord, plugs or fryer
in water or other liquid.
4. Close supervision is necessary when any appliance is used by or near
children.
5. Unplug from outlet when not in use and before cleaning. Allow to
cool before putting on or taking off parts, and before cleaning the
appliance.
6. Do not operate any appliance with a damaged cord or plug or after the
appliance malfunctions, or has been damaged in any manner. Return
appliance to the nearest authorized service facility for examination,
repair or adjustment.
7. The use of accessory attachments not recommended by the appliance
manufacturer may cause injuries.
8. Do not use outdoors.
9. Do not let cord hang over edge of table or counter, or touch hot surfaces.
10. Do not place on or near a hot gas or electric burner, or in a heated oven.
11. Extreme caution must be used when moving fryer containing hot oil.
12. Always attach plug to appliance first (depending on model), then
plug cord in the wall outlet. To disconnect, turn any control to “off”,
then remove plug from wall outlet.
13. Do not use appliance for other than intended use.
14. Be sure handles are properly assembled to basket and locked in place.
See detailed assembly instructions.
15.
SAVE THESE INSTRUCTIONS
FOR HOUSEHOLD USE ONLY.
16. WARNING: POSSIBLE ERUPTION. WATER’S REACTION TO HOT
OIL IS EXTREMELY VOLATILE. PLEASE ENSURE NO MATTER WHAT
THE RECIPE STATES, FOOD MUST BE DRIED THOROUGHLY BEFORE
IMMERSING IN HOT OIL.

3
EN
17. Before use, check that your local voltage corresponds with the
specifications shown on the appliance nameplate located on the back
of the control panel.
18. Only connect the appliance to electrical sockets which have a
minimum load of 15A. If the sockets and the plug on the appliance
should prove incompatible, get a professionally qualified technician
to replace the socket with a more suitable one.
19. This electrical equipment operates at high temperatures which may
cause burns. Do not touch the hot surfaces of the appliance (housing,
plastic parts...).
20. To ensure safe operation, oversized foods must not be inserted into
the appliance.
21. Do not overload the frying baskets. For safety reasons, never exceed
the maximum quantity.
22. The cooking times are given as guidelines only.
23. Do not leave the cord hanging.
24. Do not unplug the appliance by pulling on the cord.
25. Always unplug the appliance immediately after use, when moving it
and prior to any cleaning or maintenance.
26. In the event of fire, never try to extinguish the flames with water.
Unplug the appliance. Close the lid, if it is not dangerous to do so.
Smother the flames with a damp cloth.
27. Do not move the appliance when it is full of hot food.
28. Never immerse the appliance in water!
29. This appliance is not suitable for recipes with a high-liquid content
(eg. soups, cooking sauces...).
30. Never turn on the appliance if the frying basket is empty.
31. Do not overfill the frying basket, never exceed the indicated quantities.
32. Ensure that the bowl is completely dry after washing and before use.
33. The oil level must always be between the Min. and Max. markings.
34. Never operate your fryer without any oil.
35. This appliance is not intended to be operated by means of an external
timer or separate remote control system.
36. This appliance is not intended for use by persons (including children)
with reduced physical, sensory or mental capabilities, or lack of
experience and knowledge, unless they have been given supervision
or instruction concerning use of the appliance by a person responsible

4
for their safety. Children should be supervised to ensure that they do
not play with the appliance.
37. This appliance is intended to be used in households only.
It is not intended to be used in the following applications, and the
guarantee will not apply for:
– staff kitchen areas in shops, offices and other working
environments;
– Farms houses;
– by clients in bed and breakfast, motels and other residential type
environments;
38. If the supply cord is damaged, it must be replaced by the manufacturer,
its service agent or similarly qualified persons in order to avoid a hazard.
39. Keep the appliance and its cord out of reach of children less than
8years old.
40. If you have any problems, contact the authorized after-sales service
or go to www.t-fal.ca
41. To turn off the power, press the START/STOP button and unplug the
breakaway power cord from the wall outlet.
42. CAUTION: Over tightening can result in stripping of screws or nuts or
cracking of handle or feet.
POLARIZATION INSTRUCTIONS
This appliance has a polarized plug (one blade is wider than the other). To
reduce the risk of electric shock, this plug is intended to fit into a polarized
outlet only one way. If the plug does not fit fully into the outlet, reverse
the plug. If it still does not fit, contact a qualified electrician. Do not
attempt to modify the plug in any way.
SHORT CORD INSTRUCTIONS
Do not use with an extension cord.
A short power-supply cord is to be provided to reduce the risk of entangling
or tripping over a longer cord.
Magnetic connector
The cord is equipped with a detachable magnetic connector. The magnetic
connector should be attached directly to the fryer. THIS SHOULD BE
DONE PRIOR TO PLUGGING THE CORD INTO THE WALL OUTLET.
Environment protection first!
Your appliance contains valuable materials which can be recovered.
Leave it at a local civic waste collection point.

5
FR
CONSIGNES IMPORTANTES DE SÉCURITÉ
Lors de l’utilisation d’un appareil électrique, il est toujours impératif
de respecter les précautions de sécurité élémentaires, notamment les
suivantes:
1. Lire toutes les instructions avant l’utilisation.
2. Ne pas toucher les surfaces chaudes. Utiliser les poignées ou les
boutons.
3. Ne pas immerger le cordon électrique, les fiches d’alimentation ou
la friteuse dans l’eau ou un autre liquide pour éviter les décharges
électriques.
4. Une supervision étroite est nécessaire lorsque l’appareil est utilisé par
des enfants ou près d’eux.
5. Débrancher l’appareil de la prise de courant lorsqu’il n’est pas utilisé
et avant de le nettoyer. Laisser l’appareil refroidir avant d’ajouter ou
de retirer des pièces et avant de le nettoyer.
6. Ne pas faire fonctionner un appareil dont le cordon électrique ou
la fiche d’alimentation est endommagé, après une défaillance ou
encore s’il a été endommagé de quelque façon. Retourner l’appareil
au centre de service autorisé le plus proche pour le faire examiner,
réparer ou régler.
7. L’utilisation d’accessoires complémentaires non recommandés par le
fabricant de l’appareil pourrait causer des blessures.
8. Ne pas utiliser l’appareil à l’extérieur.
9. Ne pas laisser le cordon électrique pendre du bord d’une table ou
d’un comptoir et ne pas le laisser toucher à une surface chaude.
10. Ne pas placer l’appareil sur un brûleur au gaz ou électrique chaud ou
à proximité d’un brûleur, ou encore dans un four chaud.
11. Déplacer une friteuse contenant de l’huile chaude doit être fait avec
extrême précaution.
12. Toujours raccorder la fiche d’alimentation à l’appareil en premier
(selon le modèle), puis brancher le cordon électrique sur la prise de
courant. Pour débrancher l’appareil, mettre toute commande en
position d’arrêt («off»), puis débrancher la fiche d’alimentation de
la prise murale.
13. Ne pas utiliser l’appareil à une autre fin que celle pour laquelle il a
été conçu.

6
14. S’assurer que les poignées sont fixées adéquatement au panier et
qu’elles sont solidement en place.
Consulter les instructions d’assemblage détaillées.
15. CONSERVEZ CES INSTRUCTIONS
POUR USAGE DOMESTIQUE
SEULEMENT.
16. AVERTISSEMENT : POSSIBILITÉ D’ÉCLABOUSSURE. LA RÉACTION
DE L’EAU AU CONTACT DE L’HUILE CHAUDE EST EXTRÊMEMENT
VOLATILE. PEU IMPORTE LES INDICATIONS DE LA RECETTE,
VEILLEZ À ASSÉCHER COMPLÈTEMENT LES ALIMENTS AVANT DE
LES IMMERGER DANS L’HUILE CHAUDE.
17. S’assurer que la tension électrique locale correspond aux
caractéristiques énoncées sur la plaque signalétique de l’appareil
située à l’arrière du panneau de commande.
18. Ne brancher l’appareil que sur des prises de courant dont la charge
minimale est de 15A. Si la prise de courant et la fiche d’alimentation
de l’appareil sont incompatibles, demander à un technicien
professionnel qualifié de remplacer la prise par une prise plus
appropriée.
19. Cet équipement électrique fonctionne à des températures élevées qui
pourraient causer des brûlures. Ne pas toucher les surfaces chaudes
de l’appareil (boîtier, pièces de plastique...).
20. Pour assurer un fonctionnement sécuritaire, ne pas insérer d’aliments
surdimensionnés dans l’appareil.
21. Ne pas surcharger les paniers à friture. Pour des raisons de sécurité, ne
jamais dépasser la quantité maximale.
22. Les temps de cuisson sont offerts à titre indicatif seulement.
23. Ne pas laisser le cordon électrique pendre.
24. Ne pas débrancher l’appareil en tirant sur le cordon électrique.
25. Toujours débrancher l’appareil immédiatement après l’utilisation,
pour le déplacer et avant de le nettoyer ou de l’entretenir.
26. En cas de feu, ne jamais essayer d’éteindre les flammes avec de l’eau.
Débrancher l’appareil. Abaisser le couvercle s’il n’est pas dangereux
de le faire. Étouffer les flammes avec un linge humide.

7
FR
27. Ne pas déplacer l’appareil lorsqu’il est rempli d’aliments chauds.
28. Ne jamais immerger l’appareil dans l’eau!
29. Cet appareil ne convient pas aux recettes contenant une quantité
élevée de liquide (p. ex. soupes, sauces à cuisson...).
30. Ne jamais mettre l’appareil en marche lorsque le panier à friture est
vide.
31. Ne jamais trop remplir le panier à friture et ne jamais dépasser les
quantités indiquées.
32. Veiller à ce que le contenant soit complètement sec après l’avoir
nettoyé et avant de l’utiliser.
33. Le niveau d’huile doit toujours se trouver entre les repères «Min.» et
«Max.».
34. Ne jamais faire fonctionner la friteuse sans huile.
35. Cet appareil n’est pas destiné à fonctionner avec une minuterie
externe ou avec un système de commande à distance distinct.
36. Cet appareil n’est pas destiné à être utilisé par des gens (incluant
des enfants) à capacités physiques, sensorielles ou mentales réduites,
ou qui manquent d’expérience ou de connaissances, à moins qu’ils
ne soient supervisés par une personne responsable de leur sécurité
ou qu’ils n’aient reçu de sa part des instructions sur l’utilisation de
l’appareil. Les enfants doivent être supervisés pour s’assurer qu’ils ne
jouent pas avec l’appareil.
37. Cet appareil est destiné à un usage domestique seulement.
Il n’est pas destiné à être utilisé dans les situations suivantes et sa
garantie n’est pas applicable dans ces cas:
– les coins cuisine pour le personnel des boutiques, bureaux et autres
environnements de travail;
– les fermes;
– par les clients des hôtels, des chambres d’hôtes, des motels et
autres types d’hébergement.
38. Si le cordon d’alimentation est endommagé, il doit être remplacé par
le fabricant, par un de ses agents de service ou par une personne aux
qualifications similaires pour éviter les risques.
39. Garder l’appareil et son cordon électrique hors de la portée des
enfants de moins de 8ans.
40. En cas de problème, communiquer avec le service après-vente autorisé
ou visiter l’adresse Internet www.t-fal.ca

8
41. Pour éteindre l’appareil, appuyer sur le bouton MARCHE/ARRÊT
(START/STOP) et débrancher le cordon électrique détachable de la
prise murale.
42. AVERTISSEMENT : Trop serrer les vis ou les écrous pourrait les
émousser ou fissurer la poignée ou le pied.
INSTRUCTIONS EN MATIÈRE DE POLARISATION
Cet appareil est équipé d’une fiche d’alimentation polarisée (une lame
de contact est plus large que l’autre). Afin de réduire les risques de
décharge électrique, cette fiche est conçue pour ne pouvoir être insérée
que dans un seul sens dans une prise polarisée. Si la fiche ne convient
pas parfaitement à la prise, tourner la fiche dans l’autre sens. Si elle ne
convient toujours pas, communiquer avec un électricien qualifié. Ne pas
tenter de modifier la fiche de quelque façon.
INSTRUCTIONS CONCERNANT LE CORDON ÉLECTRIQUE
COURT
Ne pas l’utiliser avec une rallonge.
Un cordon d’alimentation électrique court est fourni afin de réduire les
risques associés à l’enchevêtrement ou au trébuchement avec un cordon
plus long.
Raccord magnétique
Le cordon est équipé d’un raccord magnétique détachable. Le raccord
magnétique doit être fixé directement à la friteuse. CE RACCORDEMENT
DOIT ÊTRE FAIT AVANT DE BRANCHER LE CORDON ÉLECTRIQUE SUR
LA PRISE MURALE.
La protection de l’environnement avant tout!
L’appareil contient des matériaux précieux qui peuvent être
récupérés.
Le déposer dans un point de collecte municipal des ordures
ménagères.

9
ES
INDICACIONES DE SEGURIDAD IMPORTANTES
Cuando utilice cualquier tipo de electrodomésticos, siga siempre las
siguientes precauciones básicas de seguridad:
1. Lea las instrucciones antes del uso.
2. No toque las superficies calientes. Use las asas o las perillas.
3. Para evitar la electrocución, no sumerja el cable, las clavijas o la
freidora en agua ni en ningún otro líquido.
4. Mantenga una vigilancia estrecha cuando el equipo es utilizado por
niños o cerca de éstos.
5. Desconecte el equipo de la corriente cuando no lo use o antes de
limpiarlo. Deje que el equipo se enfríe antes de colocarle o retirarle
componentes o antes de limpiarlo.
6. No use ningún equipo que presente un cable o clavija dañado, que
haya presentado una falla de funcionamiento, o que se haya dañado
de algún modo. Lleve el equipo al centro de servicio autorizado más
cercano para que lo examinen, reparen o ajusten.
7. El uso de accesorios que el fabricante no haya recomendado puede
causar lesiones.
8. No use el equipo al aire libre.
9. No deje que el cable cuelgue del borde de la mesa o de cualquier
superficie, ni que haga contacto con superficies calientes.
10. No coloque el equipo sobre un quemador de gas o eléctrico caliente o
cerca de éste, ni dentro de un horno caliente.
11. Tenga extremo cuidado cuando desplace una freidora que contenga
aceite caliente.
12. Siempre conecte primero el cable al equipo (dependiendo del
modelo) y luego conecte el otro extremo al enchufe. Para desconectar
el equipo, coloque todos los controles en posición de apagado (“off”)
y luego desconecte la clavija del enchufe.
13. No utilice el equipo para fines no previstos.
14. Asegúrese de que los mangos estén correcta y firmemente fijados a la cesta.
Consulte las instrucciones de montaje.
15. GUARDE ESTAS INSTRUCCIONES
SOLO PARA USO DOMÉSTICO.

10
16. ADVERTENCIA: POSIBLE ERUPCIÓN. LA REACCIÓN ENTRE EL AGUA
Y EL ACEITE CALIENTE ES EXTREMADAMENTE VOLÁTIL. ASEGÚRESE
DE QUE LOS ALIMENTOS ESTÉN COMPLETAMENTE SECOS ANTES DE
SUMERGIRLOS EN ACEITE CALIENTE, INDEPENDIENTEMENTE DE
LO QUE INDIQUE LA RECETA.
17. Antes de usar el equipo, compruebe que el voltaje de su localidad
coincida con las especificaciones que se indican en la placa de datos
del equipo, la cual se encuentra en la parte posterior del panel del
control.
18. Sólo conecte el equipo a tomas eléctricas que tengan una carga
mínima de 15A. Si la clavija del equipo es incompatible con las
tomas eléctricas, pida a un profesional calificado que cambie la toma
eléctrica por una que sea compatible.
19. Este equipo funciona a altas temperaturas, las cuales pueden causarle
quemaduras. No toque las superficies calientes del equipo (carcasa,
piezas plásticas, etc.).
20. Para cerciorarse de un funcionamiento seguro, no introduzca
alimentos demasiado grandes en el equipo.
21. No coloque demasiados alimentos en las cestas de freír. Por razones
de seguridad, nunca sobrepase la cantidad máxima.
22. Los tiempos de cocción se proporcionan solo a título indicativo.
23. No deje el cable colgando.
24. No tire del cable para desenchufarlo.
25. Siempre desenchufe el equipo inmediatamente después de usarlo,
cuando lo cambie de lugar y antes de limpiarlo o darle mantenimiento.
26. En caso de fuego, nunca use agua para extinguir las llamas.
Desenchufe el equipo. Cierre la tapa si ello no supone ningún peligro.
Apague las llamas con un paño mojado.
27. No cambie de lugar el equipo cuando este contenga alimentos
calientes en su interior.
28. ¡Nunca sumerja el equipo en el agua!
29. Este equipo no es adecuado para recetas con un alto contenido de
líquido (como sopas, salsas de cocina, etc.).
30. Nunca encienda el equipo si la cesta de freír está vacía.
31. No llene demasiado la cesta de freír y nunca sobrepase las cantidades
indicadas.
32. Asegúrese de que el tazón esté completamente seco después de
lavarlo y antes de usarlo.

11
ES
33. El nivel de aceite siempre debe encontrarse entre las marcas de nivel
mín. y máx.
34. Nunca use su freidora sin aceite.
35. Este equipo no está previsto para ser utilizado con un temporizador
externo ni con un sistema de control remoto independiente.
36. Este equipo no está previsto para ser utilizado por personas (incluidos
los niños) con capacidades físicas, sensoriales o mentales reducidas,
ni por personas que no tengan ninguna experiencia o conocimiento,
a menos que una persona responsable de su seguridad las supervise
o las instruya sobre el uso del equipo. Se debe supervisar a los niños
para asegurar que estos no utilicen el equipo para jugar.
37. Este equipo sólo está previsto para ser utilizado en el hogar.
El equipo no está previsto para ser utilizado en las condiciones
siguientes, para las cuales no tendrá efecto la garantía:
– En áreas de cocina del personal de tiendas, oficinas u otros
entornos laborales
– En casas de campo
– por clientes en hoteles, alojamiento con desayuno, moteles y otros
establecimientos de tipo residencial;
38. Con el fin de evitar peligros, sólo el fabricante, sus agentes de servicio
o personas con una calificación equivalente pueden cambiar un cable
de alimentación dañado.
39. Mantenga el equipo y su cable alejados del alcance de los niños
menores de 8 años.
40. Si tiene algún problema, contacte al servicio posventa autorizado o
visite el sitio web www.t-fal.ca.
41. Para apagar el equipo, presione el botón de puesta en marcha/parada
(START/STOP) y desconecte el cable de alimentación del enchufe.
42. CUIDADO: apretar en exceso puede provocar que se suelten los
tornillos o las tuercas o que se rompa el mango o las patas.
INSTRUCCIONES DE POLARIZACIÓN
El cable de este equipo es polarizado (presenta una varilla más ancha
que la otra). Para reducir el riesgo de electrocución, esta clavija está
previsto para conectarse en un enchufe polarizado de una sola posición.
Si la clavija no se puede insertar completamente en el enchufe, inviértalo.
Si aun así no puede insertarlo, póngase en contacto con un electricista
calificado. No intente modificar la clavija de ninguna manera.

12
RESET
1
3b
3c
3a
a
b
c
d
B
A
1a
1b
1c
1d
2b
2a
5
4
C
D
E
G
F
RESET
INSTRUCCIONES PARA EL USO DE CABLES CORTOS
No use el equipo con un cable de extensión.
Se suministra un cable de alimentación corto para reducir el riesgo de
enredarse o tropezar, el cual se asocia al uso de cables largos.
Conector magnético
El cable presenta un conector magnético desmontable. El conector
magnético se debe fijar directamente a la freidora. ESTO SE DEBE
REALIZAR ANTES DE ENCHUFAR EL CABLE AL TOMACORRIENTE.
¡La protección del medio ambiente es una prioridad!
Su equipo contiene materiales valiosos que se pueden recuperar.
Deposítelo en un centro público local de recogida de desechos.

RESET
1
3b
3c
3a
a
b
c
d
B
A
1a
1b
1c
1d
2b
2a
5
4
C
D
E
G
F
RESET

14
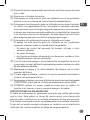
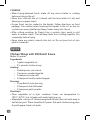
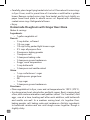
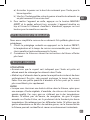
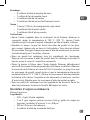
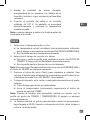
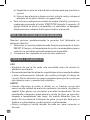
PARTS & ACCESSORIES
1 Lid Assembly
a Odour Filter
b Filter Cover
c Cool Touch Handle
d Viewing Window
2 Housing
a Stainless Steel Oil Container
b Cool Touch Handles
3 Electronic Assembly
a Control Panel (refer below
for more detail)
b Breakaway Cord
c Heating Element
4 Large Fry Basket with Cool
Touch Handle
5 Small Fry Baskets with Cool
Touch Handles (two)
6 Reset
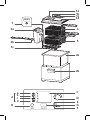
CONTROL PANEL
A. Presets – our recommended
settings for your favorite fried
foods
a French Fries – for use with
frozen French fries
b Onion Rings
c Donuts
d Chicken
B. PRESET Button – Scroll and
select preset options
C. DUAL LEVEL DISPLAY –
Displays currently selected
time and temperature
D. TEMP/TIME Knob – Adjust
time and temperature by
turning the knob; press down
on the knob to switch from one
to the other
E. ON indicator – Red light
indicates when the heating
element is on
F. OIL READY indicator – Green
light indicates when the oil
has reached your desired
temperature
G. START/STOP Button – Press to
begin heating and countdown
time. Press and hold to stop
heating at any time.

15
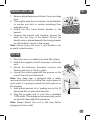
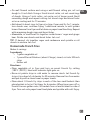
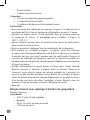
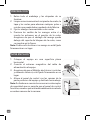
ENBEFORE FIRST USE
1. Remove all packaging and stickers from your deep
fryer.
2. Thoroughly clean the oil container, lid and baskets
to remove any dust or residue remaining from
manufacturing.
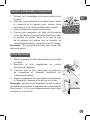
3. Attach the cool touch basket handles to the
baskets.
4. Squeeze the handle rods together placing the
ends into the loop of the basket. Ensure the
handle stem is placed beneath the locking bracket
on the basket as shown in the image.
Note: Serious injury can occur if your handle is not
properly locked in place.
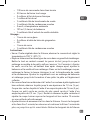
SET UP
1. Place the unit on a stable horizontal flat surface.
2. Attach the magnetic end of the power cord to the
unit.
3. Ensure the Electronic Assembly (controls and
heating element) is firmly in place.
4. Line up the control panel with the grooves on the
rear of the unit and slide down.
Note: Your deep fryer is equipped with a safety
microswitch which will not allow the control panel to
work unless it is properly seated into both grooves in
the housing.
5. Add desired amount of oil, making sure not to fill
below the Min or above the Max line.
6. Plug the pronged end of cord into a standard
120V outlet. The display will automatically switch
on and will show default temperature.
Note: Always attach the cord to the fryer before
plugging into the outlet.
2.
3.

16
FRYING
1. Select your cooking temperature:
a) The current temperature will flash indicating that the unit is in SET
TEMP mode.
b) Turn the knob to your desired temperature.
2. If desired, select your cooking time:
a) Press and release the knob to switch to SET TIME mode. The
current time will flash.
b) Turn the knob to your desired cooking time.
Note: Switch between TEMP & TIME mode at any time by pressing the
knob.
3. Press START to begin heating. Once the oil has reached the set
temperature the OIL READY light will illuminate.
4. Place food into the basket and gently submerge the basket into the
hot oil.
a) Close lid to avoid splatter.
b) Start the countdown timer by pressing the START button again.
Note: When the fryer is on, change your settings with the TIME/TEMP
knob. The unit will automatically adjust.
5. Your fryer will beep to alert you when the countdown timer has
reached 00:00. When your food is done, remove the lid and lift the
basket from the oil.
a) Hook your basket onto the oil container rim to drain.
b) Once oil has drained, remove the basket and place food onto a
paper-towel lined dish.
6. To put your machine on stand by, press and hold the START/STOP
button for 3 seconds. The unit will beep and the display and heater
will turn off. To turn on again, you can press any button.

17
ENUSING PRESETS
We’ve made it easy to cook your favorite fried foods with our presets.
1. Select your desired preset by pressing the PRESET button – our
recommended cooking temperature and time for your selection will
automatically show on the display.
2. Begin frying by following the above frying directions.
TIPS & HINTS
USE
• Make sure the green ready light is on before lowering food into oil.
• Too much food will prevent the food from moving around and browning
evenly. In addition, it may slow down the cooking time. Fry in smaller
batches for faster, crispier fried food.
OIL
• When selecting oil to use in your deep fryer, choose a high quality brand
of peanut oil, canola oil, sunflower oil or vegetable oil. These fats can
withstand high temperatures well. Do not use butter, margarine, animal
fats or olive oil because these smoke at lower temperatures. Do not mix
different oils. Do not use shortening or lumps of fat as your deep fryer’s
thermostat will overheat and could cause a flash fire.
• Cover and refrigerate the oil between uses to maintain freshness.
• Change oil often and dispose it responsibly. Do not pour down the sink
drain. Check with local regulations for proper disposal.
• Keep oil for frying seafood and fish separate from oil used for potatoes
and other milder ingredients.
MOISTURE
• Before deep frying any foods, remove excess moisture by blotting well
with a paper towel.
• Do not add water, wet foods, or icy frozen foods to hot oil, because this
will cause the oil to spatter, which may result in injury.

18
RECIPE
Chicken Wings with Dill Ranch Sauce
Makes 24 pieces
Ingredients:
– 1 gallon vegetable oil
– 2 ½ pounds chicken wings
Coating:
– 3 tablespoons corn starch
– 1 teaspoon smoked paprika
– ½ teaspoon kosher salt
– ¼ teaspoon freshly cracked pepper
Dressing:
– ½ cup Ranch style dressing
– ¾ teaspoon dried dill weed
– ¼ teaspoon garlic powder
Directions:
• Place vegetable oil in fryer container. Cover; set temperature to
190ºC(375ºF). Let oil heat until ready light goes on.
• Meanwhile, cut tips off chicken wings and discard; then cut each wing in
half at the joint. There should be 24 pieces. Pat each chicken wing piece
dry with paper towel; set aside.
COOKING
• When frying battered foods, shake off any excess batter or coating
before putting in the oil.
• Never pour salt into the oil. Instead, salt the food while it is hot and
draining on a paper towel.
• Frozen foods can be cooked in the basket. Follow directions on food
package. Use caution when lowering the basket in the oil, as the ice
crystals can cause splattering. Always lower slowly into the oil.
• After cutting potatoes for French fries or potato chips, wash in cold
water to remove starch. This will keep them from sticking together. Dry
completely before frying.
• Never place any plastic utensils into hot oil. Do not pour hot oil into
plastic containers.

19
EN
• In a large bowl, stir together coating ingredients. Place chicken wing
pieces in coating mixture and toss until well coated.
• Place fryer basket into hot oil. Carefully place about 8 chicken wing
pieces in fryer, one at a time. Cover fryer and cook for 10 to 12 minutes or
until chicken pieces are golden brown and chicken reaches 74ºC (165ºF)
on inside. Remove chicken wing pieces from fryer and drain on several
layers of paper towels. Repeat with remaining chicken wing pieces.
• In small bowl stir together all dressing ingredients. Serve chicken wings
with dill dressing. Refrigerate leftovers.
Buttermilk Onion Rings
Makes 6 servings
Ingredients:
– 1 gallon vegetable oil
– 1 to 2 large sweet yellow onions (about 1 pound), peeled, cut into
3/8-inch slices (rings)
– 2 cups buttermilk
– 3 tablespoon Dijon mustard
– 2 eggs, beaten
– ¼ cup corn starch
Breading:
– 2 cups Panko bread crumbs
– 1 teaspoon kosher salt
– ½ teaspoon freshly cracked pepper
Directions:
• In a large bowl, stir together onion rings, buttermilk, and Dijon mustard.
Set in refrigerator at least 1 hour.
• Meanwhile, place vegetable oil in fryer; cover and preset for onion rings
at 190ºC (375ºF).
• Place corn starch in pie plate. Place beaten eggs in second pie plate.
• In a large bowl stir, together all breading ingredients.
• To coat onion rings: One at a time, remove an onion ring from buttermilk
mixture. Coat with corn starch, then coat well with beaten egg. Next,
coat with breading mixture; set breaded rings on cooling rack. Repeat
with remaining onion rings.

20
• Carefully place large frying basket into hot oil. Place about 6 onion rings
in fryer. Cover; cook for preset time of 4 minutes or until batter is golden
brown. Remove cooked onion rings from basket and let cool slightly on
paper towel lined plate to absorb excess oil. Repeat with remaining
coated onion rings. Refrigerate leftovers.
• Enjoy.
Homemade Doughnuts with Ginger Beer Glaze
Makes 6 servings
Ingredients:
– 1 gallon vegetable oil
Donuts:
– ¼ cup butter, softened
– 1/3 cup sugar
– 1/3 cup firmly packed light brown sugar
– 3 ½ cups all-purpose flour
– 2 teaspoons baking powder
– 1 teaspoon salt
– ½ teaspoon baking soda
– ½ teaspoon ground cardamom
– 2 eggs, room temperature
– ½ cup buttermilk
– ½ teaspoon real vanilla extract
Glaze:
– 1 cup confectioners’ sugar
– 2 tablespoons ginger beer
– OR
– 1 cup sugar
– ½ teaspoon ground cardamom
Directions:
• Place vegetable oil in fryer; cover and set temperature for 190ºC (375ºF).
• In a large mixer bowl, place butter and both sugars. Beat, scraping bowl
often, until mixture resembles small pebbles (about 1 to 2 minutes). Add
eggs, one at a time, beating well after each addition; add buttermilk
and vanilla, mix well. In a medium mixing bowl, stir together flour,
baking powder, salt, baking soda, and cardamom. Add dry ingredients
to buttermilk mixture and mix until dough comes together. Dough is
slightly sticky.
La page charge ...
La page charge ...
La page charge ...
La page charge ...
La page charge ...
La page charge ...
La page charge ...
La page charge ...
La page charge ...
La page charge ...
La page charge ...
La page charge ...
La page charge ...
La page charge ...
La page charge ...
La page charge ...
La page charge ...
La page charge ...
La page charge ...
La page charge ...
La page charge ...
La page charge ...
La page charge ...
La page charge ...
La page charge ...
La page charge ...
-
 1
1
-
 2
2
-
 3
3
-
 4
4
-
 5
5
-
 6
6
-
 7
7
-
 8
8
-
 9
9
-
 10
10
-
 11
11
-
 12
12
-
 13
13
-
 14
14
-
 15
15
-
 16
16
-
 17
17
-
 18
18
-
 19
19
-
 20
20
-
 21
21
-
 22
22
-
 23
23
-
 24
24
-
 25
25
-
 26
26
-
 27
27
-
 28
28
-
 29
29
-
 30
30
-
 31
31
-
 32
32
-
 33
33
-
 34
34
-
 35
35
-
 36
36
-
 37
37
-
 38
38
-
 39
39
-
 40
40
-
 41
41
-
 42
42
-
 43
43
-
 44
44
-
 45
45
-
 46
46


T-Fal FR50AD50 Manuel utilisateur
- Catégorie
- Friteuses
- Taper
- Manuel utilisateur
dans d''autres langues
- English: T-Fal FR50AD50 User manual
- español: T-Fal FR50AD50 Manual de usuario
Documents connexes
Autres documents
-
Tefal FR50AD50 Manuel utilisateur
-
Krups KJ502D51 Manuel utilisateur
-
Bravetti F2015B Le manuel du propriétaire
-
-
 Create FRYER AIR PRO Le manuel du propriétaire
-
Cosori CP137-AF Manuel utilisateur
-
-
Cosori CP158-AF Manuel utilisateur
-
Hamilton Beach 840114001 Manuel utilisateur
-
Kenwood DF320 Le manuel du propriétaire
