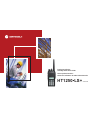
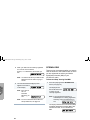
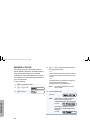
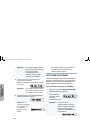
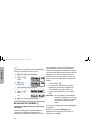
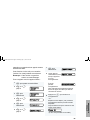
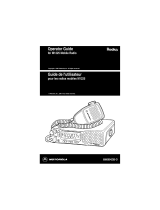
Motorola HT1250-LS+ Manuel utilisateur
- Catégorie
- Radios bidirectionnelles
- Taper
- Manuel utilisateur

HT1250•LS+
VHF/UHF
Professional Series
Two-Way Radio User Guide
Séries professionnelles
Guide de l'utilisateur de radio bidirectionnelle

6881088C42_EN.book Page 2 Thursday, May 6, 2010 7:49 PM

1
English
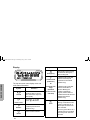
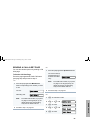
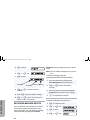
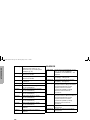
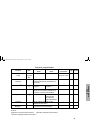
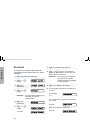
CONTENTS
CONTENTS
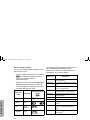
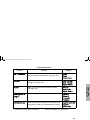
Contents. . . . . . . . . . . . . . . . . . . . . . . . . . . 1
Computer Software Copyrights. . . . . . . . 5
Safety . . . . . . . . . . . . . . . . . . . . . . . . . . . . . 6
Product Safety and RF Exposure
Compliance . . . . . . . . . . . . . . . . . . . . . . . . . 6
Introduction . . . . . . . . . . . . . . . . . . . . . . . . 7
Trunked Radio Systems . . . . . . . . . . . . . . . 7
PassPort® Trunked Systems. . . . . . . . . 7
LTR® Trunked Systems. . . . . . . . . . . . . 7
Conventional Radio Systems . . . . . . . . . . . 8
HT1250•LS+ Radio Features . . . . . . . . . . . 8
Radio Wide Features . . . . . . . . . . . . . . . 8
PassPort Zone Features . . . . . . . . . . . . 8
LTR Zone Features. . . . . . . . . . . . . . . . 9
Conventional Zone Features . . . . . . . . 10
Radio Overview . . . . . . . . . . . . . . . . . . . . 11
Parts of your Radio . . . . . . . . . . . . . . . . . . 11
HT1250•LS+ Full Keypad Model . . . . . 11
HT1250•LS+ Limited Keypad Model . . 12
On/Off/Volume Knob . . . . . . . . . . . . . . 13
Zone Selector Knob . . . . . . . . . . . . . . . 13
LED Indicator . . . . . . . . . . . . . . . . . . . . 13
Push-to-Talk (PTT) Button . . . . . . . . . 13
Microphone . . . . . . . . . . . . . . . . . . . . . 13
Menu Keys . . . . . . . . . . . . . . . . . . . . . 13
Keypad Keys . . . . . . . . . . . . . . . . . . . . 14
Display. . . . . . . . . . . . . . . . . . . . . . . . . 16
Programmable Buttons . . . . . . . . . . . . 18
Audio Indicators for Programmable
Buttons . . . . . . . . . . . . . . . . . . . . . . . . . . . 23
Getting Started . . . . . . . . . . . . . . . . . . . . 24
Battery Information . . . . . . . . . . . . . . . . . . 24
Charging the Battery . . . . . . . . . . . . . . 24
Battery Charge Status . . . . . . . . . . . . . 25
Attaching the Battery . . . . . . . . . . . . . . 26
Removing the Battery . . . . . . . . . . . . . 26
Accessory Information . . . . . . . . . . . . . . . 27
Attaching the Antenna
. . . . . . . . . . . . . . . . . . . . . . . . . . . . . . 27
Removing the Antenna . . . . . . . . . . . . 27
Attaching the Belt Clip . . . . . . . . . . . . . 28
Removing the Belt Clip . . . . . . . . . . . . 28
Attaching the Side Connector Cover . . 29
Turning your Radio On or Off . . . . . . . . . . 29
Adjusting the Volume . . . . . . . . . . . . . . . . 30
Selecting a Trunked Zone and Talkgroup 30
Sending a Trunked Call . . . . . . . . . . . . . . 30
6881088C42_EN.book Page 1 Thursday, May 6, 2010 7:49 PM

2
English
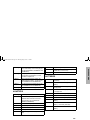
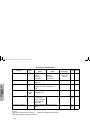
CONTENTS
Selecting a Conventional Zone and
Channel . . . . . . . . . . . . . . . . . . . . . . . . . . 31
Sending a Conventional Call . . . . . . . . . . 31
Receiving a Trunked or Conventional
Call . . . . . . . . . . . . . . . . . . . . . . . . . . . . . . 32
Repeater or Talkaround J Mode . . . . . . 32
Call Light. . . . . . . . . . . . . . . . . . . . . . . . . . 33
(Trunked Operation Only). . . . . . . . . . . . . 33
Home Channel Revert . . . . . . . . . . . . . . . 33
PassPort Signaling. . . . . . . . . . . . . . . . . 34
Selective Call . . . . . . . . . . . . . . . . . . . . . . 34
Sending a Selective Call using the
Preprogrammed Button . . . . . . . . . . . 34
Sending a Selective Call through
the Menu . . . . . . . . . . . . . . . . . . . . . . 34
Sending a Selective Call using
the One-Touch Button . . . . . . . . . . . . 36
Receiving a Selective Call F . . . . . . . . 37
Call Alert . . . . . . . . . . . . . . . . . . . . . . . . . . 38
Sending a Call Alert using the
Preprogrammed Button . . . . . . . . . . . 38
Sending a Call Alert through
the Menu . . . . . . . . . . . . . . . . . . . . . . 38
Sending a Call Alert using
the One-Touch Button . . . . . . . . . . . . 40
Receiving a Call Alert F . . . . . . . . . . . . 41
PassPort Trunking . . . . . . . . . . . . . . . . . 42
Seamless Roaming . . . . . . . . . . . . . . . . . 42
Initial Registration . . . . . . . . . . . . . . . . 42
Roaming and Registering between
Sites . . . . . . . . . . . . . . . . . . . . . . . . . 43
Site/MIN View. . . . . . . . . . . . . . . . . . . . . . 44
PTT ID Alias . . . . . . . . . . . . . . . . . . . . . . . 45
Roam Request . . . . . . . . . . . . . . . . . . . . 45
Home Site Revert. . . . . . . . . . . . . . . . . . . 46
Roam Lock. . . . . . . . . . . . . . . . . . . . . . . . 47
To Activate Roam Lock. . . . . . . . . . . . 47
To Deactivate Roam Lock. . . . . . . . . . 48
PassPort Primary Talkgroup . . . . . . . . . . 48
Site/Talkgroup Restriction . . . . . . . . . . . . 49
Site Restriction . . . . . . . . . . . . . . . . . . 49
Group Restriction . . . . . . . . . . . . . . . . 50
Troubleshooting . . . . . . . . . . . . . . . . . . . . 50
Radio Calls . . . . . . . . . . . . . . . . . . . . . . . 51
Making a Selective Call . . . . . . . . . . . . . . 51
Receiving a Selective Call F. . . . . . . . . . . . .52
Sending a Call Alert Page . . . . . . . . . . . . 53
Receiving a Call Alert Page F . . . . . . . . . . .54
Radio Check. . . . . . . . . . . . . . . . . . . . . . . 55
Sending a Status . . . . . . . . . . . . . . . . . . . 56
Sending a Message . . . . . . . . . . . . . . . . . 57
Receiving a Message. . . . . . . . . . . . . . . . 58
6881088C42_EN.book Page 2 Thursday, May 6, 2010 7:49 PM

3
English
CONTENTS
Sending an Emergency Alert E . . . . . . . . .58
(Conventional and LTR modes Only) . . . . 58
Editing a Radio Call List K . . . . . . . . . . . . .59
Name and Call Tone Tagging . . . . . . . . . . 60
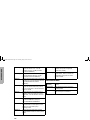
Scan . . . . . . . . . . . . . . . . . . . . . . . . . . . . . 62
Talkback . . . . . . . . . . . . . . . . . . . . . . . . . . 62
PassPort Primary Auto Group Scan . . . . . 62
(PassPort Trunked Operation Only) . . . . . 62
PassPort Group Scan G . . . . . . . . . . . . 63
(PassPort Trunked Operation Only) . . . . . 63
Auto Group Scan G . . . . . . . . . . . . . . . . . .64
(LTR Trunked Operation Only) . . . . . . . . . 64
All Group Scan G. . . . . . . . . . . . . . . . . . . .65
(LTR Trunked Operation Only) . . . . . . . . . 65
System Scan G . . . . . . . . . . . . . . . . . . . . .65
(LTR Trunked and Conventional
Operation Only). . . . . . . . . . . . . . . . . . . . . 65
Deleting a Nuisance Channel or
Talkgroup . . . . . . . . . . . . . . . . . . . . . . . . . 66
Editing a Scan List . . . . . . . . . . . . . . . . . . 67
View a Scan List . . . . . . . . . . . . . . . . . . . . 68
Adding or Deleting Talkgroups or
Channels
in a Scan List. . . . . . . . . . . . . . . . . . . . . . . 68
Prioritizing a Talkgroup or Channel
in a Scan List. . . . . . . . . . . . . . . . . . . . . . . 69
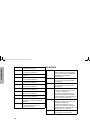
Phone. . . . . . . . . . . . . . . . . . . . . . . . . . . . 71
Making a Phone Call D through
a Trunked System . . . . . . . . . . . . . . . . . . 71
Making a Phone Call D through
a Conventional System. . . . . . . . . . . . . . . 72
Receiving a Phone Call D through a
Trunked or Conventional System . . . . . . . 74
Modifying the Phone List K. . . . . . . . . . . . 74
Voice Storage . . . . . . . . . . . . . . . . . . . . . 77
Incoming Call Recording . . . . . . . . . . . . . 78
Selective Incoming Call Recording . . . 78
All Incoming Call Recording . . . . . . . . 78
Voice Memo Recording . . . . . . . . . . . . . . 79
Recorded Message Playback. . . . . . . . . . 81
Recorded Message Delete . . . . . . . . . . . . 82
Recorded Message Transmission . . . . . . 83
Automatic Message Reply:
“When Available” . . . . . . . . . . . . . . . . . . . 84
(LTR Trunked and Conventional
Operation Only) . . . . . . . . . . . . . . . . . . . . 84
Audio/Tone Settings. . . . . . . . . . . . . . . . 86
Utilities. . . . . . . . . . . . . . . . . . . . . . . . . . . 88
Setting Tight or Normal Squelch. . . . . . . . 91
(Conventional Operation Only) . . . . . . . . . 91
Setting the Power Level B . . . . . . . . . . . . . 91
6881088C42_EN.book Page 3 Thursday, May 6, 2010 7:49 PM

4
English
CONTENTS
Setting the Clock or Alarm . . . . . . . . . . . . 92
Warranty . . . . . . . . . . . . . . . . . . . . . . . . . 94
Limited Warranty. . . . . . . . . . . . . . . . . . . . 94
Accessories . . . . . . . . . . . . . . . . . . . . . . 99
Carry Accessories. . . . . . . . . . . . . . . . . . . 99
Carry Cases . . . . . . . . . . . . . . . . . . . . . . . 99
Chargers. . . . . . . . . . . . . . . . . . . . . . . . . . 99
Headsets and Accessories . . . . . . . . . . . 100
Microphones . . . . . . . . . . . . . . . . . . . . . . 101
Ear Microphone System. . . . . . . . . . . . . 101
Integrated Microphone/Receiver . . . . . . 101
Earpiece. . . . . . . . . . . . . . . . . . . . . . . . . 102
Adapters. . . . . . . . . . . . . . . . . . . . . . . . . 103
Batteries. . . . . . . . . . . . . . . . . . . . . . . . . 103
Antennas . . . . . . . . . . . . . . . . . . . . . . . . 104
6881088C42_EN.book Page 4 Thursday, May 6, 2010 7:49 PM

5
English
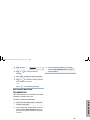
COMPUTER SOFTWARE
COPYRIGHTS
COMPUTER SOFTWARE
COPYRIGHTS
The Motorola products described in this
manual may include copyrighted Motorola
computer programs stored in semiconductor
memories or other media. Laws in the United
States and other countries preserve for
Motorola certain exclusive rights for
copyrighted computer programs, including, but
not limited to, the exclusive right to copy or
reproduce in any form the copyrighted
computer program. Accordingly, any
copyrighted Motorola computer programs
contained in the Motorola products described
in this manual may not be copied, reproduced,
modified, reverse-engineered, or distributed in
any manner without the express written
permission of Motorola.
Furthermore, the purchase of Motorola
products shall not be deemed to grant either
directly or by implication, estoppel, or
otherwise, any license under the copyrights,
patents or patent applications of Motorola,
except for the normal non-exclusive license to
use that arises by operation of law in the sale
of a product.
6881088C42_EN.book Page 5 Thursday, May 6, 2010 7:49 PM

6
English
SAFETY
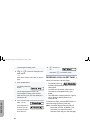
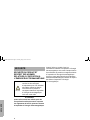
SAFETY
PRODUCT SAFETY AND RF
EXPOSURE COMPLIANCE
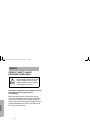
ATTENTION!
This radio is restricted to occupational use only
to satisfy FCC RF energy exposure
requirements.
Before using this product, read the RF energy
awareness information and operating instructions
in the Product Safety and RF Exposure booklet
enclosed with your radio (Motorola Publication part
number 6881095C98) to ensure compliance with
RF energy exposure limits.
Before using this product, read
the operating instructions for safe
usage contained in the Product
Safety and RF Exposure booklet
enclosed with your radio.
!
6881088C42_EN.book Page 6 Thursday, May 6, 2010 7:49 PM

7
English
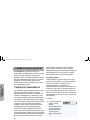
INTRODUCTION
INTRODUCTION
Welcome to Motorola’s HT Series family of radio
users. This user guide supports HT1250•LS+
™
radios. These radios combine the very latest in
two-way technology while delivering outstanding
functionality at the touch of a button.
HT1250•LS+ portable radios operate on UHF/
VHF PassPort, LTR Trunked, and
Conventional radio systems.
Contact your Motorola dealer for a list of
features available with your radio.
TRUNKED RADIO SYSTEMS
Trunked systems allow a large number of users
to share a relatively small number of
frequencies or repeaters without interfering with
each other. The airtime of all the repeaters in a
Trunked system is pooled, which maximizes
the amount of airtime available to any one radio
and minimizes channel congestion.
PassPort
®
Trunked Systems
PassPort is an enhanced trunking protocol
developed by Trident Micro Systems that
supports wide-area dispatch networking. A
network is formed by linking several Trunked
sites together to form a single system. This
offers users an extended communication
coverage area. In addition, users with
PassPort-enabled radios can seamlessly roam
among all sites within the network. Seamless
roaming means that you do not have to
manually change the zones on your radio
when roaming from site to site.
LTR
®
Trunked Systems
LTR is a transmission-based trunking protocol
developed by the E. F. Johnson Company for
primarily single-site trunking applications. In
transmission trunking, a repeater is used only
for the duration of a single transmission. Once
a transmission is completed, that repeater
becomes available to other users. This means
that a conversation comprised of many
transmissions may occur over several different
channels within the LTR system. This method
of trunking provides system efficiency by
making repeaters available to all users after
every transmission.
6881088C42_EN.book Page 7 Thursday, May 6, 2010 7:49 PM

8
English
INTRODUCTION
CONVENTIONAL RADIO SYSTEMS
Conventional radio systems typically refer to
unit-to-unit communications through a single
channel. Conventional systems also allow
radio users to extend communication coverage
by relaying their messages through a repeater.
To ensure coordinated use by multiple
talkgroups, each radio user must monitor the
channel or repeater before transmitting to
verify that the system is not currently busy.
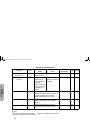
HT1250•LS+ RADIO FEATURES
Radio Wide Features
• 14-Character Alphanumeric Display
• 7 Programmable Feature Buttons
• Up to 15 PassPort and/or LTR Zones with
up to 16 Talkgroups per Zone
• Up to 16 or 32 Conventional Channels
(Depending on Model Capability)
• X-Pand
™
Audio Enhancement
• Home Channel Revert
• Telephone Interconnect
• User-Programmable Phone and Scan Lists
• Voice Storage Capability
PassPort Zone Features
• Unique Mobile Identification Number (MIN)
per Radio
• Unique Electronic Serial Number (ESN) per
Radio
• Registration/Deregistration upon Power-Up
and Power-Down
• Automatic Seamless Roaming between
Networked Sites
• Site/Talkgroup Restriction
• Optional Primary Talkgroup
• Primary Talkgroup Transmit Inhibit
• Registered Site and Mobile Identity View
Note: Throughout this manual there are
features listed as Trunked and
Conventional. Trunked indicates
the feature functions in both
PassPort and LTR zones unless
otherwise noted. Conventional
indicates the feature functions in
Conventional zones only.
6881088C42_EN.book Page 8 Thursday, May 6, 2010 7:49 PM

9
English
INTRODUCTION
• User-initiated Roam Request
• Primary Auto Group Scan and PassPort
Group Scan
• Roam (Site) Lock
• Push-To-Talk (PTT) ID Aliasing
• NTIA Band Support (403-420 MHz)
including 9 MHz Rx/Tx Separation in both
25 KHz and 12.5 KHz channel spacing.*
• Call Signalling Features
*
Only supported in UHF Band I (403-470 MHz)
HT1250
•LS+ Radios
LTR Zone Features
• MDC-1200 Signaling
• Auto Group System and All Group Scan
• System Scan with 2 Priority Levels
- PTT ID Alias or MIN
(Display of Mobile
Identification
Number or Alias if
preprogrammed in
the radio.)
- Selective Call
- Call Alert
- Call Alert
- Selective Call
- Emergency Alert*
- Message*
- Status*
- Selective Radio
Inhibit
- Radio Check
- PTT-ID
- Call List
Name/Call
Tone Tagging
6881088C42_EN.book Page 9 Thursday, May 6, 2010 7:49 PM

10
English
INTRODUCTION
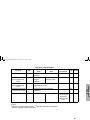
Conventional Zone Features
• MDC-1200 Signaling**
• Monitor and Sticky Permanent Monitor
• System Scan with two Priority Levels
**Not available in all models. Please check with your
dealer for feature availability.
- Call Alert
- Selective Call
- Emergency Alert
- Message
- Status
- Selective Radio
Inhibit
- Radio Check
- PTT-ID
- Call List Name/
Call Tone
Tagging
6881088C42_EN.book Page 10 Thursday, May 6, 2010 7:49 PM

11
English
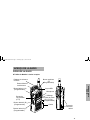
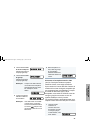
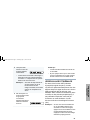
RADIO OVERVIEW
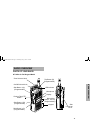
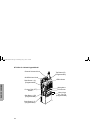
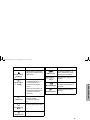
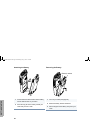
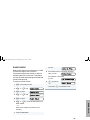
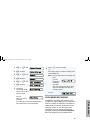
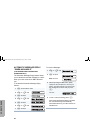
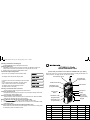
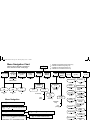
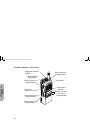
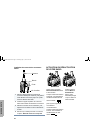
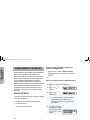
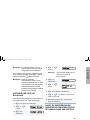
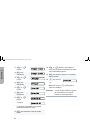
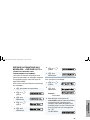
RADIO OVERVIEW
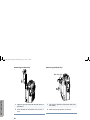
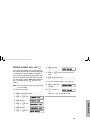
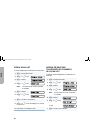
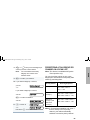
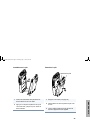
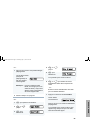
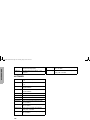
PARTS OF YOUR RADIO
HT1250•LS+ Full Keypad Model
On/Off/Volume Knob
Display
Microphone
Keypad
Menu Keys
(Programmable)
Side Button 1 (A)
Push-to-Talk (PTT)
(Programmable)
Side Button 2 (B)
(Programmable)
Side Button 3 (C)
Zone Selector Knob
(Programmable)
Top Button (D)
Button
(P1, P2, P3)
(Programmable
)
LED Indicator
Side
Connector
Cover
6881088C42_EN.book Page 11 Thursday, May 6, 2010 7:49 PM

12
English
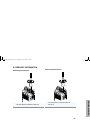
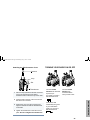
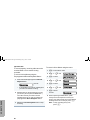
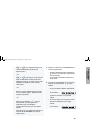
RADIO OVERVIEW
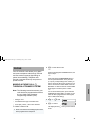
HT1250•LS+ Limited Keypad Model
On/Off/Volume Knob
LCD Screen
Microphone
Menu Keys
(Programmable)
Side Button 1 (A)
Push-to-Talk (PTT)
LED Indicator
(Programmable)
Side Button 2 (B)
(Programmable)
Side Button 3 (C)
Channel Selector Knob
(Programmable)
Top Button (D)
Button
(P1, P2, P3)
(Programmable)
6881088C42_EN.book Page 12 Thursday, May 6, 2010 7:49 PM

13
English
RADIO OVERVIEW
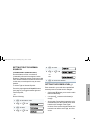
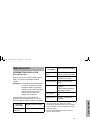
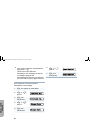
On/Off/Volume Knob
Turns your radio on or off, and adjusts your
radio’s volume.
Zone Selector Knob
Switches your radio to different Trunked and
Conventional zones. It is also used to scroll
through menu choices in Menu mode.
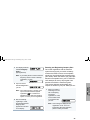
LED Indicator
Indicates battery status (see page 25); or the
status of power-up, scan, or receipt of a
talkgroup or selective call as shown below:
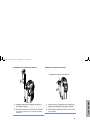
Push-to-Talk (PTT) Button
Press and hold down this button to talk; release
it to listen.
Microphone
When sending a message, hold the microphone
1 to 2 inches (2.5 to 5 centimeters) away from
your mouth, and speak clearly into it.
Menu Keys
LED Color Indicates
Steady red Your radio is transmitting (PTT
button pressed).
Blinking red • Your radio is attempting to
access a Trunked radio system
(when the PTT button is
pressed).
• Your radio is receiving (PTT
button is released).
Double
blinking
yellow
Call Light feature activated.
Individual Selective Call received
(Trunking operation only).
Single
blinking
yellow
• Group Selective Call received
(Trunked operation only).
• Individual Selective Call or Call
Alert (PassPort operation only).
Momentary
green
Your radio has powered up
successfully.
Double
blinking green
System or All Group Scan
operation, or PassPort Group Scan.
Exit Up Menu/Select
(+u
Left Down Right
<?>
LED Color Indicates
6881088C42_EN.book Page 13 Thursday, May 6, 2010 7:49 PM

14
English
RADIO OVERVIEW
Menu/Select Key
)
Used to enter Menu mode. When in Menu
mode, also used to make menu selections.
Exit Key
(
Used to move to the previous menu level
(short press) or to exit Menu mode (long
press).
Up Key
+ and Down Key
?
• Used to scroll through the preprogrammed
talkgroups of a selected Trunked zone, or
through Conventional channels in a
Conventional zone.
• Used to scroll when in Menu mode.
•The ? key can also be programmed to
activate a radio feature (see page 18).
Right Key
>
Moves the cursor right or inserts a space when
editing Call, Scan, and Phone lists. This key
can also be programmed to activate a radio
feature (see page 18).
Left Key
<
Used as a backspace key when editing Radio
Call, Scan, and Phone lists. This key can also
be programmed to activate a radio feature (see
page 18).
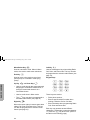
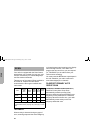
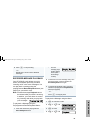
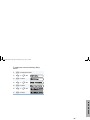
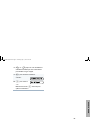
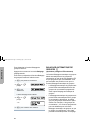
Keypad Keys
These keys are used to:
• Dial a phone number.
• Enter a specific radio ID number when
making a Selective Call or Call Alert.
• Enter information when programming Radio
Call, Scan and Phone lists.
Each key can generate several different
characters. For example, to enter the character
“C” press the 2 key three times. (Refer to
the table on the following page.)
123
456
789
*0#
6881088C42_EN.book Page 14 Thursday, May 6, 2010 7:49 PM

15
English
RADIO OVERVIEW
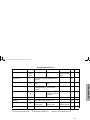
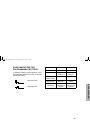
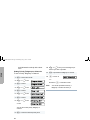
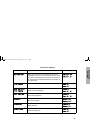
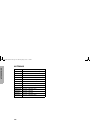
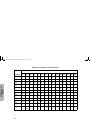
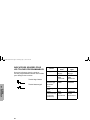
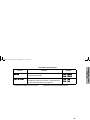
Entering Characters Using the Keypad
Number of Times Key is Pressed
Key
1234567891011 12 13 14 15
0
0( )<>
1
1&%# *
2
ABC2 abc2ÁÇàáç
3
DEF3def3ÈÉÊèéê
4
GHI4ghi4Íìí
5
JKL5jkl5
6
MNO6 mn o6ÑÓÔò óôö
7
PQRS7pqr s7
8
TUV8tuv8Úù ú
9
WX YZ9wxyz9Yy
*
*/+- =
#
#
Blank
Space
-.!?’”,;:
´
´
6881088C42_EN.book Page 15 Thursday, May 6, 2010 7:49 PM

16
English
RADIO OVERVIEW
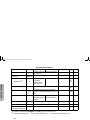
Display
The top two screen rows display menu and
radio status information:
Symbol Indication
A
X-Pand
The X-Pand feature is
activated. When in narrow
band, this feature improves
audio quality.
B
Power Level
Low Power “R” or High
Power “S” is activated.
C
Monitor
The selected channel is being
monitored (Conventional
operation only).
D
Phone
Phone mode is selected.
Call Received
E
Emergency
An Emergency Siren is being
sounded or an Emergency
Alarm is being sent.
F
Call Received
(LTR/Conv.)
Or
A Selective Call or Call Alert
has been received (LTR
trunked and Conventional
operation only).
Incoming Call/
Page
(PassPort
Selective Call/
Call Alert)
A Selective Call or Call Alert
has been transmitted or
received. Blinking icon
indicates call attempt in
progress, while a solid icon
indicates that the call has been
established (PassPort
operation only).
G
Scan
When the green LED is
blinking, it indicates that the
System, PassPort Scan, or
All Group Scan feature has
been activated.
When the green LED is off, it
indicates that non-prioritized
Auto Group Scan has been
activated.
Symbol Indication
6881088C42_EN.book Page 16 Thursday, May 6, 2010 7:49 PM

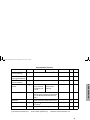
17
English
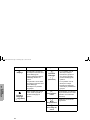
RADIO OVERVIEW
Priority 1 Scan
( blinking)
Indicates activity on a Priority
1 talkgroup or channel during
System Scan.
H
Priority 2 Scan
( steady)
• When the green LED is on,
it indicates activity on a
Priority 2 talkgroup or
channel during System
Scan.
• When the green LED is off,
it indicates prioritized Auto
Group Scan has been
activated.
J
Talkaround
You are not transmitting
through a repeater
(Conventional operation
only).
K
Programming
Mode
A Program list is being edited.
L
Keypad Lock
The keypad is locked.
Symbol Indication
•
•
P
Battery Level
The number of bars (0 – 4)
shown indicates the charge
remaining in your battery.
U
Clock
Shows the time (12-hour or
24-hour).
M
Signal Strength
The more bars, the stronger
the signal being received by
your radio.
N
PassPort Zone
A PassPort zone has been
selected.
Symbol Indication
6881088C42_EN.book Page 17 Thursday, May 6, 2010 7:49 PM

18
English
RADIO OVERVIEW
Programmable Buttons
Your dealer can program several of your
radio’s buttons as shortcuts to many of your
radio’s features.
Programmable buttons include:
• The three Side Buttons (A, B and C) and
the Top Button (D)
• The three Lower Menu Keys (P1, P2 and
P3) when your radio is not in Menu mode.
Each button can be preprogrammed to access
up to two features, depending on the type of
button press:
• Short Press – quickly pressing and
releasing the programmable buttons.
• Long Press – pressing and holding the
programmable buttons for a period of time
(programmable for 1/2 to 1 1/2 seconds).
• Hold Down – pressing and holding down
the programmable buttons while checking
status or making adjustments.
The table on page 19 summarizes the
programmable features available along with
the page number where the feature is
explained.
Ask your dealer to write down, in the “Button”
column, the names of the programmable
buttons next to the features that have been
preprogrammed to them. Your dealer can use
the abbreviations shown in the radio illustration
on page 11 of this use guide. For example, A
for Side Button 1, D for Top Button, etc. Your
dealer can also indicate whether the button
press is short press (SP) or long press (LP)
where applicable.
Contact your dealer for a complete list of
features available with your radio.
6881088C42_EN.book Page 18 Thursday, May 6, 2010 7:49 PM
La page est en cours de chargement...
La page est en cours de chargement...
La page est en cours de chargement...
La page est en cours de chargement...
La page est en cours de chargement...
La page est en cours de chargement...
La page est en cours de chargement...
La page est en cours de chargement...
La page est en cours de chargement...
La page est en cours de chargement...
La page est en cours de chargement...
La page est en cours de chargement...
La page est en cours de chargement...
La page est en cours de chargement...
La page est en cours de chargement...
La page est en cours de chargement...
La page est en cours de chargement...
La page est en cours de chargement...
La page est en cours de chargement...
La page est en cours de chargement...
La page est en cours de chargement...
La page est en cours de chargement...
La page est en cours de chargement...
La page est en cours de chargement...
La page est en cours de chargement...
La page est en cours de chargement...
La page est en cours de chargement...
La page est en cours de chargement...
La page est en cours de chargement...
La page est en cours de chargement...
La page est en cours de chargement...
La page est en cours de chargement...
La page est en cours de chargement...
La page est en cours de chargement...
La page est en cours de chargement...
La page est en cours de chargement...
La page est en cours de chargement...
La page est en cours de chargement...
La page est en cours de chargement...
La page est en cours de chargement...
La page est en cours de chargement...
La page est en cours de chargement...
La page est en cours de chargement...
La page est en cours de chargement...
La page est en cours de chargement...
La page est en cours de chargement...
La page est en cours de chargement...
La page est en cours de chargement...
La page est en cours de chargement...
La page est en cours de chargement...
La page est en cours de chargement...
La page est en cours de chargement...
La page est en cours de chargement...
La page est en cours de chargement...
La page est en cours de chargement...
La page est en cours de chargement...
La page est en cours de chargement...
La page est en cours de chargement...
La page est en cours de chargement...
La page est en cours de chargement...
La page est en cours de chargement...
La page est en cours de chargement...
La page est en cours de chargement...
La page est en cours de chargement...
La page est en cours de chargement...
La page est en cours de chargement...
La page est en cours de chargement...
La page est en cours de chargement...
La page est en cours de chargement...
La page est en cours de chargement...
La page est en cours de chargement...
La page est en cours de chargement...
La page est en cours de chargement...
La page est en cours de chargement...
La page est en cours de chargement...
La page est en cours de chargement...
La page est en cours de chargement...
La page est en cours de chargement...
La page est en cours de chargement...
La page est en cours de chargement...
La page est en cours de chargement...
La page est en cours de chargement...
La page est en cours de chargement...
La page est en cours de chargement...
La page est en cours de chargement...
La page est en cours de chargement...
La page est en cours de chargement...
La page est en cours de chargement...
La page est en cours de chargement...
La page est en cours de chargement...
La page est en cours de chargement...
La page est en cours de chargement...
La page est en cours de chargement...
La page est en cours de chargement...
La page est en cours de chargement...
La page est en cours de chargement...
La page est en cours de chargement...
La page est en cours de chargement...
La page est en cours de chargement...
La page est en cours de chargement...
La page est en cours de chargement...
La page est en cours de chargement...
La page est en cours de chargement...
La page est en cours de chargement...
La page est en cours de chargement...
La page est en cours de chargement...
La page est en cours de chargement...
La page est en cours de chargement...
La page est en cours de chargement...
La page est en cours de chargement...
La page est en cours de chargement...
La page est en cours de chargement...
La page est en cours de chargement...
La page est en cours de chargement...
La page est en cours de chargement...
La page est en cours de chargement...
La page est en cours de chargement...
La page est en cours de chargement...
La page est en cours de chargement...
La page est en cours de chargement...
La page est en cours de chargement...
La page est en cours de chargement...
La page est en cours de chargement...
La page est en cours de chargement...
La page est en cours de chargement...
La page est en cours de chargement...
La page est en cours de chargement...
La page est en cours de chargement...
La page est en cours de chargement...
La page est en cours de chargement...
La page est en cours de chargement...
La page est en cours de chargement...
La page est en cours de chargement...
La page est en cours de chargement...
La page est en cours de chargement...
La page est en cours de chargement...
La page est en cours de chargement...
La page est en cours de chargement...
La page est en cours de chargement...
La page est en cours de chargement...
La page est en cours de chargement...
La page est en cours de chargement...
La page est en cours de chargement...
La page est en cours de chargement...
La page est en cours de chargement...
La page est en cours de chargement...
La page est en cours de chargement...
La page est en cours de chargement...
La page est en cours de chargement...
La page est en cours de chargement...
La page est en cours de chargement...
La page est en cours de chargement...
La page est en cours de chargement...
La page est en cours de chargement...
La page est en cours de chargement...
La page est en cours de chargement...
La page est en cours de chargement...
La page est en cours de chargement...
La page est en cours de chargement...
La page est en cours de chargement...
La page est en cours de chargement...
La page est en cours de chargement...
La page est en cours de chargement...
La page est en cours de chargement...
La page est en cours de chargement...
La page est en cours de chargement...
La page est en cours de chargement...
La page est en cours de chargement...
La page est en cours de chargement...
La page est en cours de chargement...
La page est en cours de chargement...
La page est en cours de chargement...
La page est en cours de chargement...
La page est en cours de chargement...
La page est en cours de chargement...
La page est en cours de chargement...
La page est en cours de chargement...
La page est en cours de chargement...
La page est en cours de chargement...
La page est en cours de chargement...
La page est en cours de chargement...
La page est en cours de chargement...
La page est en cours de chargement...
La page est en cours de chargement...
La page est en cours de chargement...
La page est en cours de chargement...
La page est en cours de chargement...
La page est en cours de chargement...
La page est en cours de chargement...
La page est en cours de chargement...
La page est en cours de chargement...
La page est en cours de chargement...
La page est en cours de chargement...
La page est en cours de chargement...
La page est en cours de chargement...
La page est en cours de chargement...
La page est en cours de chargement...
La page est en cours de chargement...
La page est en cours de chargement...
La page est en cours de chargement...
La page est en cours de chargement...
La page est en cours de chargement...
La page est en cours de chargement...
La page est en cours de chargement...
La page est en cours de chargement...
La page est en cours de chargement...
La page est en cours de chargement...
La page est en cours de chargement...
La page est en cours de chargement...
La page est en cours de chargement...
-
 1
1
-
 2
2
-
 3
3
-
 4
4
-
 5
5
-
 6
6
-
 7
7
-
 8
8
-
 9
9
-
 10
10
-
 11
11
-
 12
12
-
 13
13
-
 14
14
-
 15
15
-
 16
16
-
 17
17
-
 18
18
-
 19
19
-
 20
20
-
 21
21
-
 22
22
-
 23
23
-
 24
24
-
 25
25
-
 26
26
-
 27
27
-
 28
28
-
 29
29
-
 30
30
-
 31
31
-
 32
32
-
 33
33
-
 34
34
-
 35
35
-
 36
36
-
 37
37
-
 38
38
-
 39
39
-
 40
40
-
 41
41
-
 42
42
-
 43
43
-
 44
44
-
 45
45
-
 46
46
-
 47
47
-
 48
48
-
 49
49
-
 50
50
-
 51
51
-
 52
52
-
 53
53
-
 54
54
-
 55
55
-
 56
56
-
 57
57
-
 58
58
-
 59
59
-
 60
60
-
 61
61
-
 62
62
-
 63
63
-
 64
64
-
 65
65
-
 66
66
-
 67
67
-
 68
68
-
 69
69
-
 70
70
-
 71
71
-
 72
72
-
 73
73
-
 74
74
-
 75
75
-
 76
76
-
 77
77
-
 78
78
-
 79
79
-
 80
80
-
 81
81
-
 82
82
-
 83
83
-
 84
84
-
 85
85
-
 86
86
-
 87
87
-
 88
88
-
 89
89
-
 90
90
-
 91
91
-
 92
92
-
 93
93
-
 94
94
-
 95
95
-
 96
96
-
 97
97
-
 98
98
-
 99
99
-
 100
100
-
 101
101
-
 102
102
-
 103
103
-
 104
104
-
 105
105
-
 106
106
-
 107
107
-
 108
108
-
 109
109
-
 110
110
-
 111
111
-
 112
112
-
 113
113
-
 114
114
-
 115
115
-
 116
116
-
 117
117
-
 118
118
-
 119
119
-
 120
120
-
 121
121
-
 122
122
-
 123
123
-
 124
124
-
 125
125
-
 126
126
-
 127
127
-
 128
128
-
 129
129
-
 130
130
-
 131
131
-
 132
132
-
 133
133
-
 134
134
-
 135
135
-
 136
136
-
 137
137
-
 138
138
-
 139
139
-
 140
140
-
 141
141
-
 142
142
-
 143
143
-
 144
144
-
 145
145
-
 146
146
-
 147
147
-
 148
148
-
 149
149
-
 150
150
-
 151
151
-
 152
152
-
 153
153
-
 154
154
-
 155
155
-
 156
156
-
 157
157
-
 158
158
-
 159
159
-
 160
160
-
 161
161
-
 162
162
-
 163
163
-
 164
164
-
 165
165
-
 166
166
-
 167
167
-
 168
168
-
 169
169
-
 170
170
-
 171
171
-
 172
172
-
 173
173
-
 174
174
-
 175
175
-
 176
176
-
 177
177
-
 178
178
-
 179
179
-
 180
180
-
 181
181
-
 182
182
-
 183
183
-
 184
184
-
 185
185
-
 186
186
-
 187
187
-
 188
188
-
 189
189
-
 190
190
-
 191
191
-
 192
192
-
 193
193
-
 194
194
-
 195
195
-
 196
196
-
 197
197
-
 198
198
-
 199
199
-
 200
200
-
 201
201
-
 202
202
-
 203
203
-
 204
204
-
 205
205
-
 206
206
-
 207
207
-
 208
208
-
 209
209
-
 210
210
-
 211
211
-
 212
212
-
 213
213
-
 214
214
-
 215
215
-
 216
216
-
 217
217
-
 218
218
-
 219
219
-
 220
220
-
 221
221
-
 222
222
-
 223
223
-
 224
224
-
 225
225
-
 226
226
-
 227
227
-
 228
228
-
 229
229
-
 230
230


Motorola HT1250-LS+ Manuel utilisateur
- Catégorie
- Radios bidirectionnelles
- Taper
- Manuel utilisateur
dans d''autres langues
- English: Motorola HT1250-LS+ User manual
Documents connexes
-
Motorola P165 Manuel utilisateur
-
-
-
Motorola P160 Series Manuel utilisateur
-
-
-
-
-
-
Autres documents
-
Philips DCM105/12 Guide de démarrage rapide
-
 Hytera P D60X UL913 Manuel utilisateur
-
Harris XL-200M Manuel utilisateur
-
-
-
 Radius m1225 Manuel utilisateur
-
-
-

