for Living 5-blade 3-Speed Le manuel du propriétaire
- Catégorie
- Ventilateurs ménagers
- Taper
- Le manuel du propriétaire

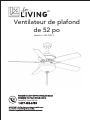
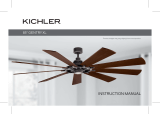
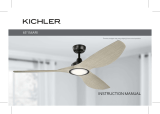
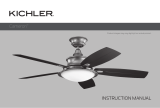
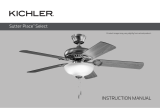
52” Ceiling Fan
Model No. 052-9707-2

From your first apartment to downsizing
your family home,
For Living is a great place to start.
Uncomplicate yourlife with timeless style
and reliable quality that delivers everyday
solutionsfor your home.
Let us know how our products
work for you. Rate and review at
canadiantire.ca

1
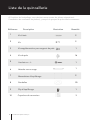
Parts List
Exploded View
Hardware List
Before You Begin Assembly
Step-by-step Guide
2
3
4
5
7
Instructions for Use
Technical Data
Assembly Troubleshooting
Caring for Your Item
Warranty
15
16
17
18
19
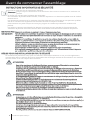
52" Ceiling Fan
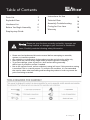
Warning! Please use your furniture correctly and safely. Improper use
can cause safety hazards, or damage to your furniture or household
items. Carefully read the following safety information.
•Please read and understand this entire manual before attempting to assemble,
operate, or install the product.
•Any assembly or maintenance of the product must be carried out by adults only.
•Some parts may contain sharp edges. Wear protective gloves if necessary.
•To prevent damage, place all parts on a level surface during assembly.
Add a layer of protective surface if needed.
•Due to the nature of steel, surface oxidation (rusting) will occur if this protective coating
is scratched. This is a natural process. To minimize this condition, it is recommended
that care be taken when assembling and handling the product in order to prevent the
paint from being scratched.
Table of Contents

252" Ceiling Fan
1
2
3
4
5
6
7
8
1
1
1
1
1
1
5
5
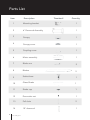
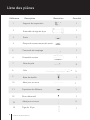
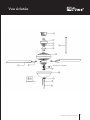
Canopy
Mounting bracket
6" Downrod Assembly
Canopy cover
Motor assembly
Blade arm
Blades
Item Description Thumbnail Quantity
Parts List
Coupling cover
91
Socket base
10 1
Glass Shade
11 1
Shade cap
12 1
Decorative nut
13 2
Pull chain
14 1
10" downrod

3
52" Ceiling Fan
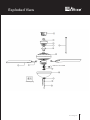
Exploded View
Bulbs are not included
Accessory bag

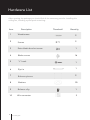
452" Ceiling Fan
2
2
1
16
1
1
1
2
Blade screws
Zip tie
Balance pieces
Balance clip
Washers 20
Item Description Thumbnail Quantity
After opening the package you should find all the necessary parts for installing this
ceiling fan, including a parts pack containing:
Wood screws
"J" hook
Screws
Extra blade bracket screw
1
2
3
4
5
6
7
8
9
Hardware List
Wire connector
10 3

5
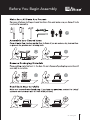
52" Ceiling Fan
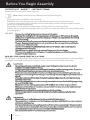
Before You Begin Assembly

DO NOT:
Note: Always turn the power off before servicing the ceiling fan.
A dry dust cloth is suitable for most cleanings.
Should the ceiling fan become wet, have a qualified electrician inspect it before next use.
In order to comply with safety regulations and to avoid safety hazards, ceiling fan repairs must be
carried out by qualified personnel.
Pay attention to the ceiling fan blades when cleaning, painting or working nearby.
Children do not recognize the dangers that may occur when operating ceiling fan. Keep children away
from ceiling fans.
Please retain this manual for future reference.
Expose the ceiling fan to water or immerse it in water.
Operate the ceiling fan if it shows any signs of damage or if it has been dropped.
Attempt to remove any parts of the housing or insert any object while the ceiling
fan is operating.
Position the ceiling fan on or near hot surfaces such as stove tops, or near open
flames. Expose the ceiling fan to rain or moisture. Do not operate the ceiling fan
outdoors or with wet hands.
Use the reverse switch while the fan blades are in motion. This could result in
damage to the ceiling fan.
Do not hang any decorations or external items onto the fan blades.
If fan starts to wobble, shut off power immediately; have a qualified electrician
inspect it before next use.
This ceiling fan is designed for household use only and not for commercial applications. No responsibility
is accepted for damage resulting from improper use or noncompliance with the instructions.
To avoid possible electric shock, be sure electricity at the fuse box or the circuit
breaker is turned off before wiring.
All wiring must be done in accordance with national and local wiring codes. Consult a
qualified electrician to ensure correct branch circuit conductor.
Follow the recommended instructions for the proper method of wiring for the new
ceiling fan. The ceiling fan must be grounded as a precaution against possible electric
shock.
If you do not have sufficient electrical wiring knowledge, have the fan installed by a
licensed electrician.
The outlet box and joist must be securely mounted and capable of reliably supporting
at least 50 lb (22.7 kg).
Mount the lowest moving parts at least 10’ (3.05 m) above floor or ground level.
Make sure all electrical connections are sealed with proper connector and electrical
tape inside the outlet box.
Make sure the ceiling fan is securely fastened to the ceiling.
All set screws must be checked and re-tightened where necessary before fan
operation.
Mount only to an outlet box marked acceptable for fan support.
To prevent injury , make sure the fan blades are not bent and that there are no objects
within the rotation area.
The important precautions, safeguards and instructions appearing in this manual are
not meant to cover all possible situations. It must be understood that common sense
and caution are factors which cannot be built into the product.
Not suitable for use with solid-state speed controls.
652" Ceiling Fan
Before You Begin Assembly

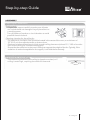
7
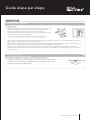
52" Ceiling Fan
Gettinq ready
Unpack and inspect carefully to make sure all parts
are included and not damaged. Lay all pieces out on
a working space.
Turn off power at fuse box or circuit breaker to avoid
possible electrical shock.
Choosinq a location for the ceilinq fan
For effective air circulation, fans should be located in the centre of the room, or a minimum of
32" (81.3 cm) from adjacent walls or obstructions.
Choose a location where there is a high enough ceiling clearance (at least 10’ / 3.05 m from the
floor to the ceiling fan's lowest moving part).
Ensure that the outlet box in the room's ceiling can support the weight of the fan. Typically, if the
outlet box is marked acceptable for fan support, it can hold the fan securely.
This method is preferred if the ceiling is sloped or vaulted, or if
ceiling is extra high, requiring the need of a downrod.
Drop-mount (for normal ceilinqs)
Mounting options
Preparing for installation
Step-by-step Guide

852" Ceiling Fan
Installation
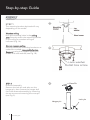
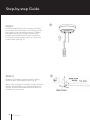
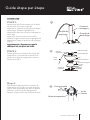
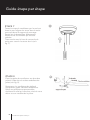
STEP 1
The mounting bracket depicted will vary
depending on the model.
Wooden ceiling
Drill two mounting holes in the ceiling
joist. Securely attach the mounting bracket
to the ceiling or wooden ceiling as
indicated (Fig. 1A).
Normal masonry ceiling
Securely attach the mounting bracket to an
outlet box marked "Acceptable for Fan
Support", using the supplied outlet box
screws with two washers (see Fig. 1B).
STEP 2
Downrod assembly
Remove the lock pin and take out the
hanger pin, then remove the hanger ball
from the downrod assembly by loosening
the set screw and removing the cross pin
(see Fig. 2).
Step-by-step Guide
1B
1A
2
Lock pin
Hanger pin
Cross Pin

9
52" Ceiling Fan
Step-by-step Guide
4
3
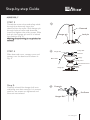
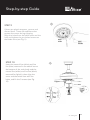
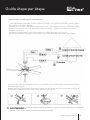
STEP 3
Thread the motor wires and safety cable
through the downrod. Insert the
downrod into the collar. Slide hanger pin
through holes of collar and downrod.
Insert and tighten the collar screws. Slide
lock pin into hanger pin until it is locked
into position (Fig. 3).
Warning: Ensure wiring is not pinched or
twisted.
STEP 4
Slide downrod cover, canopy cover and
canopy over the downrod as shown in
Fig. 4.
Step 5.
Carefully reinstall the hanger ball onto
rod being sure that cross pin is in correct
position, set screws are tightened and
wires are not twisted.
5
Hanger pin
Downrod
Lock pin
Safety cable
collar
Lock Pin
Downrod
Canopy
Canopy Cover
Hanger pin
Downrod stand cover
Motor Wires
Hanger Ball
Cross pin
Set Screw
Hanger Ball

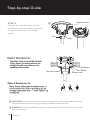
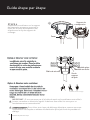
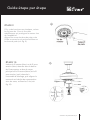
STEP 6
Hang the fan onto the hanger bracket,
and make sure the slot of the hanger ball
is aligned with the clip of the hanger
bracket.
6
Option A. Securing your fan
The safety cable prevents the fan from
falling. Secure the safety cable to the
ceiling joist with a wood screw, star
washer and flat washer.
Option B. Securing your fan
Note: Attach safety cable from fan unit to "J"
hook in outlet box. Secure by looping zip tie
through safety cable and "J" hook. Tighten zip
tie securely. zip tie
Step-by-step Guide
10
IMPORTANT: If you are not sure if the electrical outlet box and fan are grounded, contact a
licensed electrician for advice. They must be grounded for safe operation.
WARNING: To avoid possible electric shock, be sure electricity is turned off at the main fuse
box before wiring.
52" Ceiling Fan
Hanger bracket
Slot Clip
The Safety cable Star Washer
Wood screw
Flat Washer

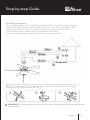
Fan Wiring Instructions:
Three cables are reserved for the FAN host: black (FAN L), white (N), and blue (Light L).
Connect the white (N) wire to the neutral wire on the wall. Connect the black (FAN L)
live wire and the blue (Light L) Light wire together to the live wire on the wall.
The fan cable (Green) connects to the ground cable on the wall.
Please see the following example for specific connection operation:
Step-by-step Guide
C
When wires are matched up, connect them by twisting frayed ends together (see Fig. A).
Screw wire connectors (3 are provided) onto the tops of the twisted wires (see Fig. B).
Fasten them with electrical tape (see Fig. C).
WARNING: Secure the connectors with electrical tape and ensure there are no loose strands
or connections.
AB
11
52" Ceiling Fan

8
7
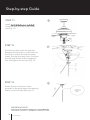
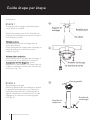
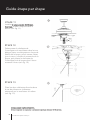
STEP 7
Hold the assembly by the canopy and raise
up to align the two holes in the canopy with
the holes in the mounting bracket. Tighten
the loosened screws. Now re-secure the
screws and washers which were removed.
Then pull up the canopy cover to cover the
screw holes (see Fig. 7).
STEP 8
Fasten fan blades to blade arms by using
blade screws and washers (see Fig. 8).
Note: This ceiling fan includes 5 dual-finished
blades. Depending on personal preference,
choose the side that best suits the decor or
furniture of your room.
Step-by-step Guide
1252" Ceiling Fan

13
52" Ceiling Fan
10
9
STEP 10
Insert the neutral line (white) and live
line (blue) reserved in the switch box at
the bottom of the main body and the
neutral line (white) and live line (black)
reserved for light kit, then align the
cover and the switch box with the
holes, and fix the 3 screws (see Fig.
10).
Step-by-step Guide
STEP 9
If there are plastic stoppers, remove and
discard them. These are stablilzers that
protect the motor during shipping.
Align the holes from the blade arms and the
host and tighten the pre-locked screws on
the blade arms (see Fig. 9).

1452" Ceiling Fan
12
11
Step-by-step Guide
IMPORTANT NOTE:
If you replace the bulbs, the wattage can't exceed 50 W total.
STEP 11
Install 2 x 25 W bulbs (not included).
Screw the bulb into the lamp holder
(see Fig. 11).
STEP 12
Put the fan switch chain through the
designated hole (with an arrow label) of
the lamp, and then through the glass
shade, through the lamp cover, and then
put the lamp switch chain through the
nut, and tighten the nut (see Fig. 12).
STEP 13
Attach the two extension chains
provided in the parts bag to the existing
chains on the fan itself (see Fig. 13).
13

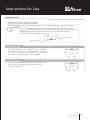
This ceiling fan is equipped with reverse switch for downward or upward air flow.
NOTE:
Switch housing
Do not change the direction of rotation while the fan blades are in
motion. To change direction, turn off the fan and wait for the blades to
stop rotating before setting the switch to the desired rotation
direction, either forward or reverse.
Forward Reverse
On this setting, the fan will turn counter-
clockwise to create a cooling effect. Use this
function during warmer weather to circulate
the hot air away from your living space.
On this setting, the fan will turn clockwise. Use
this function during cooler weather to re-
circulate warm air.
Forward function
Reverse function
Instructions for Use
15
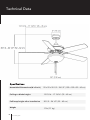
52" Ceiling Fan

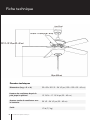
52 x 52 x 20 1/2 – 24 1/2” (132 x 132 x 52 – 62 cm)
13 13/16 – 17 13/16” (35 – 45 cm)
20 1/2 – 24 1/2” (35 – 45 cm)
Assembled Dimensions(W x D x H)
Ceiling to blade height
Full lamp height after installation
Weight 17 lb (7.7 kg)
Technical Data
1652" Ceiling Fan

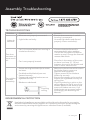
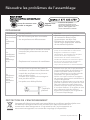
TROUBLESHOOTING
ENVIRONMENTAL PROTECTION
Used electrical appliances are recyclable and should not be discarded in your regular
domestic waste! Please actively support us in conserving resources and protecting the
environment by returning this appliance to a collection centre (if available).
Problem
Lights do
not work.
Possible reason
Wires are not properly connected.
Light bulbs are faulty.
Ensure wire connector in switch
housing is connected.
Unscrew light bulbs and discard
properly. Insert new bulb(s).
Solution
Fan is not properly located.
Fan is in reverse (blades are moving in
clockwise direction).
Fan does
not seem to
move much
air.
Counter-clockwise (forward) is
recommended in warm weather.
Turn off fan and power and wait for
rotation to stop. Change the forward/
reverse slide switch.
Place fan in the centre of the room
so there is at least 12" (30 cm)
between the end of the blades and
walls or other obstructions.
Make sure that screws which attach
fan blade clips to motor are
fastened and tightened.
Tighten screws of fan blade to
blade clip securely.
Ensure that canopy and mounting
bracket are tightened securely to
ceiling joist.
Check by selecting a point on the
ceiling above the tip of one of the
blades. Measure this distance and
ensure all blades are even. If all
blade levels are not equal, adjust
accordingly (see Balancing Kit
Manual).
Screws securing fan blade clips to motor
are loose.
Fan blade and its blade clip are not
fastened securely.
Canopy and mounting bracket are not
tightened securely.
Blades are unbalanced.
Fan wobbles
or shakes
excessively.
Touching
ceiling
Assembly Troubleshooting
17
52" Ceiling Fan

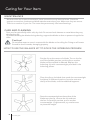
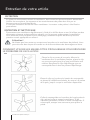
HOW TO USE THE BALANCE KIT TO SOLVE THE WOBBLING PROBLEM
Because of the fan's natural movement, some connections may become loose. Check the
support connections, brackets and blade attachments twice a year. Make sure they are secure.
There is no need to oil your fan. The motor has permanently lubricated bearings.
MAINTENANCE
CARE AND CLEANING
Dust your fan periodically with a soft, dry cloth. Do not use harsh cleaners or materials as they may
damage the unit.
To prevent bending the blades during cleaning, support the blades so that no pressure is applied to
them.
Caution!
Do not allow water to come in contact with fan blades or the ceiling fan. Doing so will create
fire and/or shock hazards, damaging property.
Caring for Your Item
·Put the clip on the centre of a blade. Turn on the fan
and if the wobble persists, put the clip on another
blade until the wobble is reduced. Replace the
balancing clip with counterweight provided in the
balancing pieces.
·Place the clip on the blade that needs the counterweight
and place in different locations, from the centre to
the tip of the blade, until the wobble disappears.
·Paste the counterweight on the surface of the
blade near the clip, remove the clip and test
the fan. If vibrations persists, put on another
counterweight. If it gets worse, try another area
to place the weight.
1852" Ceiling Fan
La page charge ...
La page charge ...
La page charge ...
La page charge ...
La page charge ...
La page charge ...
La page charge ...
La page charge ...
La page charge ...
La page charge ...
La page charge ...
La page charge ...
La page charge ...
La page charge ...
La page charge ...
La page charge ...
La page charge ...
La page charge ...
La page charge ...
La page charge ...
La page charge ...
La page charge ...
La page charge ...
-
 1
1
-
 2
2
-
 3
3
-
 4
4
-
 5
5
-
 6
6
-
 7
7
-
 8
8
-
 9
9
-
 10
10
-
 11
11
-
 12
12
-
 13
13
-
 14
14
-
 15
15
-
 16
16
-
 17
17
-
 18
18
-
 19
19
-
 20
20
-
 21
21
-
 22
22
-
 23
23
-
 24
24
-
 25
25
-
 26
26
-
 27
27
-
 28
28
-
 29
29
-
 30
30
-
 31
31
-
 32
32
-
 33
33
-
 34
34
-
 35
35
-
 36
36
-
 37
37
-
 38
38
-
 39
39
-
 40
40
-
 41
41
-
 42
42
-
 43
43


for Living 5-blade 3-Speed Le manuel du propriétaire
- Catégorie
- Ventilateurs ménagers
- Taper
- Le manuel du propriétaire
Documents connexes
-
for Living 5-Reversible Blade 3-Speed Le manuel du propriétaire
-
-
-
-
-
-
Autres documents
-
NOMA Ashton 5-Blade 3-Speed Le manuel du propriétaire
-
Kichler 310155SBK Manuel utilisateur
-
 Kichler Lighting Jade 300030 Manuel utilisateur
-
 Kichler Lighting Motu Manuel utilisateur
-
 Kichler Lighting 300285AVI Manuel utilisateur
-
-
-
 Kichler Lighting 300365MWH Manuel utilisateur
-
 Kichler Lighting 310204WCP Manuel utilisateur
-
 Kichler Lighting 339501AP Manuel utilisateur


