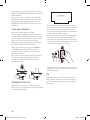
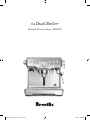
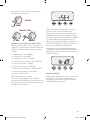
Breville the Dual Boiler Manuel utilisateur
- Catégorie
- Cafetières
- Taper
- Manuel utilisateur

the Dual Boiler
™
Instruction Book - BES920
BES920_USC_IB_R20_FA.indd 1BES920_USC_IB_R20_FA.indd 1 21/5/20 9:40 am21/5/20 9:40 am

2
BREVILLE
RECOMMENDS
SAFETY FIRST
At Breville we are very safety
conscious. We design and
manufacture consumer
products with the safety of you,
our valued customer, foremost
in mind. In addition, we ask
that you exercise a degree of
care when using any electrical
appliance and adhere to the
following precautions.
IMPORTANT
SAFEGUARDS
When using electrical
appliances, basic safety
precautions should always
be followed, including
the following:
FOR ALL ELECTRICAL
APPLIANCES
• Carefully read all instructions
before operating and save for
future reference.
• Do not touch hot surfaces. Use
handles or knobs as advised in
this instruction book.
• To protect against fire, electric
shock and injury to persons do
not immerse the power cord,
plug, or appliance itself in water
or other liquids.
• Close supervision is necessary
when any appliance is used by or
near children.
• If the appliance is to be:
− left unattended
− cleaned
− moved
− assembled; or
− stored
Always switch off the appliance
by pressing the POWER button
to off and unplug from the
power outlet.
c
Contents
2 Breville Recommends
Safety First
6 Features
7 Components
9 Operation
19 Coffee Making Tips
& Preparation
23 Care, Cleaning & Storage
27 Troubleshooting
32 Coffees to try
33 French
2 Breville Recommends
Safety First
6 Components
8 Features
8 Assembly
9 Functions
15 Care & Cleaning
18 Troubleshooting
20 Coffees to try
BES920_USC_IB_R20_FA.indd 2BES920_USC_IB_R20_FA.indd 2 21/5/20 9:40 am21/5/20 9:40 am

3
• Unplug from outlet when not
in use and before cleaning.
Allow to cool before putting on
or taking off parts and before
cleaning the appliance.
• It is recommended to regularly
inspect the appliance and
power cord. Do not use the
appliance if there is damage to
the power cord or plug, or after
the appliance malfunctions or
has been damaged in any way.
Immediately stop use and call
Breville Consumer Support.
• The use of accessory
attachments not recommended
by Breville may result in
fire, electric shock or injury
to persons.
• Do not let the power cord
hang over the edge of a
table or counter-top or touch
hot surfaces.
• Do not place the appliance near
the edge of a table or counter-
top. Ensure the surface is level,
clean and free of water and
other substances.
• Do not place the appliance on
or near a hot gas or electric
burner. Do not place it in,or
allow it to come in contact with
a heated oven.
• This appliance is recommended
for household use only. Do not
use this appliance for anything
other than its intended use. Do
not use outdoors. Do not use in
moving vehicles or boats.
NOTICE TO CUSTOMERS
REGARDING MEMORY
STORAGE
• Please note that in order to
better serve our customers,
internal memory storage has
been imbedded into your
appliance. This memory
storage consists of a small chip
to collect certain information
about your appliance including
the frequency of use of the
appliance and the manner
in which your appliance
is being used. In the event
your appliance is returned
for service, the information
collected from the chip enables
us to quickly and efficiently
service your appliance. The
information collected also
serves as a valuable resource in
developing future appliances
to better serve the needs of
our consumers. The chip does
not collect any information
regarding the individuals
who use the product or the
household where the product is
used. If you have any questions
regarding the memory
storage chip, please contact us
at privacy@breville.com
BES920_USC_IB_R20_FA.indd 3BES920_USC_IB_R20_FA.indd 3 21/5/20 9:40 am21/5/20 9:40 am

4
SPECIFIC
INSTRUCTIONS FOR
BES920XL
• It is recommended to plug
the espresso machine into
a properly grounded and
dedicated circuit, separate from
other electrical appliances.
• Use only cold water in the
water tank. Do not use any
other liquids. Do not use highly
filtered, demineralized or
distilled water as this may affect
the taste of the coffee and how
the espresso machine operates.
• Ensure the portafilter is firmly
inserted and secured into the
group head before starting
an extraction. Never remove
the portafilter during the
extraction process.
• Caution must be used during
descaling as hot steam may be
released. Before descaling, turn
off the machine, allow to cool
for at least 1 hour and ensure
the drip tray is empty and fully
inserted. For instructions, refer
to ‘Descale (dESc).’
• Do not attempt to open or
service the espresso machine.
• For any maintenance other
than cleaning, call Breville
Consumer Support or visit a
Breville Authorized Service.
WARNING
To avoid the risk of injury, do not
open the brew chamber during
the brew process.
SHORT CORD
INSTRUCTIONS
Your Breville appliance is
fitted with a short power cord
to reduce personal injury or
property damage resulting from
pulling, tripping or becoming
entangled with a longer cord.
Longer detachable power cords
or extension cords are available
and may be used if care is
exercised. If an extension cord
is used, (1) the marked electrical
rating of the cord set or extension
cord should be at least as great
as the electrical rating of the
appliance,(2) the cord should
be arranged so that it will not
drape over the counter-top or
table where it can be pulled
on by children or tripped over
unintentionally and (3) the
extension cord must include a
3-prong grounding plug.
BREVILLE ASSIST™ PLUG
Your Breville appliance comes
with a unique Assist™ Plug,
conveniently designed with a
finger hole to ease removal from
the power outlet.
BES920_USC_IB_R20_FA.indd 4BES920_USC_IB_R20_FA.indd 4 21/5/20 9:40 am21/5/20 9:40 am

5
CSA DUTY CYCLE
MARKING:
The Canadian Standards
Authority requires any
appliances capable of drawing
over 1500W to be marked with
a ‘duty cycle’ in minutes. For
the BES920XL, this ‘duty cycle’
represents the maximum time
for which the appliance will
draw over 1500W during any
2-hour period of use. It does not
indicate the appliance is unsafe
for continuous use or is required
to be switched off at certain
intervals during normal use.
SPECIFIC
INSTRUCTIONS FOR
WATER FILTER
• Filter cartridge should be kept
out of reach of children.
• Store filter cartridges in a dry
place in the original packaging.
• Protect cartridges from heat
and direct sunlight.
• Do not use damaged
filter cartridges.
• Do not open filter cartridges.
• If you are absent for a
prolonged period of time,
empty the water tank and
replace the cartridge.
SAVE THESE INSTRUCTIONS
BES920_USC_IB_R20_FA.indd 5BES920_USC_IB_R20_FA.indd 5 21/5/20 9:40 am21/5/20 9:40 am

6
F
Features
TRIPLE HEAT SYSTEM
Dual Stainless-Steel Boilers
Dedicated espresso and steam boilers for
simultaneous milk texturing and espresso
extraction at the optimum temperature.
Actively Heated Group Head
Commercial 58mm group head with
embedded element for optimal thermal
stability during extraction.
PRECISION CONTROL
Electronic PID Temperature Control
Electronic temperature control delivers precise
water temperature for optimum espresso flavor.
Programmable.
Regulated Extraction Pressure
Over pressure valve (OPV) limits maximum
pressure for optimal espresso flavor.
Low Pressure Pre-Infusion
Gradually increases water pressure to
gently expand grinds for an even extraction.
Programmable.
Dual Pumps
Dedicated espresso and steam boiler
pumps help maintain constant pressure
throughout extraction.
Programmable Shot Temperature
Adjust water temperature to achieve optimal
espresso flavor depending on coffee origin and
degree of roast.
ADDITIONAL FEATURES
Backlit LCD
Displays current settings and simplifies
programming functions.
High Volume Instant Steam
Dedicated 32 fl.oz (950ml) steam boiler
delivers instant and continuous steam.
Commercial Steam Wand
Stainless steel 360° swivel-action steam wand
with 3 hole tip for a silkier texture.
Instant Hot Water
Dedicated hot water outlet for making
Americanos and pre-heating cups.
58mm Full Stainless Steel Portafilter
Helps to promote a more even extraction and
is easier to clean.
Shot Clock
Displays duration of the espresso shot
being extracted.
Auto Start
Switches machine on at a specified time.
The Razor™ Dose Trimming Tool
Patented twist blade trims down the puck
to the right level for precision dosing and a
consistent extraction.
BES920_USC_IB_R20_FA.indd 6BES920_USC_IB_R20_FA.indd 6 21/5/20 9:40 am21/5/20 9:40 am

7
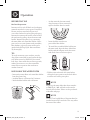
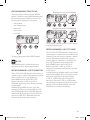
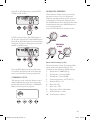
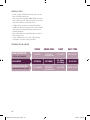
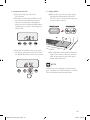
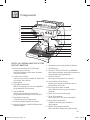
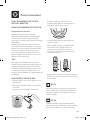
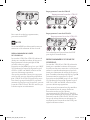
KNOW YOUR BREVILLE PRODUCT
A. Top-fill 84 fl.oz (2.5L) removable water tank
With integrated water filter and backlit
level indicator.
B. Hot water dial
Rotate to start and stop the flow of hot
water from the hot water outlet.
C. POWER button
D. Backlit LCD
Displays current settings and simplifies
programming functions.
E. MENU button
Use in conjunction with the LCD to set the
programmable functions.
F. Espresso pressure gauge
Monitors extraction pressure.
G. Integrated & removable 58mm tamper
H. Heated 58mm group head with
embedded element
I. 58mm full stainless steel portafilter
J. Heated cup warming tray
K. 1 CUP, 2 CUP and MANUAL buttons
With preset shot durations, manual
override or reprogrammable
durations/volumes.
L. Steam lever
For instant and continuous steam.
M. Dedicated hot water outlet
Delivers hot water for Americanos and pre-
heating cups.
N. 360° swivel action steam wand
With 3-hole tip for a silkier texture.
O. Descale access point
P. Tool storage tray
Houses accessories when not in use.
Q. Drop down swivel foot
Lifts the machine upwards for easy
maneuverability.
R. Removable drip tray
With Empty Me! indicator.
c
Components
H
I
F
G
D
E
C
A
B
J
K
L
M
N
O
P
R
Q
A
BES920_USC_IB_R20_FA.indd 7BES920_USC_IB_R20_FA.indd 7 21/5/20 9:40 am21/5/20 9:40 am

8
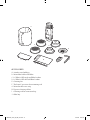
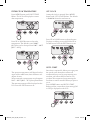
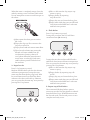
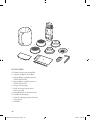
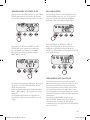
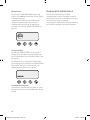
ACCESSORIES
A. Stainless steel milk jug
B. Water filter holder with filter
C. 1 CUP & 2 CUP single wall filter baskets
D. 1 CUP & 2 CUP dual wall filter baskets
E. Cleaning disc
F. The Razor™ precision dose trimming tool
G. Water hardness test strip
H. Espresso cleaning tablets
I. Cleaning tool for steam wand tip
J. Allen key
I
H
A
D
C
G
J
E
F
B
BES920_USC_IB_R20_FA.indd 8BES920_USC_IB_R20_FA.indd 8 21/5/20 9:40 am21/5/20 9:40 am

9
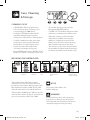
o
Operation
BEFORE FIRST USE
Machine Preparation
Remove and discard all labels and packaging
materials attached to your espresso machine.
Ensure you have removed all parts and
accessories before discarding the packaging.
Remove the water tank located at the back of
the machine by pulling down the water tank
handle. Remove the plastic bag containing
the water filter and water filter holder. Clean
parts and accessories (water tank, portafilter,
filter baskets, jug) using warm water and a
gentle dish washing liquid. Rinse well then
dry thoroughly.
TIP
To easily maneuver your machine, use the
drop-down swivel foot located under the drip
tray. When turned to UNLOCK, the swivel
foot drops down & lifts the machine upwards,
making it easier to access the removable
water tank or reposition the machine to
another location.
INSTALLING THE WATER FILTER
• Remove the water filter and water filter holder
from the plastic bag.
• Soak the filter in cold water for 5 minutes.
• Wash the filter holder with cold water.
• Set the reminder for next month
of replacement. We recommend to
replace the filter after 3 months.
• Insert the filter into the two
parts of the filter holder.
• To install the assembled filter holder into
the water tank, align the base of the filter
holder with the adapter inside the water
tank. Push down to lock into place.
• Fill the water tank with cold water before
sliding back into position at the back of the
machine and locking into place.
NOTE
Replacing the water filter after three months
or 10.6 USgal / 40L will reduce the need to
descale the machine. Filters can be purchased
at Breville webpage.
NOTE
DO NOT use highly filtered, demineralized or
distilled water in this machine. This may affect
the taste of the coffee.
BES920_USC_IB_R20_FA.indd 9BES920_USC_IB_R20_FA.indd 9 21/5/20 9:40 am21/5/20 9:40 am

10
FIRST USE
1. Ensure tank is filled with cold water.
You can do this by either opening the
top-fill water tank lid (push to open), or
by removing the water tank at the back
of the machine.
2. Check STEAM LEVER and HOT WATER
dial are in the CLOSED position.
3. Press POWER button to turn machine on.
4. The LCD will display ‘Hrd3’, prompting
you to set the water hardness level.
Programming this will determine the
regularity of the ‘NEW FILTER’ alert which
indicates when the water filter in the water
tank needs to be replaced.
Setting Water Hardness
• Remove the supplied water hardness
test strip from the wrapper.
• Dip the test strip into a sample of the water
you have filled the tank with. Wait for one
minute. The water hardness setting is
indicated by the number of red squares
displayed on the test strip e.g. 3 red squares
indicate a water hardness setting of 3.
• Press UP or DOWN arrow to the required
setting from ‘Hrd1’ (softest water) to ‘Hrd5’
(hardest water). Press MENU button to set.
Machine will beep to confirm selection.
NOTE
If there is no selection within 5 minutes, the
machine will default to setting ‘Hrd3’.
5. A pumping/vibrating sound will be heard
indicating empty boilers are being filled
with water for the first time. The LCD will
display the current boiler temperature as it
heats up.
6. After approximately 10 minutes, the
machine will reach the default operating
temperature (200˚F/93˚C) and all 4
buttons will illuminate. The machine is now
in STANDBY mode, ready for the next step,
‘Flushing The Machine’.
POWER
NOTE
You will not be able to select the 1 CUP or 2
CUP functions; access the cleaning cycle in
the menu options; or activate the steam wand
until the machine has reached operating
temperature (STANDBY mode). The machine
will beep 3 times if one of these functions
is selected.
FLUSHING THE MACHINE
When the machine has
reached STANDBY mode:
1. Press 2 CUP button to run water through
the group head for 30 seconds.
2. Rotate HOT WATER dial to the OPEN
position to run water through the hot
water outlet. After 30 seconds, rotate HOT
WATER dial to the CLOSED position.
3. Lift STEAM LEVER to the OPEN position
to release steam through the steam wand.
After 30 seconds, lower the STEAM
LEVER to the CLOSED position.
4. Repeat steps 1–3 twice.
5. Re-fill water tank and empty drip
tray, if required.
BES920_USC_IB_R20_FA.indd 10BES920_USC_IB_R20_FA.indd 10 21/5/20 9:40 am21/5/20 9:40 am

11
POWER SAVE MODE
The machine will enter POWER SAVE mode
after remaining idle for 1 hour and turn off
completely if not used for a continuous
4-hour period.
Pressing any button during POWER SAVE
(except POWER) or operating the STEAM
LEVER or HOT WATER dial will cause the
machine to heat-up to operating temperature.
Pressing the POWER button during POWER
SAVE will turn the machine off.
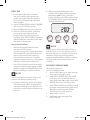
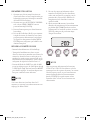
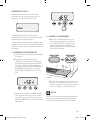
LCD INTERFACE
Display modes
3 modes can be displayed on the LCD screen:
Shot Temperature, Shot Clock or Clock.
Press UP or DOWN arrow to change the
display mode.
1. Shot Temp
Displays selected extraction temperature.
The default is 200°F (93°C), but can be
changed from 190°F–205°F (86°C–96°C). See
‘Extraction Temperature’, page 14.
2. Shot Clock
Displays duration of espresso extraction in
seconds. See ‘Extraction Guide’, page 22.
Shot clock will be displayed during an
extraction and 10 seconds after the extraction
before returning to the default shot
temperature display mode.
3. Clock
Displays current time. The default is 12:00AM
if the time has not been set. See ‘Set Clock’,
page 14.
If selected, the clock will display for 10
seconds before returning to the default shot
temperature display mode.
GENERAL OPERATION
The 1 CUP & 2 CUP buttons use duration to
control espresso volume. The duration times
are preset but can be reprogrammed (refer
to ‘Reprogramming Shot Duration’, page 13).
Alternatively, access the Advanced Features if
you wish to use volumetric controls instead of
duration to determine espresso volume (refer
to ‘Volumetric Control (vOL)’,page 17).
1 CUP BUTTON
Press 1 CUP button once to extract a single
shot of espresso at the preset duration (30
seconds). The extraction will start using the
low-pressure pre-infusion.
The machine will stop after 30 seconds and
return to STANDBY mode.
TIP
To by-pass low pressure pre-infusion and
deliver water to the group head at full pump
pressure, press and hold the 1 CUP button.
Release button when the desired amount of
espresso has been extracted. This function can
be used when purging the group head.
BES920_USC_IB_R20_FA.indd 11BES920_USC_IB_R20_FA.indd 11 21/5/20 9:40 am21/5/20 9:40 am

12
2 CUP BUTTON
Press 2 CUP button once to extract a double
shot of espresso at the preset duration (30
seconds). The extraction will start using the
low-pressure pre-infusion.
The machine will stop after 30 seconds and
return to STANDBY mode.
TIP
To by-pass low pressure pre-infusion and
deliver water to the group head at full pump
pressure, press and hold the 2 CUP button.
Release button when the desired amount of
espresso has been extracted. This function can
be used when purging the group head.
MANUAL BUTTON
The MANUAL button allows you to control
the espresso duration/volume to suit your
preference. Press MANUAL button once to
start the espresso extraction. The extraction
will start using the low-pressure pre-infusion.
Press MANUAL button again to stop
extraction.
TIP
To manually control the low-pressure
pre-infusion duration, press and hold the
MANUAL button. When the required pre-
infusion duration is met, release button to
begin full pump pressure. Press MANUAL
button again to stop extraction.
STEAM
For instant steam, move STEAM LEVER to
OPEN position. The STEAM LED will illuminate.
To turn steam off, move STEAM LEVER to
CLOSED position. The machine will return to
STANDBY mode.
CAUTION: BURN HAZARD
Pressurized steam can still be released, even after
machine has been switched off. Children must
always be supervised.
HOT WATER
For instant hot water, rotate the HOT WATER
dial to OPEN position. The HOT WATER LED
will illuminate.
To turn hot water off, rotate the HOT WATER
dial to CLOSED position.The machine will return
to STANDBY mode.
NOTE
You cannot run hot water and extract espresso at
the same time.
NOTE
Hot water will cease to dispense after approx.
30 seconds. Depending on the size of your cup,
you may need to close, then re-open the HOT
WATER dial. See ‘HOT WATER LED flashing’,
page 18.
BES920_USC_IB_R20_FA.indd 12BES920_USC_IB_R20_FA.indd 12 21/5/20 9:40 am21/5/20 9:40 am

13
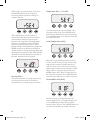
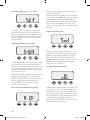
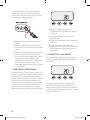
PROGRAMMABLE FUNCTIONS
To enter program mode, press the MENU
button. Continue to press MENU button until
the desired function is flashing on the LCD.
Program mode allows you to program:
• Shot Volume
• Shot Temperature
• Auto Start
• Clean Cycle
• Set Clock
To exit program mode, press EXIT button.
NOTE
The MENU button is disabled during an
extraction or when dispensing hot water.
REPROGRAMMING SHOT DURATION
The 1 CUP and 2 CUP buttons use duration to
control espresso volume. Reprogram the preset
30 second duration to your preference.
Press MENU button until ‘SHOT VOL’
flashes and either ‘1 CUP’ or ‘2 CUP’ is
displayed, depending on the button you’d like
to reprogram.
Without the portafilter in place, press the
button you’d like to reprogram (either 1 CUP
or 2 CUP button) to start water flow from the
group head. Using the shot clock on the LCD,
press the 1 CUP or 2 CUP button once the
required duration has been reached.
Reprogramming 1 CUP button
Reprogramming 2 CUP button
The machine will beep. Press the EXIT button
to set the new duration.
REPROGRAMMING SHOT VOLUME
The 1 CUP and 2 CUP buttons use duration to
control espresso volume. Access the Advanced
Features if you wish to use volumetric controls
instead of duration to determine espresso
volume (refer to ‘Volumetric Control (vOL)’,
page 17). Then follow these instructions:
Press MENU button until ‘SHOT VOL’
flashes and either ‘1 CUP’ or ‘2 CUP’ is
displayed, depending on the button you’d like
to reprogram.
Dose & tamp the portafilter with ground coffee.
Insert the portafilter into the group head. Press
the button you’d like to reprogram (either
1 CUP or 2 CUP button) to start espresso
extraction. Press the 1 CUP or 2 CUP button
once the desired volume of espresso has been
extracted. The machine will beep. Press the
EXIT button to set the new volume.
BES920_USC_IB_R20_FA.indd 13BES920_USC_IB_R20_FA.indd 13 21/5/20 9:40 am21/5/20 9:40 am

14
EXTRACTION TEMPERATURE
Press MENU button until ‘SHOT TEMP’
flashes. The LCD will display the current
shot temperature.
Press UP or DOWN arrow to adjust the
temperature. The default is set at 200°F
(93°C) but can be changed from 190°F – 205°F
(86°C – 96°C).
The optimum temperature will depend on the
origin of the coffee beans, their freshness and
degree of roast.
We recommend a temperature range between
194°F – 203°F (90°C – 95°C) for optimal flavor.
The new temperature will be displayed on the
LCD. Press the EXIT button to set.
SET CLOCK
Setting the clock is optional. Press MENU
button until ‘SET CLOCK’ flashes. The default
is 12.00AM if time has not been set.
Press UP or DOWN arrow to adjust the time.
For faster scrolling, press and hold the UP or
DOWN arrow. Press the EXIT button to set.
AUTO START
Auto Start is optional. It allows you to program
the specific time when the machine will
automatically turn on. By programming your
machine, you will not have to wait for it to
pre-heat. We recommend programming the
machine to start 15 minutes before you plan to
use it.
Press MENU button until ‘AUTO START’
flashes and the current Auto Start setting (ON
or OFF) is displayed on the LCD.
BES920_USC_IB_R20_FA.indd 14BES920_USC_IB_R20_FA.indd 14 21/5/20 9:40 am21/5/20 9:40 am

15
Press UP or DOWN arrow to set the AUTO
START to ON or OFF.
If OFF is selected, press the EXIT button to
set. If ON is selected, press the MENU button.
Press UP or DOWN arrow to the desired Auto
Start time. For faster scrolling, press and hold
the UP or DOWN arrow.
Press the EXIT button to set. A small clock
icon will be displayed on the LCD when the
Auto Start function has been programmed.
CLEANING CYCLE
The cleaning cycle cleans the shower screen
and back-flushes the group head. Select this
feature when the LCD displays ‘CLEAN ME!’
Refer to ‘Cleaning Cycle’, page 23.
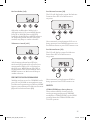
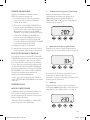
ADVANCED FEATURES
These features should only be accessed by
experienced users. To access Advanced
Features, with the machine turned off, press
and hold the 1 CUP button, then also press
the POWER button. Press the UP arrow to the
desired feature then press MENU button to
access feature settings.
Press the EXIT button at any time to exit.
POWER
POWER
TURN
POWER OFF
THEN PRESS
& HOLD
Reset Default Settings (rSEt)
Use this function to reset all programmable
values back to the default settings. The
machine has the following default settings:
1. Temperature – 200°F (93°C)
2. Pre-Infusion – Duration Pd07
3. Pre-Infusion – Power PP60
4. Steam temperature – 275°F (135°C)
5. Machine Audio – LO
6. Auto Off – ON
7. Auto Start – OFF
8. Temperature Unit – Fahrenheit
9. Water Hardness – Hrd3
10. Shot Duration – 30 secs
BES920_USC_IB_R20_FA.indd 15BES920_USC_IB_R20_FA.indd 15 21/5/20 9:40 am21/5/20 9:40 am

16
While ‘rSEt’ is displayed on the LCD, press
the MENU button to reset all settings
to factory defaults. Machine will beep to
confirm selection.
‘Hrd3’ will flash on screen. Machine is
now in Water Hardness mode. Determine
water hardness with the supplied water
hardness test strip. Refer to ‘Setting Water
Hardness’, page 10. Press UP or DOWN
arrow to the required setting from ‘Hrd1’
(softest water) to ‘Hrd5’ (hardest water). Press
MENU button to set. Machine will beep to
confirm selection. Setting water hardness will
determine the regularity of the ‘NEW FILTER’
alert which indicates when the water filter in
the water tank needs to be replaced.
Descale (dESC)
Select this feature to access the step by step
descale procedure on the LCD. Refer to
page 24 for the accompanying instructions.
Temperature Unit - ˚C/˚F (SEt)
Set units to metric or imperial. While ‘SEt’ is
displayed on the LCD, press MENU button.
Press UP or DOWN arrow to the desired unit.
Press MENU button to set. Machine will beep
to confirm selection.
Steam Temperature (StEA)
Adjust the steam boiler temperature ,which
in turn controls steam pressure. Lower steam
temperature to texture smaller volumes of
milk or to have more control. Increase steam
temperature to texture larger volumes of milk.
While ‘StEA’ is displayed on the LCD, press
MENU button. Press UP or DOWN arrow to
the desired temperature. Press MENU button
to set. Machine will beep to confirm selection.
Disable AUTO OFF (A OF)
Use this function to disable the Auto Off
feature. While ‘A OF’ is displayed on the LCD,
press MENU button. Press UP or DOWN
arrow to select off or on. Press MENU button to
set. Machine will beep to confirm selection.
BES920_USC_IB_R20_FA.indd 16BES920_USC_IB_R20_FA.indd 16 21/5/20 9:40 am21/5/20 9:40 am

17
Machine Audio (Snd)
Adjust the audible alerts. While ‘Snd’ is
displayed on the LCD, press MENU button.
Press UP or DOWN arrow to off (OFF),
low(LO) or high (HI). Press MENU button to
set. Depending on the selected setting, the
machine may beep to confirm selection.
Volumetric Control (vOL)
Select between volume based (FLo) or
time based (SEc) method for espresso dose
measurement. While ‘vOL’ is displayed on
the LCD, press MENU button. Press UP or
DOWN arrow to the desired method. Press
MENU button to set. Machine will beep to
confirm selection.
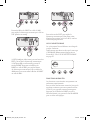
PRE-INFUSION PROGRAMMING
With the machine on and in STANDBY mode,
press UP and DOWN arrow together to enter
Pre-Infusion Programming mode.Press MENU
button to move between Pre-Infusion Duration
(Pd) and Pre-Infusion Power (PP).
Pre-Infusion Duration (Pd)
The LCD will display the current Pre-Infusion
Duration. Press UP or DOWN arrow to
vary time.
We recommend a range between 5–15 secs as
being optimum. Press MENU button to access
Pre-Infusion Power or press EXIT button to set.
Pre-Infusion Power (PP)
The LCD will display current Pre-Infusion
Power. Press UP or DOWN arrow to
vary power.
We recommend a range between 55-65 as
being optimum. Press EXIT button to set.
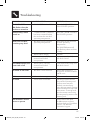
ALERTS
STEAM LEVER beeps during heat-up
The machine will beep 3 times and not
reach operating temperature (STANDBY
mode) if the STEAM LEVER is in the OPEN
position. Move the STEAM LEVER to the
CLOSED position.
BES920_USC_IB_R20_FA.indd 17BES920_USC_IB_R20_FA.indd 17 21/5/20 9:40 am21/5/20 9:40 am

18
HOT WATER LED flashing during heat-up
The machine will not reach operating
temperature (STANDBY mode) if the HOT
WATER dial is in the OPEN position. The
HOT WATER LED will flash. Move the HOT
WATER dial to the CLOSED position.
HOT WATER LED flashing
To ensure water is dispensed at the correct
temperature, hot water will cease to dispense
after approx. 30 seconds and the HOT WATER
LED will flash. Move the HOT WATER dial to
the CLOSED position.
Fill Tank
The machine will detect a low water level. The
LCD will display ‘FILL TANK’.
Fill tank with cold fresh water. The machine
will not be able to make coffee or hot water
while the tank is empty.
Clean Me!
Indicates when 200 extractions have been
carried out since the last cleaning cycle. The
cleaning cycle cleans the shower screen and
back-flushes the group head. For information
on how to clean the machine, refer to ‘Cleaning
Cycle’, page 23.
New Filter
Indicates when the water filter in the water
tank needs to be replaced. For information
on changing the filter, refer to ‘Replacing the
Water Filter’, page 23. The regularity of this
alert is determined by the water hardness
setting (Hrd1-Hrd5) selected. For information,
refer to ‘Setting Water Hardness’, page 10.
Temperature flashing
Indicates when the machine is heating up or if
the temperature drops excessively during use.
TRANSPORTING AND STORING
We recommend draining both boilers
completely before transporting the machine
or storing for an extended period of time. This
procedure is also intended as an anti-freeze
measure in the event the machine is exposed to
extreme cold temperatures.
BES920_USC_IB_R20_FA.indd 18BES920_USC_IB_R20_FA.indd 18 21/5/20 9:40 am21/5/20 9:40 am

19
i
Coffee Making
Tips & Preparation
PRE-HEATING
Heating your cup or glass
A warm cup will help maintain the coffee’s
optimal temperature. Pre-heat your cup by
rinsing with hot water from the hot water outlet
and place on the cup warming tray.
Heating the portafilter and filter basket
A cold portafilter and filter basket can
reduce the extraction temperature enough to
significantly affect the quality of your espresso.
Always ensure the portafilter and filter basket
are pre-heated with hot water from the hot
water outlet before initial use.
NOTE
Always wipe the portafilter and filter basket dry
before dosing with ground coffee as moisture
can encourage ‘channeling’ where water by-
passes the ground coffee during extraction.
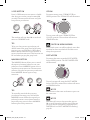
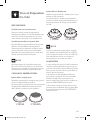
SELECTING FILTER BASKET
Single Wall Filter Baskets
Use Single Wall filter baskets if grinding fresh
whole coffee beans Single Wall filter baskets
allow you to experiment with grind and dose to
create a more balanced espresso.
1 CUP 2 CUP
Dual Wall Filter Baskets
Use Dual Wall filter baskets if using pre-ground
coffee. Dual Wall filter baskets regulate the
pressure and help to optimize the extraction
regardless of the grind, dose or freshness.
1 CUP 2 CUP
NOTE
Regardless of whether you use Single Wall or
Dual Wall filter baskets, use the 1 CUP basket
when brewing a single cup and the 2 CUP
basket when brewing two cups or a stronger
single cup or mug.
THE GRIND
If grinding coffee beans, the grind size should
be fine but not too fine. The grind size will
affect the rate at which the water flows through
the ground coffee in the filter basket and the
taste of the espresso.
If the grind is too fine (looks like powder and
feels like flour when rubbed between fingers),
the water will not flow through the coffee even
BES920_USC_IB_R20_FA.indd 19BES920_USC_IB_R20_FA.indd 19 21/5/20 9:40 am21/5/20 9:40 am

20
when under pressure. The resulting espresso
will be OVER-EXTRACTED, dark in color and
bitter in flavor.
If the grind is too coarse the water will flow
through the ground coffee in the filter basket
too quickly. The resulting espresso will be
UNDER-EXTRACTED and lacking in color
and flavor.
DOSE AND TAMPING
Wipe filter basket with a dry cloth.
If using Single Wall filter baskets, grind just
enough coffee to fill the filter basket. You may
need to experiment with how long the grinder
needs to run to achieve the correct dose.
Tap the portafilter several times to distribute
the coffee evenly in the filter basket.
Tamp down firmly (using approx.30-40lbs
or 15-20kg of pressure). The amount of
pressure is not as important as consistent
pressure every time.
As a guide to dose, the top edge of the metal
cap on the tamper should be level with
the top of the filter basket after the coffee
has been tamped.
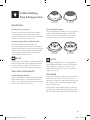
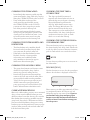
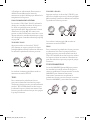
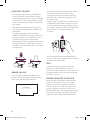
TRIMMING THE DOSE
The Razor™ precision dose trimming tool
allows you to trim the puck to the right level for
a consistent extraction.
the Razor
™
Precision dose trimming tool
• Insert the Razor™ dose trimming tool into
the filter basket until the shoulders of the tool
rest on the rim of the basket. The blade of
the dose trimming tool should penetrate the
surface of the tamped coffee.
• Rotate the Razor™ dose trimming tool back
and forth while holding the portafilter on
an angle over a knock box to trim off excess
coffee grinds. Your filter basket is now dosed
with the correct amount of coffee.
• Wipe excess coffee from the rim of the filter
basket to ensure a proper seal is achieved in
the group head.
TIP
If the extraction is too fast, make the grind
finer & repeat above steps. If the extraction is
too slow, make the grind coarser and repeat
above steps.
BES920_USC_IB_R20_FA.indd 20BES920_USC_IB_R20_FA.indd 20 21/5/20 9:40 am21/5/20 9:40 am
La page est en cours de chargement...
La page est en cours de chargement...
La page est en cours de chargement...
La page est en cours de chargement...
La page est en cours de chargement...
La page est en cours de chargement...
La page est en cours de chargement...
La page est en cours de chargement...
La page est en cours de chargement...
La page est en cours de chargement...
La page est en cours de chargement...
La page est en cours de chargement...
La page est en cours de chargement...
La page est en cours de chargement...
La page est en cours de chargement...
La page est en cours de chargement...
La page est en cours de chargement...
La page est en cours de chargement...
La page est en cours de chargement...
La page est en cours de chargement...
La page est en cours de chargement...
La page est en cours de chargement...
La page est en cours de chargement...
La page est en cours de chargement...
La page est en cours de chargement...
La page est en cours de chargement...
La page est en cours de chargement...
La page est en cours de chargement...
La page est en cours de chargement...
La page est en cours de chargement...
La page est en cours de chargement...
La page est en cours de chargement...
La page est en cours de chargement...
La page est en cours de chargement...
La page est en cours de chargement...
La page est en cours de chargement...
La page est en cours de chargement...
La page est en cours de chargement...
La page est en cours de chargement...
La page est en cours de chargement...
La page est en cours de chargement...
La page est en cours de chargement...
La page est en cours de chargement...
La page est en cours de chargement...
La page est en cours de chargement...
La page est en cours de chargement...
La page est en cours de chargement...
La page est en cours de chargement...
La page est en cours de chargement...
La page est en cours de chargement...
La page est en cours de chargement...
La page est en cours de chargement...
-
 1
1
-
 2
2
-
 3
3
-
 4
4
-
 5
5
-
 6
6
-
 7
7
-
 8
8
-
 9
9
-
 10
10
-
 11
11
-
 12
12
-
 13
13
-
 14
14
-
 15
15
-
 16
16
-
 17
17
-
 18
18
-
 19
19
-
 20
20
-
 21
21
-
 22
22
-
 23
23
-
 24
24
-
 25
25
-
 26
26
-
 27
27
-
 28
28
-
 29
29
-
 30
30
-
 31
31
-
 32
32
-
 33
33
-
 34
34
-
 35
35
-
 36
36
-
 37
37
-
 38
38
-
 39
39
-
 40
40
-
 41
41
-
 42
42
-
 43
43
-
 44
44
-
 45
45
-
 46
46
-
 47
47
-
 48
48
-
 49
49
-
 50
50
-
 51
51
-
 52
52
-
 53
53
-
 54
54
-
 55
55
-
 56
56
-
 57
57
-
 58
58
-
 59
59
-
 60
60
-
 61
61
-
 62
62
-
 63
63
-
 64
64
-
 65
65
-
 66
66
-
 67
67
-
 68
68
-
 69
69
-
 70
70
-
 71
71
-
 72
72


Breville the Dual Boiler Manuel utilisateur
- Catégorie
- Cafetières
- Taper
- Manuel utilisateur
dans d''autres langues
- English: Breville the Dual Boiler User manual
Documents connexes
-
Breville the Barista Express Le manuel du propriétaire
-
-
-
-
Breville BES870XL Manuel utilisateur
-
-
-
-
-
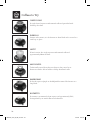
Autres documents
-
 BRG SES500BTR4GUK1 Manuel utilisateur
-
Sage BES920 Mode d'emploi
-
Sage SES875 - the Barista Express Le manuel du propriétaire
-
-
-
-
 MALONGO EK'OH! Le manuel du propriétaire
-
Ariel DZ938F8 Guide d'installation

