ClearSounds V608 Manuel utilisateur
- Catégorie
- Téléphones
- Taper
- Manuel utilisateur
Ce manuel convient également à

1 – ENGLISH
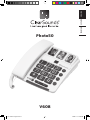
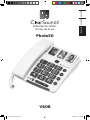
Photo50
V608
FRANCAIS ESPAÑOL ENGLISH
Photo50-TriLingual.indd 1 7/6/08 11:11:09 AM

2 – ENGLISH
3 – ENGLISH
Congratulations on your purchase of the Photo50 Phone from
ClearSounds Communications
®
. Please read this User Guide carefully
in order to get the very best results from your telephone. Keep the
manual near the telephone for easy reference.
Please visit our web site at www.clearsounds.com to: Register your
product, download additional manuals, and review trouble shooting
tips.
CAUTION: The Photo50 phone is capable of amplifying sounds to
a loud volume. It is important to instruct all potential users of its
proper operation. It is advised to adjust the volume control to its
minimum level when not in use and alert other users that hearing
damage can potentially result from misuse.
Important Safety Instructions
Follow basic safety precautions when using your telephone to reduce
the risk of fire, electric shock and injury to persons.
• Plugtheadapterintoanoutletthatiseasilyaccessibleandnear
the equipment.
• Keepyourphonedry;ifitgetswet,wipeitimmediately.
• Handleyourphonecarefully,DONOTdropit
• Keep your phone away from dust and dirt, and wipe it with a
dampclothoccasionallytokeepitlookingnew.Donotuseliquid
cleaners or aerosol cleaners on the phone.
• Donotusethisproductnearwater,forexample,nearabathtub,
washbowl, kitchen sink or laundry tub, in a wet basement or near
a swimming pool.
• Avoidusingthetelephoneduringelectricalstorms.Theremaybe
a remote risk of electric shock from lightning.
• Donotusethetelephoneifyoususpectagasleakinthearea.
DuetothenatureofVOIP/Broadbandtechnologyresultsmayvary
whenusedwithVOIP/Broadbandservice.
Photo50-TriLingual.indd 2 7/6/08 11:11:10 AM

2 – ENGLISH
3 – ENGLISH
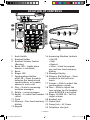
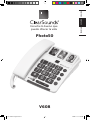
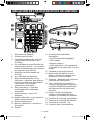
LOCATION OF CONTROLS
1 Hook Switch
2 Handset Holder
3 HandsetVolumeControl
(Booster)
4 BoostLED–Lightswhen
booster is activated.
5 Boost
6 RingerLED
7 SpeakerphoneButton
withLED–Presstoswitch
between the handset and
speakerphone, or to make,
answer or end a call.
8 Play – listen to answering
machine messages
9 Delete–erasemessages
10 Redial – to redial last number
called
11 Flash
12Memory–Two-touchmemory
dialing
13 Keypad
14 Answering Machine Controls
•On/Off
•Skip
•Repeat
•Store–Usedtoprogram
oneandtwo-touchmemory
dialing.
15MessageDisplay
16MemoryDialButtons–Store
numbers to dial with one
touch
17Volume–Slidetoadjustthe
speakerphone volume
18Tone–Slidetoadjustthe
tone volume for the handset
whenBOOSTERisactivated
19RingerLOMIDHI–Setthe
ringer volume
20 Headset Jack
21 Shaker Jack
22 Power Jack – AC Power
23TelephoneLineJack
Photo50-TriLingual.indd 3 7/6/08 11:11:11 AM

4 – ENGLISH
5 – ENGLISH
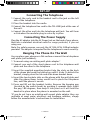
SET-UP
Connecting The Telephone
1 Connect the curly cord to the handset and to the jack on the left
side of the telephone.
2 Place the handset into the cradle.
3 ConnectthetelephonelinecordtotheTEL.LINEjackattherearof
the unit.
4 Connect the other end into the telephone wall jack. You will hear
a click when the modular plug is correctly in place.
Connecting The Power Supply
Plug the AC adapter into the AC Power Jack on the back of your phone,
then into a standard electrical outlet or surge protector, if you are
using one.
Note: For safety reasons, use only the AC120v DC9v 300mA adapter
provided. The adapter is required for the telephone to work correctly.
Hanging The Phone On The Wall
You can place your phone on a flat surface or mount it on a telephone
wallplate(notincluded).
1 Tomountusinganexistingwallplateadapter.*
2 Connect one end of the short phone cord to the telephone wall
plate and the other to the telephone
3 Insert the supplied mounting bracket into the slots on the back
ofthephoneandpushthebracketupuntilitclicks.Todetachthe
bracket, simply press the tab and slide down bracket down.
4 Insert the two keyhole slots on the phone with the wall plate and
slide the phone down, being careful not to pinch the telephone
line, until the phone is secure.
5 Press and lift out the handset holder. Remove the hanging peg
(locatedbytheswitchhook)bypushingitupwardsthenrotate
the peg 180 degrees, then snap it into place so it will hold the
handset in place when the phone is mounted on the wall.
*If you do not have an existing wall mount plate adapter they are
available at most major electronic and hardware retailers, simply
follow the manufacturer’s instructions for installation.
Photo50-TriLingual.indd 4 7/6/08 11:11:12 AM

4 – ENGLISH
5 – ENGLISH
OPERATION
Switching the Answering Machine On/Off
TheansweringmachinecanbeswitchedON/OFFusingthebutton.
In the ON position, incoming calls will be answered by the answering
machine, in the OFF position no calls will be answered and the display
will be off.
NOTE: Although turned Off, the Answering Machine will answer a
call after 10 rings. This is to allow some features to be accessed
remotely.
Using the telephone
1 Lift the handset and wait until you hear the dial tone.
2 Using the keypad, press the telephone number you wish to dial or
press the photo of the person you wish to call.
3 Toendthecallsimplyreplacethehandset.
Receiving calls
Whenyoureceiveacallyouwillhearthetelephonering.Thecallcan
now be accepted by lifting the handset.
Amplification & Receiver volume control
The receiver volume can be boosted up to +40dB max during a
conversation.Pressthe+40dBkey,andtheBoostLEDwilllight.
You can increase the handset volume by turning the volume control
wheel(locatedunderthehandset)tothelisteninglevel(1-9)
YoucanturnOFFtheBOOSTbypressingtheRED+40dBBoostkey
at anytime during your conversationthe BOOST LEDwill turn off
and the volume will return to normal level. After the call when you
replace the handset to the cradle, the boost volume will be reset to
normal automatically.
Note: If you do not need the additional amplification you do not
need to press the RED +40dB BOOST Button.
Tone control
If the volume has been boosted up, you can also adjust the tone
control. You can adjust and increase the low frequency or high
frequency sounds to suit your hearing needs.
Ringer
Theringervolumelevelcanbeadjustedbyslidingtheswitchonthe
rightsideoftheunittoselectLOMIDHI.
Photo50-TriLingual.indd 5 7/6/08 11:11:12 AM

6 – ENGLISH
7 – ENGLISH
Redial
Lift the handset and press the Redial button to redial the last number
(upto32digits).
MEMORY DIALING
This telephone has 3 One-Touch memory buttons. A picture or
symbol can be placed under the transparent cover on the speed dial
buttons so it is easy to see who you are calling.
Once a number has been stored in a memory location, you only need
to press one button to make the call.
Storing One-touch Memory Buttons
1 Lift the handset.
2 PresstheSTOREbutton.
3 Enter the telephone number to be stored.
4 PresstheSTOREbuttonagain.
5 Press Memory Button to store the number.
6 Replace the handset.
NOTE: Press the Redial button if you need to insert a pause in the
telephone number.
Dialing using One-touch Memory Buttons
1 Lift the handset and wait for a dial tone.
2 PresseitherM1-M3,Thestoredtelephonenumberwillnowbe
dialed.
Storing Two-touch Memory Buttons
ThePhoto50canstoreupto10phonenumbersusingtwo-touch
memory.
1 Lift the handset.
2 PresstheSTOREbutton.
3 Enter the telephone number to be stored.
4 PresstheSTOREbuttonagain.
5 Press0-9tostorethenumber.
6 Replace the handset.
NOTE: Press the Redial button if you need to insert a pause in the
telephone number.
Photo50-TriLingual.indd 6 7/6/08 11:11:12 AM

6 – ENGLISH
7 – ENGLISH
Dialing using two-touch Memory Buttons
1 Lift the handset and wait for a dial tone.
2 Press theMEMORY keyandmemorylocation(0-9),thestored
telephone number will now be dialed.
Flash
TheFLASHbuttoncanbeusedtoobtainanewdialtoneafterending
a call. If you subscribe to Call Waiting or three-way calling from
your local phone company you can use the FLASH button to switch
between calls.
Speakerphone
You can make outgoing or receive incoming calls by speakerphone.
Simply press the SPEAKERPHONE button and the sound will be
switchedtospeaker.TheSpeakerphoneLEDwilllight.
You can adjust speaker volume by setting the right side speaker
volume control.
To switch between the handset and the
speakerphone.
While on a call using the handset, press the Speaker Button and
replace the handset in the cradle.
While on a call using the speakerphone, simply lift the handset.
Headset (headset not included)
You can plug a 2.5mm headset instead of the speakerphone or
handset mode.
Tomakeoutgoingcalls and receive incoming calls, plug the headset
to the 2.5mm headset jack(locatedontheleftsideofthephone).
Press the Speakerphone button to get a dial tone.
Note: When using the headset the call is not amplified
Shaker (Shaker not included)
At the rear of the phone, there is a 3.5mm shaker jack. You can
connectanoptionalshakerdevice.Duringringing,theshakerwill
vibrate to alert you.
ANSWERING MACHINE OPERATION
The answering machine has to be turned on in order to receive
messages. When a call is received it will be answered after the
selectednumberofrings(seeAnsweringmachineset-up).
Photo50-TriLingual.indd 7 7/6/08 11:11:12 AM

8 – ENGLISH
9 – ENGLISH
When the answering machine answers an incoming call, the caller
will hear your outgoing message. After a short beep they can then
leave a message up to 2 minutes.
Shouldthecallerexceedthislimit,thecallwillbedisconnected.
The memory will store approximately 14 minutes of incoming
messages(includingtheoutgoingmessage).
Voice Control
Theansweringmachinewillrecordamessageupto2minutes.If
the caller stops speaking, the answering machine will disconnect
afterapproximately7seconds.
Outgoing Message
Beforeyouusetheansweringmachineyoushouldrecordanoutgoing
message.Theoutgoingmessageisyourmessagetoanincoming
caller and may be up to 60 seconds in length.
You may want the message to tell the caller that they may start
speaking once the beep is heard.
Recording an Outgoing Message
1 Press and hold REPEAT. You will hear a short beep, and the display
willshow rA. (HoldtheREPEAT keydown while recordingyour
message)
2 Record youroutgoing message (min 5 seconds). Speak clearly
towardsthemachinefromadistanceof6-8inches.
3 Release REPEAT to stop recording.
4 The outgoing message will be repeated after a few seconds.
Repeat this procedure if you want to change the message, any old
outgoing message will automatically be erased when a new one is
recorded.
Checking the Outgoing Message
Press REPEAT. Thecurrentoutgoingmessage will nowbeplayed.
PressON/OFFontheansweringmachine,tostopplayingtheOut
Going Message.
ANSWERING MACHINE SET-UP
Usethe2\6\TSswitchonthebottomofthephonetoselectafter
how many rings the unit will respond to an incoming call.
• 2=callsareansweredaftertworings.
• 6=callsareansweredaftersixrings.
• TS(TOLLSAVER)=activatesthetollsaverfunction.
Photo50-TriLingual.indd 8 7/6/08 11:11:12 AM

8 – ENGLISH
9 – ENGLISH
InTollSavermodeincomingcallsareansweredaftersixringsuntil
the first new message has been recorded. Once a message has been
recorded the answering machine will answer after approximately
two rings.
Thisisusefulwhentryingtoremotelyaccesstheansweringmachine;
if the answering machine has not answered at the fourth ring, no
messages have been recorded and you can hang up before you are
charged for the call.
If the machine answers after two rings new messages have been
recorded.
Setting the date and time
Press and hold the SKIPbuttonfor2seconds.Thesystemannounces
Sunday.
Press the SKIP button repeatedly until you hear the correct day of
the week.
Confirm by pressing the PLAY button, the system will announce “0”
Press the SKIP button repeatedly until you hear the correct time
Confirm by pressing the PLAY button, you will hear the minutes
currently set.
Press the SKIP button until you hear the correct minutes
announced.
Confirm by pressing the PLAY button and the complete day and time
will be announced.
You can check the day and time setting at any time by pressing the
SKIP button.
Note: In case of a power failure the date and time must be reset
Playback of messages
Thedisplayflashes to show how many newmessageshavebeen
received. If no new messages have been received the display shows
totalmessages(old).
Playbackwillalwaysbeginwithanynewmessages.Forexampleif
there are three old messages and two new ones, only the two new
ones will be played back, then the answering machine will return to
standby mode.
Press the play button once again to listen to all messages, starting
with the oldest messages.
1 Press PLAY to start playback. If you want to pause during playback
Photo50-TriLingual.indd 9 7/6/08 11:11:12 AM

10 – ENGLISH
11 – ENGLISH
of a message press the PLAY button and the message will pause
(max.7seconds).PressPLAY again to resume playback.
2 When playback is finished you will hear two short beeps, and the
machine will return to standby mode. All incoming messages are
saved(unlessyouhaveerasedanyduringplayback,seebelow),
new messages will then be recorded after the old ones.
The following functions are available during playback:
Button Function
SKIP Skiptonextmessage.
REPEAT Repeats the current message, or hold down until you
hear a beep to step back through the messages
ON/OFF Stop playback.
DELETE Erase messages.
Playback through handset receiver
(+40dB volume)
Toplaybackyourmessages,pick-upthehandsetandpressPLAY,now
youcanpressthe+40dBBOOSTkeytoboostthemessagevolume
to40dB.
Delete Incoming Messages
If you want to delete a single incoming message press DELETE while
the message is playing.
Toeraseallmessagesafterplayback,pressandholdDELETE until
unit beeps.
Please note that new messages cannot be deleted until they have
been played.
Call Screening
Incoming messages can be heard through the Speakerphone as they
are received. If there is no sound adjust the volume using the control
on the right side of the phone.
You can lift the handset to speak directly to the caller. If the recording
doesnotstopautomatically,pressON/OFFontheansweringmachine,
orpress*(2seconds)onthetelephone.
Checking your messages from a remote
location.
Thismachinecanberemotelycontrolledusingthekeysofanordinary
tone dialing telephone. Call up the answering machine and enter the
remote code while the outgoing message is playing. Once the code
is accepted, several remote control commands are available.
Photo50-TriLingual.indd 10 7/6/08 11:11:12 AM

10 – ENGLISH
11 – ENGLISH
Remote Code
Thisthree-digitremotecodeisrequiredinordertogainaccessto
theremotefunctionsoftheansweringmachine.Theremotecodeis
printed underneath the machine.
Remote Control
1 Call up the answering machine.
2 While the outgoing message is playing, enter the remote code. If
the code is accepted, you will hear two beeps.
3 Selectaremotecontrolcommand(within20seconds)frombelow.
4 When you have finished accessing the machine replace the handset.
Command Functions
25 ....................... Play new messages
2# ...................... Play all messages
During playback:
3# ...................... Erase single message during playback
6# ...................... Skip to previous message
7# ...................... Skiptonextmessage
8# ...................... Repeat message
## ..................... Stop playback
After playback:
3# ......................Erase all messages
7# ......................Record a new outgoing message, to Stop
recording press 7#again.
8# ......................Record a MEMO, to Stop recording press 8#
again.
9# ......................TurntheansweringmachineeitherOnorOff.
ThreebeepsindicateOff-TwobeepsindicateOn.
0# ......................Room monitor, press 5# to stop the room
monitoring.
NOTE: If the machine doesn’t respond correctly to the remote
control commands, try pressing the telephone buttons for a longer or
shorter time. In normal cases, the answering machine should react
to tones approximately 0.5 – 1 seconds in length, but longer tones
may be necessary. If you do not enter any remote control command,
the answering machine will disconnect after a few seconds.
If you listen to any incoming messages for more than 2 minutes and
Photo50-TriLingual.indd 11 7/6/08 11:11:12 AM

12 – ENGLISH
13 – ENGLISH
40 seconds, you will hear a tone. Press any key to continue.
Room Monitoring
ThisremoteaccessfeatureenablesyoutocallyourhomeandturnON
the answering machine’s microphone function, allowing you to monitor
sounds in the room where the answering machine is situated.
Turning the answering machine on from a
remote location
Theansweringmachinecanbeactivatedusingtheremotecontrol
functions.
1 Calluptheansweringmachine.Afterapproximately10rings,the
machine will answer and emit a long tone.
2 Enter the remote code, printed underneath the unit. If the code is
accepted, you will hear two short beeps.
3 Press9#.Twobeepsconfirmsthattheansweringmachineisnow
on. Replace the handset.
Out of Memory
The total capacity of the answering machine’s memory is
approximately14minutes.
The memory space is shared between the outgoing message,
personal memos, and regular incoming messages.
When the memory is full the display will show FL, the answering
machine will answer after 10 rings to allow remote playback and
deletion of messages, no new messages will be accepted until the
existingmessageshavebeenplayedanderased.
FCC WANTS YOU TO KNOW
This equipment complies with Part 68 of the FCC rules and the
requirementsadoptedbytheACTA.Onthebottomofthisequipment
is a label that contains, among other information, a product identifier
intheformatUS:AAAEQ##TXXXX.Ifrequested,thisnumbermust
be provided to the telephone company. An applicable certification
jacks Universal Service Order Codes (USOC)for theequipment is
provided(i.e.,RJ11C)inthepackagingwitheachpieceofapproved
terminal equipment
The RENis useful to determine the quantity ofdevices you may
connect to your telephone line and still have all of those devices ring
when your telephone number is called. In most, but not all areas,
the sum of the REN’s of all devices connected to one line should not
exceedfive(5.0).Tobecertainofthenumberofdevicesyoumay
Photo50-TriLingual.indd 12 7/6/08 11:11:12 AM

12 – ENGLISH
13 – ENGLISH
connect to your line, as determined by the REN, you should contact
yourlocaltelephonecompanytodeterminethemaximumRENfor
your calling area.
If your telephone equipment causes harm to the telephone network,
the telephone company may discontinue your service temporarily.
Ifpossible,theywillnotifyyouin advance.Butifadvance notice
isn’t practical, you will be notified as soon as possible. You will be
informed of your right to file a complaint with the FCC.
Your telephone company may make changes in its facilities, equipment,
operations, or procedures that could affect the proper functioning of
your equipment. If they do, you will be notified in advance to give
you an opportunity to maintain uninterrupted telephone service. If
youexperience troublewiththistelephoneequipment disconnect
from the network until the problem has been corrected or until you
are sure that the equipment is not malfunctioning.
Thisequipmentmaynot beusedoncoinserviceprovidedbythe
telephone company. Connection to party lines is subject to state
tariffs.Thisequipmentishearingaidcompatible.
Warning: Changes or modifications to this unit not expressly
approved by the party responsible for compliance could void the
user’s authority to operate the equipment.
Note: This equipment has been tested and found to comply with
the limits for a Class B digital device, pursuant to Part 15 of
the FCC Rules. These limits are designed to provide reasonable
protection against harmful interference in a residential installation.
Some cordless telephones operate at frequencies that may cause
interference to nearby TV’s and VCR’s; to minimize or prevent
such interference, the base of the cordless telephone should not
be placed near or on top of a TV or VCR; and, if interference is
experienced, moving the cordless telephone farther away from the
TV or VCR will often reduce or eliminate the interference. However,
there is no guarantee that interference will not occur in a particular
installation. If this equipment does cause harmful interference to
radio or television reception, which can be determined by turning
the equipment off and on, the user is encouraged to try to correct
the interference by one or more of the following measures:
• Reorientorrelocatethereceivingantenna.
• Increasetheseparationbetweentheequipmentandreceiver.
• Connecttheequipmentintoanoutletonacircuitdifferentfrom
that to which the receiver is connected.
• ConsultthedealeroranexperiencedradioTVtechnicianforhelp.
Photo50-TriLingual.indd 13 7/6/08 11:11:12 AM

14 – ENGLISH
15 – ENGLISH
INDUSTRY CANADA CS03 STATEMENT
This product meets the applicable Industry Canada technical specifications.
Thisisconfirmedbytheregistrationnumber.Theabbreviation,ICbeforethe
registration number signifies that registration was performed based on a
DeclarationofConformityindicatingthatIndustryCanadatechnicalspecifications
were met. It does not imply that Industry Canada approved the equipment.
Beforeinstallingthisequipment,usersshouldensurethatitispermissible
to be connected to the facilities of the local telecommunications company.
The equipment must also be installed using an acceptable method of
connections.Thecustomershouldbeawarethatcompliancewiththeabove
conditions may not prevent degradation of service in some situations.
Repairs to certified equipment should be made by an authorized Canadian
maintenance facility designated by the supplier. Any repairs or alterations
made by the user of this equipment, or equipment malfunctions, may give
the telecommunications company cause to request the user to disconnect
the equipment.
WARNING! Users should not attempt to make such connections themselves,
but should contact the appropriate electric inspection authority, or an
electrician, as appropriate.
CAUTION: The Ringer Equivalence Number (REN) assigned to each terminal
device provides an indication of the maximum number of terminals allowed
to be connected to a telephone interface.
Theterminationonaninterfacemayconsistofanycombinationofdevices
subject only to the requirement that the sum of the Ringer Equivalence
Numbersofallthedevicesdoesnotexceed5.Analternativeindicationof
theRENistheLoadNumber(LN);thisnumbershouldbedividedby20to
approximatetheequivalentREN.TheRENNumberofthisunitisindicated
on the bottom of your answering machine.
If your home has specially wired alarm equipment connected to the
telephone line, ensure the installation of Photo50 does not disable your
alarm equipment. If you have questions about what will disable alarm
equipment, consult your telephone company or a qualified installer.
ThisClassBdigitalapparatuscomplieswithCanadianICES-003.
LIMITED ONE-YEAR WARRANTY
The product is warranted by ClearSounds against manufacturing
defectinmaterialandworkmanshipundernormaluseforone(1)
yearfromthedateofpurchase.Shouldyouexperienceaproblem,
contact our customer service department or visit our website at
www.clearsounds.com.
Photo50-TriLingual.indd 14 7/6/08 11:11:12 AM

14 – ENGLISH
15 – ENGLISH
Besuretosaveyoursalesreceiptasproofofpurchasedateshould
you need warranty service.
Within a period of one year from purchase date, ClearSounds
Communications
®
willrepairorreplace(ourdiscretion)yourphone,
if a defect in materials or workmanship is found. If we elect to replace
your phone, we may replace it with a new or reconditioned product of
the same or similar design. Repair or replacement will be warranted
for a period of 90 days or the remainder of the warranty period (from
originalpurchasedate),whicheverislonger.
Thewarrantydoesnotcoveraccidents,negligenceorbreakagetoany
parts.Thisincludesshippingdamage,failuretofollowinstructions,
misuse, fire, floods, use of incompatible accessories, Acts of God
orfailureinyourphoneservicecarrier’slineservice.Theproduct
must not be tampered with or taken apart by anyone who is not an
authorized ClearSounds Communications
®
representative.Tampering
with the phone will void any written or implied warranties.
Photo50-TriLingual.indd 15 7/6/08 11:11:13 AM

16 – ENGLISH 1 – ESPAÑOL
IMPORTANT: YOUR RECEIPT IS PART OF YOUR WARRANTY AND MUST
BE RETAINED AND PRODUCED IN THE EVENT OF A WARRANTY CLAIM.
ServiceinUnitedStates ServiceinCANADA
ClearSounds Communications ClearSounds Canada
Attention: Repair Center Attention: Repair Center
8160SMadisonStreet 220DonaghyAve
BurrRidge,IL60527 NorthVancouver,BC
USA CANADAV7P2L5
800-965-9043 800-965-9043
Check our website www.Clearsounds.Com for additional information
and to download additional manuals and information.
Photo50-TriLingual.indd 16 7/6/08 11:11:13 AM

16 – ENGLISH 1 – ESPAÑOL
Photo50
V608
Escuche lo bueno que
puede ofrecer la vida
FRANCAIS ESPAÑOL ENGLISH
Photo50-TriLingual.indd 1 7/6/08 11:11:14 AM

2 – ESPAÑOL
3 – ESPAÑOL
Felicitaciones por la compra de su teléfono Photo50 de ClearSounds
Communications
®
.Paraaprovecharalmáximotodaslasfuncionalidades
de su teléfono, le recomendamos leer detenidamente esta guía de
uso.Tengaelmanualcercadelteléfonoparaconsultarloencualquier
momento.
En nuestro sitio web www.ClearSounds.com usted podrá registrar su
producto, descargar manuales complementarios y encontrar consejos
para la identificación y resolución de problemas.
PRECAUCIÓN: El teléfono Photo50 puede amplificar el volumen del
sonido. Es importante que todos los posibles usuarios conozcan
cómo manejar este aparato correctamente. Se recomienda poner el
volumen del teléfono en el nivel mínimo cuando el aparato no esté
en uso y advertir a los demás usuarios que su uso inadecuado podría
provocar lesiones auditivas.
Medidas de seguridad importantes
Al usar su teléfono, siempre tome las precauciones de seguridad
mínimas para reducir el riesgo de incendio, descargas eléctricas y
lesiones personales.
• Conecteeladaptadorenuntomacorrientedefácilacceso,ubicado
cerca del aparato.
• Mantengasecosuteléfono;sisemoja,séqueloinmediatamente.
• Seacuidadosoalmanipularsuteléfono,EVITElascaídas.
• Eviteexponerloalpolvoylasuciedad,ypáseleuntrapohúmedo
periódicamente para evitar que se deteriore. No aplique al teléfono
limpiadores líquidos o en aerosol.
• No utilice este aparato cerca de agua, por ejemplo, en las
proximidades de una tina debaño,lavabo, lavaderodecocina,
tina de lavar ropa, en un sótano con humedad o cerca de una
piscina.
• Tratedenoutilizarelteléfonodurantetormentaseléctricas.Existe
laremotaposibilidaddequealgúnrayoorelámpagoprovoque
una descarga eléctrica.
• Noutiliceelteléfonosisospechaquehayunescapedegasenel
área donde usted se encuentra.
DebidoalascaracterísticasdelatecnologíaVOIP/bandaancha,los
resultados pueden variar cuando el aparato se utilice con un servicio
deVOIP/bandaancha.
Photo50-TriLingual.indd 2 7/6/08 11:11:14 AM

2 – ESPAÑOL
3 – ESPAÑOL
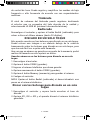
UBICACIÓN DE LOS DISPOSITIVOS DE CONTROL
1 Interruptor de llamada
2 Soporte para auricular
3 Control del volumen del auricular
(amplificador del volumen del
auricular)
4 Luz indicadora de amplificación del
volumen del auricular – se enciende
cuando el amplificador del volumen
del auricular está activado
5 Amplificación del volumen del
auricular
6 Luz indicadora del timbrado
7 Botóndelaltoparlanteconluz
indicadora – oprímalo para alternar
entre el auricular y el altoparlante,
o para hacer una llamada,
contestarla o terminarla
8 Play(reproducir)–escuchar
los mensajes del contestador
automático
9 Delete(borrar)–borrarlos
mensajes
10 Redial(rediscado)–pararepetirel
últimonúmerodiscado.
11 Flash(transferencia)
12 Memory(Memoria)–discadoen
dos toques
13 Teclado
14 Controles del contestador
automático
•On/Off(encendido/apagado)
•Skip(saltar)
•Repeat(repetir)
•Store(guardar)–paraprogramar
el discado en un solo toque y en dos
toques
15 Cantidad de mensajes nuevos
16 Botonesdediscadoenunsolo
toque–guardelosnúmerospara
discarlos con un solo toque
17 Volumen–deslícelopararegularel
volumen del altoparlante
18 Tono-deslícelopararegularel
volumen del tono para el auricular
cuandoelBOOSTER(amplificador
delvolumendelauricular)esté
activado
19 RingerLOMIDHI(timbrado
mínimo/intermedio/máximo)–
configure el volumen del timbrado
20 Terminaldeconexióndeaudífonos
21 Terminaldeconexióndelvibrador
22 Terminaldeconexión–CA
23 Conexiónparalíneatelefónica
Photo50-TriLingual.indd 3 7/6/08 11:11:15 AM

4 – ESPAÑOL
5 – ESPAÑOL
CONFIGURACIÓN
Cómo conectar el teléfono
1 Conecteelcableenespiralalauricularyalterminaldeconexión
que se encuentra del lado izquierdo del teléfono.
2 Coloque el auricular en la base.
3 ConecteelcabletelefónicoenelterminaldeconexiónTEL.LINE
que se encuentra en la parte posterior del aparato.
4 Conecte el otro extremo a la roseta telefónica de la pared.
Se escuchará un clic cuando el enchufe esté correctamente
conectado.
Cómo conectar la fuente de alimentación
Enchufe el adaptador de CA en la conexión para CA en la parte
posterior del teléfono y luego en un tomacorriente estándar o en un
estabilizador de tensión, si se está utilizando uno.
Nota: Por razones de seguridad, use únicamente el adaptador de
300 miliamperios de 120 voltios de CA/9 voltios de CC que viene
con el aparato. El teléfono requiere el adaptador para funcionar
correctamente.
Cómo colgar el teléfono en la pared
Puede colocar el teléfono sobre una superficie plana o instalarlo
sobreunaplacaparamontajeenlapared(noincluida).
1 Para montar el teléfono sobre una placa adaptadora para montaje
enlaparedyainstalada*.
2 Conecte un extremo del cable telefónico corto a la placa para
montaje en la pared y la otra al teléfono.
3 Inserte el soporte de montaje que viene con el aparato en las
ranuras de la parte posterior del teléfono y empuje el soporte
hasta que encaje firmemente. Para retirar el soporte, simplemente
oprima la lengüeta y deslice el soporte hacia abajo.
4 Inserte los dos orificios en forma de ojo de cerradura del teléfono
sobre la placa para montaje en la pared y deslice el teléfono hacia
abajo, con cuidado de no aplastar la línea telefónica, hasta que el
aparato quede firme.
*Si no tiene una placa adaptadora para montaje en la pared ya
instalada, puede adquirirla en la mayoría de las tiendas de artículos
electrónicos y ferreterías. Simplemente siga las instrucciones del
fabricante para instalarla.
5 Oprima y levante el dispositivo de soporte del auricular. Retire
laclavija paracolgar(ubicadajunto al interruptordellamada)
Photo50-TriLingual.indd 4 7/6/08 11:11:16 AM
La page est en cours de chargement...
La page est en cours de chargement...
La page est en cours de chargement...
La page est en cours de chargement...
La page est en cours de chargement...
La page est en cours de chargement...
La page est en cours de chargement...
La page est en cours de chargement...
La page est en cours de chargement...
La page est en cours de chargement...
La page est en cours de chargement...
La page est en cours de chargement...
La page est en cours de chargement...
La page est en cours de chargement...
La page est en cours de chargement...
La page est en cours de chargement...
La page est en cours de chargement...
La page est en cours de chargement...
La page est en cours de chargement...
La page est en cours de chargement...
La page est en cours de chargement...
La page est en cours de chargement...
La page est en cours de chargement...
La page est en cours de chargement...
La page est en cours de chargement...
La page est en cours de chargement...
La page est en cours de chargement...
La page est en cours de chargement...
La page est en cours de chargement...
La page est en cours de chargement...
La page est en cours de chargement...
La page est en cours de chargement...
-
 1
1
-
 2
2
-
 3
3
-
 4
4
-
 5
5
-
 6
6
-
 7
7
-
 8
8
-
 9
9
-
 10
10
-
 11
11
-
 12
12
-
 13
13
-
 14
14
-
 15
15
-
 16
16
-
 17
17
-
 18
18
-
 19
19
-
 20
20
-
 21
21
-
 22
22
-
 23
23
-
 24
24
-
 25
25
-
 26
26
-
 27
27
-
 28
28
-
 29
29
-
 30
30
-
 31
31
-
 32
32
-
 33
33
-
 34
34
-
 35
35
-
 36
36
-
 37
37
-
 38
38
-
 39
39
-
 40
40
-
 41
41
-
 42
42
-
 43
43
-
 44
44
-
 45
45
-
 46
46
-
 47
47
-
 48
48
-
 49
49
-
 50
50
-
 51
51
-
 52
52


ClearSounds V608 Manuel utilisateur
- Catégorie
- Téléphones
- Taper
- Manuel utilisateur
- Ce manuel convient également à
dans d''autres langues
- English: ClearSounds V608 User manual
- español: ClearSounds V608 Manual de usuario
Documents connexes
-
ClearSounds IL95 Le manuel du propriétaire
-
-
-
-
-
-
-
-
-