Hoover HOZ7173IN WF/E Manuel utilisateur
- Taper
- Manuel utilisateur

PROPERTY OF
CL N° REV. DATE
SPECIFICATION
1/1
MODIFY DESCRIPTION
MODIFIED BY
BASE CODE
TREATMENT
MATERIAL
DATE SIGNATURE
DRAWN
CHECKED
FOR
WEIGHT SCALE
SIZE
NAME
(LOCAL LANGUAGE)
PART CODE
SHEET
REPLACE No ORIGIN CL No Class Specification
FR
RELEASE LEVEL
WITHOUT OUR WRITTEN CONSENT IS FORBIDDEN
ALL RIGHTS RESERVED, THE REPRODUCTION OF ANY PART
OF EU DIRECTIVE 2002/95/CE + AMENDMENTS
MATERIALS IN COMPLIANCE WITH REQUIREMENTS
A5
------------
14.05.2019
KULLANMA KILAVUZU H HNFTF08
55196
14.05.2019
Y.GÜLTÜRK
-
USER MANUAL H HNFTF08
HOOVER OVEN
GENERAL TOLERANCE
ISO 2768 - m
-
-
SC 000-000
PRODUCTION RELEASED
------------
A
B
C
D
E
42831714
70 gr/m
2
PAPER TECHNICAL DATA SHEET / KAĞIT MALZEMESİ

USER INSTRUCTIONS
OVENS
NOTICE D'EMPLOI ET D'INSTALLATION
DES FOURS ENCASTRABLES
MANUALE D’ISTRUZIONI
FORNO
INSTRUCCIONES DE USO
HORNOS EMPOTRABLES
BEDIENUNGSANLEITUNG
BACKOFEN
KULLANIM KILAVUZU
FIRINLAR
POKYNY PRO UŽIVATELE
TROUBY
EN
FR
02
17
IT
ES
33
48
DE
64
TR
CZ
79
97
• HOZ7173 WIFI
• HOZ7173 WF/E
CANDY HOOVER GROUP S.R.L. • Via Comolli 16 • 20861 Brugherio (MB) - Italy
ΦΟΥΡΝΟΙ
ΟΔΗΓΙΕΣ ΧΡΗΣΗΣ
EA
113
PL
INSTRUKJA OBSŁUGI
PIEKARNIKI DO ZABUDOWY
129

Safety Indications
• Avoid leaving food inside the oven after cooking for more than 15/20
minutes.
• During cooking, moisture may condense inside the oven cavity or on
the glass of the door. This is a normal condition. To reduce this effect,
wait 10-15 minutes after turning on the power before putting food
inside the oven. In any case, the condensation disappears when the
ovenreaches the cookingtemperature.
• Cookthe vegetablesin acontainer with a lid instead of an open tray.
• WARNING: the accessible parts can become hot when the oven is in
use. Childrenmust be kept at a safe distance.
• WARNING: ensure that the appliance is switched off before replacing
the bulb, to avoidthe possibility of electric shocks.
- Clean the oven door;
- Remove large or coarsefood residues from the inside of the oven using
a damp sponge. Do not use detergents;
- Remove all accessories and the sliding rack kit (wherepresent);
- Do not place tea towels
• In ovens with meat probe it is necessary, before making the cleaning
cycle, close the hole with the nut provided. Always close the hole with
the nut when the meat probe is not used.
• Children must not play with the appliance. The appliance can be used
by those aged 8 or over and by those with limited physical, sensorial or
mental capacities, without experience or knowledge of the product,
only if supervised or provided with instruction as to the operationof the
appliance, in a safe way with awareness of the possible risks.
• Do not use rough or abrasive materials or sharp metal scrapers to
clean the oven door glasses, as they can scratch the surface and cause
the glass to shatter.
• The oven must be switched off before removing the removable parts
and, aftercleaning, reassemble them accordingthe instructions.
• WARNING: the appliance and accessible parts become hot during use.
Be careful not to touch any hot parts.
• Children under 8 must be kept at a safe distance from the appliance if
not continuouslysupervised.
• Only use the meat proberecommended for this oven.
• WARNING: beforeinitiating the automaticcleaning cycle:
• Cleaning and maintenance should not be carried out by unsupervised
children.
EN 02

• Do not use a steamcleaner forcleaning operations.
• Connect a plug to the supply cable that is able to bear the voltage,
current and load indicated on the tag and having the earth contact. The
socket must be suitable for the load indicated on the tag and must be
having the earth contact connected and in operation. The earth
conductoris yellow-green in colour. This operation should be carried out
by a suitably qualified professional. In case of incompatibility between
the socket and the appliance plug, ask a qualified electrician to
substitute the socket with another suitable type. The plug and the
socket must be conformed to the current norms of the installation
country. Connection to the power source can also be made by placing an
omnipolar breaker between the appliance and the power source that
can bear the maximum connected load and that is in line with current
legislation. The yellow-green earth cable should not be interrupted by
the breaker. The socket or omnipolar breaker used for the connection
should be easily accessible when the appliance is installed.
• The disconnection may be achieved by having the plug accessible or
by incorporating a switch in the fixed wiring in accordance with the
wiring rules.
• The type of power cable must be H05V2V2-F.
• Failure to comply with the above can compromise the safety of the
appliance and invalidatethe guarantee.
• The appliance must not be installed behind a decorative door in order
toavoidoverheating.
• If the power cable is damaged, it must be substituted with a cable or
special bundle available from the manufacturer or by contacting the
customer service department.
• When you place the shelf inside, make sure that the stop is directed
upwards and in the back of the cavity.
• During the pyrolytic cleaning process, surfaces can heat up more than
usual, childrenmust therefore be kept at a safe distance.
The shelf must be inserted completelyintothe cavity
• WARNING: Do not line the oven walls with aluminum foil or single-use
protection available from stores. Aluminum foil or any other protection,
in direct contact with the hot enamel, risk melting and deteriorating the
enamel of the insides.
• Anyexcess of spilled material should be removedbefore cleaning.
• WARNING: Never removethe oven door seal.
• No additional operation/setting is required in order to operate the
appliance at the rated frequencies.
EN 03

Summary
EN 04
General Instructions
5
1.1 Safety indications
1.2 Electrical safety
1.3 Recommendations
1.4 Installation
1.5 Waste management
1.6 Conformity declaration
2.1 Overview
2.2 Accessories
2.3 First use
Product Description
7
3.1 Display description
3.2 Cooking modes
Use of the Oven
8
4.1 General notes on cleaning
4.2 Steam cleaning
4.3 Maintenance
• Removal and cleaning of grills
• Removal of the oven window
• Removal and cleaning of the glass
door
• Changing the bulb
Oven Cleaning and Maintenance
13
5.1 F.A.Q.
Troubleshooting
16

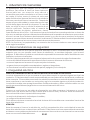
1. General Instructions
We thank you for choosing one of our products. For the
best results with your oven, you should read this
manual carefully and retain it for future reference.
Before installing the oven, take note of the serial
number so that you can give it to customer service staff
if any repairs are required. Having removed the oven
from its packaging, check that it has not been damaged
during transportation. If you have doubts, do not use
the oven and refer to a qualified technician for advice.
Keep all of the packaging material (plastic bags,
polystyrene, nails) out of the reach of children. When
the oven is switched on for the first time, strong
smelling smoke can develop, which is caused by the glue on the insulation panels surrounding the oven
heating for the first time. This is absolutely normal and, if it occurs, you should wait for the smoke to
dissipate before putting food in the oven. The manufacturer accepts no responsibility in cases where
the instructions contained in this document are not observed.
NOTE: the oven functions, properties and accessories cited in this manual will vary, depending on the
model you havepurchased.
1.1 Safety Indications
The use of anyelectricalapplianceimplies the observance of some fundamental rules:
Only use the oven for its intended purpose, that is only for the cooking of foods; any other use, for
example as a heat source, is considered improper and therefore dangerous. The manufacturer cannot
be held responsible foranydamageresultingfrom improper, incorrector unreasonableusage.
- do not touchthe appliance with wet or damp hands or feet;
- in general the use of adaptors, multiplesockets and extensioncablesis not recommended;
- in case of malfunction and/orpoor operation,switch offtheappliance and do nottamperwith it.
- do not pull on the power cable to disconnect the plug fromthesocket;
1.2 Electrical Safety
- power voltageindicated on the gauge;
WARNING
The oven is supplied with a power cable that should only be connected to an electrical supply with 220-
240 Vac 50 Hz power between the phases or between the phase and neutral. Before the oven is
connectedtotheelectricalsupply, it is important to check:
Before connecting the oven to the powersupply, ask a qualified electrician to check the continuity of the
power supply's earth terminal. The manufacturer accepts no responsibility for any accidents or other
problems caused by failure to connect the oven to the earth terminal or by an earth connection that has
defective continuity.
CONNECTION
ENSURE THAT AN ELECTRICIAN OR QUALIFIED TECHNICIAN MAKES THE ELECTRICAL CONNECTIONS.
The power supply to which the oven is connected must conform with the laws in force in the country of
installation.The manufactureracceptsno responsibility forany damage caused by the failuretoobserve
these instructions. The oven must be connected to an electrical supply with an earthed wall outlet or a
disconnector with multiple poles, depending on the laws in force in the country of installation. The
electrical supply should be protected with suitable fuses and the cables used must have a transverse
section that can ensure correctsupplytothe oven.
- the setting of the disconnector.
The grounding wire connected to the oven's earth terminal must be connected to the earth terminal of
the power supply.
EN 05

1.3 Recommendations
Do not line the oven walls with aluminium foil or single-use protectionavailable from stores. Aluminium
foil or any other protection, in direct contact with the hot enamel, risks melting and deteriorating the
enamel of the insides. In order to prevent excessive dirtying of your oven and the resulting strong
smokey smells, we recommend not using the oven at very high temperature. It is better to extend the
cooking time and lower the temperature a little. In addition to the accessories supplied with the oven,
we advise you only use dishes and baking moulds resistant toveryhigh temperatures.
Aftereach use of the oven,a minimum of cleaning will help keepthe ovenperfectly clean.
1.4 Installation
The oven can be located high in a column or under a worktop. Before fixing, you must ensure good
ventilation in the oven space to allow proper circulation of the fresh air required for cooling and
protecting the internalparts. Make the openings specifiedon last page accordingtothe type of fitting.
The manufacturers have no obligation to carry this out. If the assistance of the manufacturer is required
to rectify faults arising from incorrect installation, this assistance is not covered by the guarantee. The
installation instructions for professionally qualified personnel must be followed. Incorrect installation
may cause harm or injury to people, animals or belongings. The manufacturer cannot be held
responsiblefor such harm or injury.
NOTE: as the oven could require maintenance work, it is advisable to keep another wall socket available
so that the oven can be connected to this if it is removed from the space in which it is installed. The
power cable must only be substituted by technical service staff or by technicians with equivalent
qualifications.
1.5 Waste management and environmental protection
- the WEEE should not be treatedas domestic waste;
- the WEEE should be taken to dedicated collection areas managed by the town council or a registered
company.
SAVING AND RESPECTINGTHE ENVIRONMENT
Where possible, avoid pre-heating the oven and always try to fill it. Open the oven door as infrequently
as possible, because heat from the cavity disperses every time it is opened. For a significant energy
saving, switch off the oven between 5 and 10 minutes before the planned end of the cooking time, and
use the residual heat that the ovencontinues togenerate.Keeptheseals clean and in order, to avoid any
heat dispersal outside of the cavity. If you have an electric contract with an hourly tariff, the "delayed
cooking" programme makes energy saving more simple, moving the cooking process to start at the
reducedtariff time slot.
In many countries, domestic collections may be available for large WEEEs. When you buy a new
appliance, the old one can be returned to the vendor who must accept it free of charge as a one-off, as
long as the applianceis of an equivalent type and has the same functions as the purchasedappliance.
This appliance is labelled in accordance with European Directive 2012/19/EU regarding
electric and electronic appliances (WEEE). The WEEE contain both polluting substances
(that can have a negative effect on the environment) and base elements (that can be
reused). It is important that the WEEE undergo specific treatments to correctly removeand
dispose of the pollutants and recover all the materials. Individuals can play an important
role in ensuring that the WEEE do not become an environmental problem; it is essential to
follow a fewbasic rules:
1.6 Declaration of compliance
The parts of this appliance thatmaycomeintocontact with foodstuffscomply with the provisions of EEC
Directive89/109.
By placing the mark on this product,we are confirming compliance to all relevant European safety,
health and environmental requirementswhich areapplicablein legislation forthisproduct.
EN 06

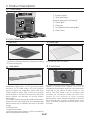
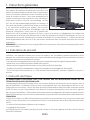
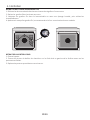
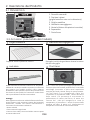
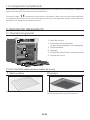
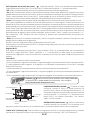
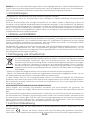
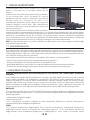
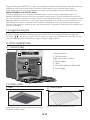
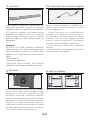
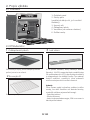
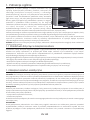
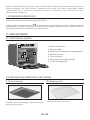
2. Product Description
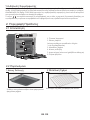
2.1 Overview
1
2
3
5
4
6
1. Control panel
2. Shelf positions
(lateral wire grid if included)
3. Metal grill
4. Drip pan
5. Fan (behind the steel plate)
6. Oven door
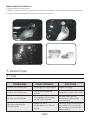
2.2 Accessories
Drip pan
1
Collects the residues that drip during the cooking
of foodson the grills.
EN 07
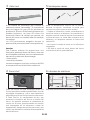
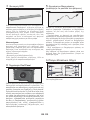
3
Led vision
-Long lifeillumination
Is an illumination system which replaces the
traditional « light bulb ». 14 LED (for non-pyrolitic
versions) or 10 High Power LED (for pyrolitic
versions) lights are integrated within the door.
These produce white high quality illumination
which enables to view the inside of the oven with
clarity without any shadows on all the shelves.
Advantages :
-Optimum view
-Very low energy consumption,-95% in comparison
with the traditional illumination.
This system, besides providing excellent illumination
inside the oven, lasts longer than the traditional light
bulb its easier and to maintain and most of all saves
energy.
Metal grill
2
Holds baking trays and plates.
All ovens with this technology boast a function
typical of professional models, the fruit of
innovative technologies and the vast experience
acquired by the Candy Hoover Group in this
sector. The Chef Panel is an air conveyor that
increases air circulation inside the oven. This
allows for an increase in oven cooking
performance, more standard cooking of food at
all temperatures, shorter cooking times and,
lastly, a uniform temperature distribution inside
the oven.
4
Chef Panel

EN 08
2.3 First Use
PRELIMINARYCLEANING
Clean the oven before using for the first time. Wipe over external surfaces with a damp soft cloth. Wash
all accessories and wipe inside the oven with a solution of hot water and washing up liquid. Set the
empty oven to the maximum temperature and leave on for about 1 hour, this will remove any lingering
smells of newness.
3. Use of the Oven
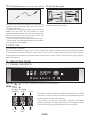
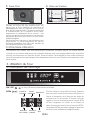
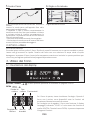
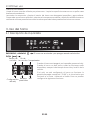
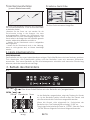
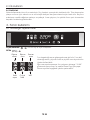
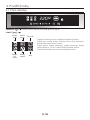
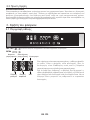
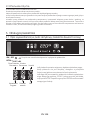
3.1 Display description
Cooking
duration
Cooking
end
Timer
Clock
set
Child
lock
WiFi
ON / OFF
EXTRA
The oven is switched on and off with this button.
If the clock is not set, the oven does not work: the display
flashes, showing "12:00" and the only functioning key is Extra.
Fromthe Extrakey, the followingfunctionscanbe set:
If the oven is switched off, the display shows the clock. When
the oven is inactive, all the functions are available except the
cookingduration and end of cooking.
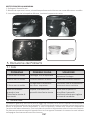
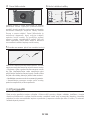
Measuresthe internal temperature of food during
cooking. Insert the meat-probe into the hole on
the top of the cavity.
– Do not insert the meat probe in the frozen food.
– Do not leave the meat probe inside the oven when
it's not used: it could damage.
– Prepare the food and properly insert the meat
probe into the food. Do not preheat or start
cooking before properlyinserting the meatprobe.
Probe should be inserted into the food and
receptacle while the ovenisstillcool.
5
Meat-probe (depends on the oven model)
Lateral wiregridif included.
6
Lateral wire grids

NB: can only be set with
an active cooking
programme.
Press EXTRA twice and set
the time using the “+” and
“-” keys, confirming by
pressing "SELECT".
The display shows “00:00”
if no cooking duration has
been inserted, otherwise
the display shows the time
remaining.
When a cooking
programme terminates, the
oven switches off while the
display shows "END" (the
cooking programme icon
remains on) until the
On/Off button, the only
functioning key, is pressed.
When a cooking
programme terminates, an
alarm will sound.
When the cooking time has
finished, the oven
automatically switches off
and the alarm sounds for a
few seconds.
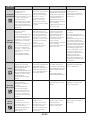
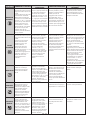
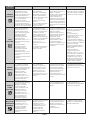
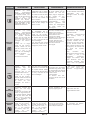
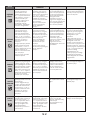
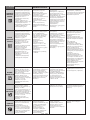
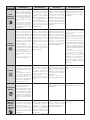
FUNCTION HOW TO DEACTIVATE WHAT IT DOES WHY IT IS NEEDED
END OF
COOKING
COOKING
DURATION
SETTING
THE CLOCK
TIMER
HOW TO USE
Press EXTRA enough times
to illuminate the icon, set
the end of cooking time
using the “<” and “>” keys
and confirm by pressing
"SELECT".
Press EXTRA enough times
to illuminate the icon, set
the end of cooking time
using the “<” and “>” keys
and confirm by pressing
"SELECT".
The cooking duration is
automatically calculated.
NB: can only be set with
an active cooking
programme.
•This function is also used for
cooking that can be scheduled
in advance.
•If a cooking programme is
set, it will be lost if the "F" key
is pressed.
•If a cooking programme is
set, by pressing the “<” and
“>” keys you can see and
modify the temperature set:
at the first touch, the
operating temperature is
shown while another touch
will allow you to modify said
temperature.
•If delayed cooking is set, the
oven switches off and the
display shows the current time
while the cooking programme,
cooking duration and end of
cooking icons are illuminated.
To modify the end of
cooking before the set
time, press EXTRA enough
times to illuminate the
icon, regulate the end of
cooking time as required
using the “<” and “>” keys
and confirm by pressing
"SELECT".
To cancel the end of
cooking time, reset the
display to “00:00”.
When a cooking
programme terminates,
the oven switches off
while the display shows
"END" (the cooking
programme icon remains
on) until the On/Off
button, the only
functioning key, is pressed.
When a cooking
programme terminates, an
alarm will sound.
•This function is useful
when there are children in
the house.
•Press the EXTRA key
enough times to
illuminate the icon and
then either the “<” or “>”
key to activate this
function: the display will
show ON; to confirm
press SELECT.
•Press the EXTRA key
enough times to
illuminate the icon and
then either the “<” or “>”
key to deactivate this
function: the display will
show OFF; to confirm
press SELECT.
•If the function is active
only the "Extra" button,
to deactivate the
function, and "On/Off"
button can be used.
•The alarm functions
regardless of whether the
oven is switched on.
•To modify the time,
press EXTRA enough
times to illuminate the
icon and use the “<” and
“>” keys to set the time,
confirming it by pressing
SELECT.
•Switched on for the first
time, the display
illuminates and shows
"12:00".
•It allows you to set the
time that appears on the
display.
Press EXTRA enough times
to illuminate the icon and
use the “<” and “>” keys
to set the time,
confirming by pressing
SELECT.
•The display shows
“00:00” if no time has
been inserted or the time
remaining if this has
already been set.
•To modify the timer,
press EXTRA enough times
to illuminate the icon,
regulate the cooking time
as required using the “<”
and “>” keys and confirm
by pressing "SELECT".
You can select a time
between 00:00 and 23:59.
•This function activates an
alarm that sounds for a
few seconds when the set
time expires (this function
does not switch the oven
off).
• The timer functions
regardless of whether the
oven is switched on.
•To cancel the cooking
duration, reset the display
to “00:00”.
•To modify cooking before
the set time, press EXTRA
twice and regulate the
cooking time as required
using the “<” and “>”
keys, before pressing
"SELECT" once more.
CHILD
SAFETY
EN 09

LANGUAGE SETTING The language can be set when
the oven is switched off by pressing the Extra and Select
buttonssimultaneously and for 3". The current language is
shown on the display and can be changed by pressing the
“<” or “>” keys, confirming it by pressing SELECT. Available
languages are:Italian,English,Frenchand German.
“HOT” ICON When a cooking programme finishes or when the oven switches off, if the oven is still
hot, the display shows the currenttime alternatingwith the message “HOT” at3" intervals.
SELECT Any selection must be confirmed. If not
confirmed within 15 seconds, the selection is cancelled.
By changing menu, any unconfirmed selection is lost.
- : Wi-Fi is off; the ovenisnotcontrollable via the app.Off
Pressing"Extra" on the timer displayallowsyou to select the Wi-
Fi menu. In the Wi-Fi menu if you press the "< >" buttonsyoucan select:
- : Wi-fi is on and the oven is only controllable via the app. It means that it is not possible to select cooking
functions, recipes and temperature from the display. Only the Wi-Fi menu is available by pressing "Extra". You
can switch the oven off using the On/Off button, but you cannot switch it back on again via the display, it can
only be switchedonvia the app.
On
-:Reset This setting should be used to enrol the oven the first time it connects to your Wi-Fi network and to
reset the current Wi-Fi connection to allow a new enrolment. Once selected, the appliance gives you 5
minutes to complete the enrolment process. During this process the cooking functions, recipes and
temperature setting are not accessible from the display. Only the Wi-Fi menu is available by pressing "Extra".
You can switch the oven off using the On/Off button, but you cannot switch it back on again via the display, it
can only be switched on via the app. To exit the enrolment/reset procedure via the display, press "Extra" and
then use "< >" buttons to select "Off". After five minutes, the appliance will exit the enrolment/reset
procedure automatically.
- : the oven sends its status to the app but it cannot be controlled remotely. The oven must be enrolled
before this is possible.
Read
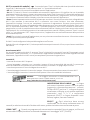
Wi-Fi Enrolment:
When the oven is connected to Wi-Fi, the default cooking time durationis 5 hours, but this can be modified by
the user.
- icon not lit: Wi-Fi is off.
- Icon blinks 1 second on an 1 second off: the oven is accessible to your Wi-Fi network and ready to be enrolled.
If the enrolmenthasnotbeensuccessful,theWi-Fiiconwillswitch off after 5 minutes.
- The icon blinks1 secondonand3 secondsoff: theoven is in readonlymode.
- The icon blinks3 secondsonand1 secondoff: the ovenis trying toconnecttoyour Wi-Fi router.
To enroll the appliance for Wi-Fi, press "Extra" on the display until the Wi-Fi icon lights, then select "Reset" by
pressing "< >". The procedure on the app should then be followed. Once selected, the appliance gives you 5
minutestocompletethe enrolment process.
Wi-Fi icon
If Wi-Fi is not configureditisonlypossibletochoosebetweenoff and reset.
- Icon is permanentlylit:the ovenisconnected toyour Wi-Fi router.
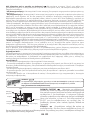
WiFi (depends on the oven model)
HOOVER :
For detailed information on HOW TO CONNECT your OneFi appliance and HOW
TO USE IT effectively, go to http://wizardservice.candy-hoover.com/
Grill
Oven box
Turnspit
Circular
heating element
Bottom heating element
Fan
Defost
EN 10

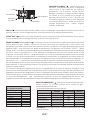
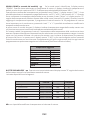
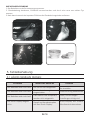
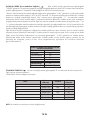
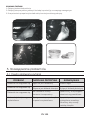
The availablerecipesare the following:
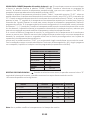
PRE-SETTED RECIPES When a recipe is selected the display shows “R” followed by the number of
the recipe and shows the correspondentway of cooking.
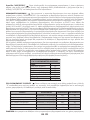
MEAT PROBE
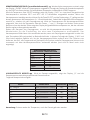
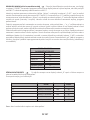
RECOMMENDED TEMPERATURES
Meat
Rare
Medium rare
Medium
Well done
Salmon
Chicken
56
58
60
62
35
min 68
RECIPE
COOKING
METHOD
TEMPERATURE
COOKING
DURATION
R1- Lasagne
R2- Roast/Oven cooked chicken
R3- Crusted bream
R4- Baked potatoes
R5- Omelette
Static + fan
Static
150°
180°
10°6
45’
4’0
25’
Static + fan
Static + fan
Static + fan
180°
180°
4’0
45’
R6- Apple pie
Static + fan
180°
45’
EN 11
NB: It is not possible to change neither the temperature nor the cooking duration.
MEAT PROBE (depends on the oven model) If the meat probe is identified, the display shows
"PROBE". When a cooking programme is selected, the display shows the default temperature but is
neverhigher than 200°C: the selectabletemperature is also limited to 200°C.
When the temperature is confirmed, by pressing "Select", the display shows “ 40°”: it is now possible
to select the meat probe target temperature, between 30°C and 90°C at 1°C intervals. When the meat
probe temperature is confirmed, press the "Select" key and the display shows “” followed by the
actual temperature taken by the meat probe (1 degree intervals). As soon as the meat probe reaches
the set temperature, the cooking programme terminates. If a cooking programme is set with the meat
probe, by pressing the “-” and “+” keys you can see and modify the temperature of the meat probe: at
the first touch of one of the two keys, the display shows the meat probe target temperature, while at the
nexttouchyoucanchangethe selected temperature of the probe.
If the user changes the cooking programme, the meat probe temperature setting is reset. Repeat the
setting sequence to select a new target temperature. The meat probe cannot be used with pre-set
cooking or with the separating plate (if present) inside the oven: in this case the display shows“ NO”
and will not execute any command until the meat probe is removed. Defrost, grill, any program with
turnspit, pyrolysis and any programmed cooking are not allowed with the meat probe (they are not
shown on the menu).

T °C
default
180
210
200
210
40
L3
T °C
range
40 ÷ 40
50 ÷ 240
50 ÷ 230
150 ÷ 220
50 ÷ 240
L1 ÷ L5
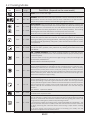
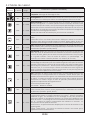
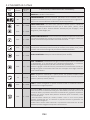
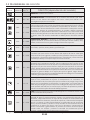
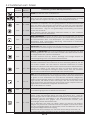
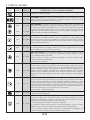
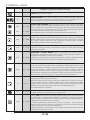
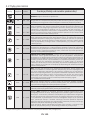
Function
Dial
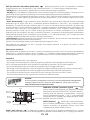
Function (Depends on the oven model)
LAMP: Turns on the oven light.
GRILL: usethegrill with the doorclosed.
The top heating element is used alone and you can adjust the temperature. Five
minutes preheating is required to get the elements red-hot. Success is guaranteed
forgrills,kebabs and gratin dishes. White meats should be put at a distance from the
grill; the cooking time is longer, but the meat will be tastier. You can put red meats
and fish fillets on the shelf with the drip tray underneath. The oven has two grill
positions:
Grill: 2140 W Barbecue: 3340 W
FAN ASSISTED GRILL : use the turbo-grill with the door closed.
The top heating element is used with the fan circulating the air inside the oven.
Preheating is necessary for red meats but not for white meats. Ideal for cooking
thick food items, whole pieces such as roast pork, poultry, etc. Place the food to be
grilled directly on the shelf centrally, at the middle level. Slide the drip tray under the
shelf to collect the juices. Make sure that the food is not too close to the grill. Turn
the food over halfwaythroughcooking.
FAN COOKING: We recommend you use this method for poultry, pastries, fish
and vegetables. Heat penetrates into the food better and both the cooking and
preheating times are reduced. You can cook different foods at the same time
with or without the same preparation in one or more positions. This cooking
method gives even heat distribution and the smells are not mixed.
Allow about ten minutes extrawhen cooking foods at the same time.
DEFROST: When the dial is set to this position. The fan circulates air at room
temperature around the frozen food so that it defrosts in a few minutes
without the proteincontentof the food being changed or altered.
*Tested in accordance with the CENELEC EN 60350-1 used for definition of energy class.
3.2 Cooking Modes
FAN + LOWER ELEMENT: The bottom heating element is used with the fan
circulatingthe air inside the oven. This method is ideal for juicy fruit flans, tarts,
quiches and pâté.
It prevents food from drying and encourages rising in cakes, bread dough and
other bottom-cooked food.
Place the shelf in the bottomposition.
EN 12
*
220 50 ÷ 280
CONVENTIONAL COOKING: Both top and bottom heating elements are used.
Preheat the oven for about ten minutes. This method is ideal for all traditional
roasting and baking. For seizing red meats, roast beef, leg of lamb, game, bread,
foilwrapped food (papillotes), flaky pastry. Place the food and its dish on a shelf
in mid position.
BOTTOM: Using the lower element. Ideal for cooking all pastry based dishes.
Use this for flans, quiches, tarts, pate and any cooking that needs more heat
frombelow.
PIZZA: With this function hot air circulated in the oven to ensure perfect result
fordishes such as pizza or cake.
Try all your recipes and reduce the amount of dressing you usually use and
experiencethe lightness of this new function!
The " " function allows you to cook in a healthier way, by reducing the amount of
fat or oil required. Thanks to the use of the grill and fan combined with a pulsating
cycle of air, it will retain the moisture content of the food, grilling the surface and
using a shorter cooking time, without compromisingon taste.
ECO
It is particularly suitable for cooking meat, roasted vegetables and omelettes. The
cycle of pulsed air keeps the humidity inside the oven and the moisture content of
the food, preserving the nutritional values and ensuring a rapid uniform cooking
process.
210 50 ÷ 230
220 50 ÷ 230
190 50 ÷ 230
*

EN 13
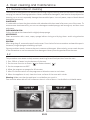
4. Oven cleaning and maintenance
4.1 General notes on cleaning
If dirty, theseal can be cleaned with a slightly damp sponge.
The lifecycle of the appliance canbe extended throughregular cleaning. Waitfor the oven to cool before
carrying out manual cleaning operations. Never use abrasive detergents, steel wool or sharp objects for
cleaning, so as to not irreparably damage the enamelled parts. Use only water, soap or bleach-based
detergents (ammonia).
GLASS PARTS
OVENWINDOW SEAL
Clean accessories with a wet, soapy sponge before rinsing and drying them: avoid using abrasive
detergents.
DRIP PAN
It is advisable to clean the glass window with absorbent kitchen towel after every use of the oven. To
remove more obstinate stains, you can use a detergent-soaked sponge, well wrung out, and then rinse
with water.
ACCESSORIES
If greasy residues remain, immerse the pan in water and detergent. Alternatively, you can wash the pan
in the dishwasher or use a commercialoven detergent. Neverput a dirty pan back intothe oven.
After using the grill, remove the pan from the oven.Pourthe hot fat into a container and wash the pan in
hot water, using a spongeand washing-upliquid.
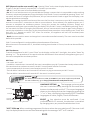
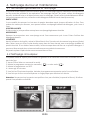
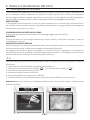
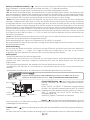
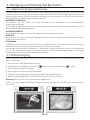
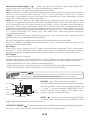
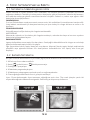
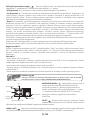
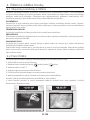
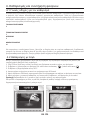
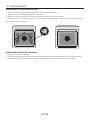
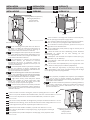
4.2
This procedure uses steam to help remove remaining fat and food particles from the oven.
2. Set the oven function to Static ( )or Bottom heater ( ).
Warning: Make sure that the appliance is cool before you touch it.
1. Pour 300 ml of water into the bottom of the oven.
5. After 30 minutes switch off the program and allow the oven to cool down.
4. Allow the program to operate for 30 minutes.
Care must be taken with all hot surfaces as there is a risk of burns. Use distilled or drinkable water.
3. Set the temperature at 90°C.
6. When the appliance is cool, clean the inner surfaces of the oven with a cloth.
300 ml

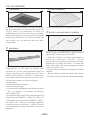
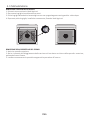
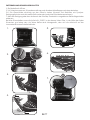
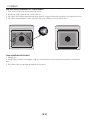
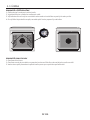
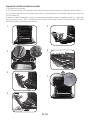
REMOVAL AND CLEANINGOF THE SIDE RACKS
1. Unscrew the bolt in an anti-clockwise direction.
2. Removethe side racks by pulling them towardsyou.
3. Clean the side racksin a dishwasheror with a wet sponge and then dry them immediately.
4. Having cleaned the side racks, put them back in and reinsert the bolts, ensuring that they are fully
tightened.
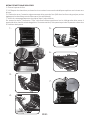
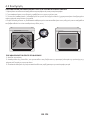
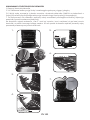
4.3 Maintenance
A
1. Open the front window.
REMOVAL OF THE OVEN WINDOW
2. Open the clamps of the hinge housing on the right and left side of the front window by pushing them
downwards.
3. Replace the window by carrying out the procedure in reverse.
EN 14

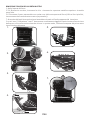
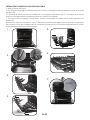
LOW-E
1
2
3
1.
2.
3.
4.
5.
6.
7.
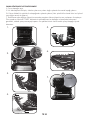
2.3.4. Lock the hinges,remove the screws and removethe upper metalcover by pulling itupwards.
5.6. Remove the glass, carefully extracting it from the oven door (NB: in pyrolytic ovens, also remove
the second and third glass (if present)).
On all glass, the indication "Pyro" must be legible and positioned on the left side of the door, close to the
left-hand lateralhinge. In this way, the printed label of the first glass will be inside the door.
REMOVAL AND CLEANINGOF THE GLASS DOOR
1. Open the ovendoor.
7. Atthe end of cleaning orsubstitution,reassemble the parts in reverse order.
EN 15

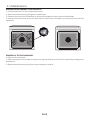
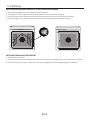
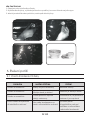
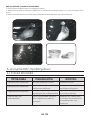
CHANGING THE BULB
2. Undo the glass cover, unscrew the bulb and replaceit with a new bulb of the same type.
1. Disconnect the oven from the mains supply.
3. Once the defective bulb is replaced,replace the glass cover.
5.
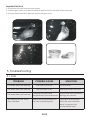
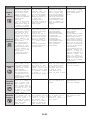
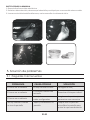
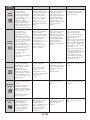
5.1 FAQ
Troubleshooting
PROBLEM POSSIBLE CAUSE SOLUTION
The oven does not heat up
The clock is not set Set the clock
The child lock is on
A cooking function and
temperature has not been set
Deactivate the child lock
Ensure that the necessary
settings are correct
The oven does not heat up
The oven does not heat up
EN 16
Steam and condensation on
the user interface panel
Clean with a microfiber
cloth the user interface
panel to remove the
condensation layer
No reaction of the touch
user interface

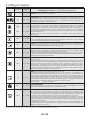
• Nous vous conseillons de faire la cuisson des légumes dans un
récipient avec couvercle pas sur un plateau.
• AVERTISSEMENT: L'appareil et les parties accessibles deviennent
chauds pendant l'utilisation. Des précautions doivent être prises pour
éviterde toucher les éléments chauffants.
• Cet appareil n'est pas destiné à être utilisé par des personnes (y
compris les enfants) dont les capacités physiques, sensorielles ou
mentales sont réduites, ou ayant un manque d'expérience et de
connaissances, à moins qu'elles n'aient été formées à l'utilisation de
l'appareil,par une personneresponsable de leur sécurité.
• Le nettoyage et l'entretien par l'utilisateur ne doit pas être fait par des
enfants sans surveillance.
• Ne pas utiliser de nettoyants abrasifs ou de racloirs métalliques
tranchantspour nettoyer la vitre de la porte du fourcar ils peuventrayer
la surface, entrainant des risques d'explosion.
AVERTISSEMENT: Les parties accessibles peuvent devenir chaudes
pendantl'utilisation. Les jeunes enfants doiventêtretenus à l'écart.
• Pendant la cuisson de l’humidité peut se créer dans la cavité ou sur la
surface de la porte. Le cas décrit est normal. Si on veut reduire cet effet, il
faut laisser réchauffer le four 10-15 minutes avant d’introduire les
aliments. L’humidité va disparaître grâce à la juste température de cuisson.
• Une fois que la cuisson est terminée, nous vous conseillons de ne pas
laisser les aliments à l’intérior de la cavité pour plus de 15/20 minutes.
• ATTENTION : les parties accessibles peuvent devenir très chaudes
quand le four est en marche. Les enfants doivent être tenus à une
distance de sécurité.
• Les enfants ne doivent jouer avecl'appareil.
• En cours d'utilisation l'appareil devient chaud. Des précautions doivent
être prises pour éviter de toucher les éléments chauds à l'intérieur du four.
• Utiliser seulement la sonde de température recommandée pour ce four.
• Ne pas utiliser de nettoyantsvapeur pour le nettoyage.
• Brancher le câble d’alimentation sur une prise de courant qui supporte
le voltage ; le courant et la charge sont indiqués sur l’étiquette ; vérifier la
présence d’une mise à la terre. La prise d’alimentation doit supporter la
charge indiquée sur l’étiquette et être dotée d’une mise à la terre en état
de fonctionnement. Le conducteur de mise à la terre est jaune et vert.
• Le four doit être éteint avant d'enlever la protection et après le
nettoyage, la protection doit être replacé en respectant les instructions.
FR 17
Conseils De Securite

Le plateaudoit complètementêtre inséré dans la cavité
• Aucun réglage/opération supplémentaire n’est requis pour faire
fonctionner l’appareil aux fréquences nominales.
• En introduisant le plateau dans le four, s’assurer que le stop est dirigé
vers le haut et au fond de la cavité.
• AVERTISSEMENT : Ne retirez jamais le joint de la porte du four.
• AVERTISSEMENT : Ne tapissez pas les parois du four avec du papier
aluminium ou un autre matériau de protection jetable en vente dans le
commerce. Tout papier aluminium ou autre matériau de protection qui
entrerait au contact direct de l'émail chaud risquerait de fondre et de
détériorer l'émail intérieur du four.
Cette opération doit être exécutée par du personnel qualifié. En cas
d’incompatibilité entre la prise d’alimentation et la fiche du câble de
l’appareil, demander à un électricien professionnel de remplacer la prise
d’alimentation par un dispositif compatible. La fiche du câble
d’alimentation et la prise d’alimentation doivent être conformes aux
normes en vigueur dans le pays d’installation. Il est possible de brancher
l’appareil à la prise d’alimentation en installant un disjoncteur
multipolaire qui supporte la charge électrique maximale, conformément
aux lois en vigueur, entre l’appareil et la prise d’alimentation. Le
conducteur jaune et vert de mise à la terre ne doit pas être bloqué par le
disjoncteur. La prise d’alimentation ou le disjoncteur multipolaire utilisé
pour le branchement doit rester à tout moment accessible lors de
l’installation de l’appareil.
• Si le câble d’alimentation est endommagé, il doit être remplacé par un
câble ou un faisceau de câbles spécial disponible auprès du fabriquant
ou en contactantle service après-vente.
• Le câble d’alimentation requisest le H05V2V2-F.
• Le non-respect des consignes ci-dessus peut compromettre la sécurité
de l’appareil et annuler la garantie.
• Le débranchement doit se faire en accédant à la prise d’alimentation
ou en prévoyant un interrupteur sur le circuit électrique fixe, conforme
aux normes électriques.
• Tout produit déversé en quantitédoit être éliminé avant le nettoyage.
• Pendant le nettoyage à pyrolyse, les surfaces peuvent devenir beaucoup
plus chaude que d’habitude, les enfants doivent donc être tenus à une
distance de sécurité.
• Ne pas installer l’appareil derrière une porte décorative, pour éviter la
surchauffe.
FR 18

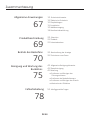
SOMMAIRE
FR 19
Instructions Générales
20
1.1 Indications de sécurité
1.2 Sécurité électrique
1.3 Recommandations
1.4 Installation
1.5 La gestion des déchets et la
protection de l'environnement
1.6 Déclaration de conformité
2.1 Vue d'ensemble
2.2 Accessoires
2.3 Première utilisation
Description du produit
22
3.1 Description de l'affichage
3.2 Mode de cuisson
Utilisation du Four
24
4.1 Remarques générales concernant
le nettoyage
4.2 Nettoyage à la vapeur
4.3 Entretien
• Retrait et nettoyage des grilles
• Retrait de la porte du four
• Retrait et nettoyage des vitres
• Remplacement de l'ampoule
Nettoyage du four et
maintenance
29
5.1 F.A.Q.
Dépannage
32
La page est en cours de chargement...
La page est en cours de chargement...
La page est en cours de chargement...
La page est en cours de chargement...
La page est en cours de chargement...
La page est en cours de chargement...
La page est en cours de chargement...
La page est en cours de chargement...
La page est en cours de chargement...
La page est en cours de chargement...
La page est en cours de chargement...
La page est en cours de chargement...
La page est en cours de chargement...
La page est en cours de chargement...
La page est en cours de chargement...
La page est en cours de chargement...
La page est en cours de chargement...
La page est en cours de chargement...
La page est en cours de chargement...
La page est en cours de chargement...
La page est en cours de chargement...
La page est en cours de chargement...
La page est en cours de chargement...
La page est en cours de chargement...
La page est en cours de chargement...
La page est en cours de chargement...
La page est en cours de chargement...
La page est en cours de chargement...
La page est en cours de chargement...
La page est en cours de chargement...
La page est en cours de chargement...
La page est en cours de chargement...
La page est en cours de chargement...
La page est en cours de chargement...
La page est en cours de chargement...
La page est en cours de chargement...
La page est en cours de chargement...
La page est en cours de chargement...
La page est en cours de chargement...
La page est en cours de chargement...
La page est en cours de chargement...
La page est en cours de chargement...
La page est en cours de chargement...
La page est en cours de chargement...
La page est en cours de chargement...
La page est en cours de chargement...
La page est en cours de chargement...
La page est en cours de chargement...
La page est en cours de chargement...
La page est en cours de chargement...
La page est en cours de chargement...
La page est en cours de chargement...
La page est en cours de chargement...
La page est en cours de chargement...
La page est en cours de chargement...
La page est en cours de chargement...
La page est en cours de chargement...
La page est en cours de chargement...
La page est en cours de chargement...
La page est en cours de chargement...
La page est en cours de chargement...
La page est en cours de chargement...
La page est en cours de chargement...
La page est en cours de chargement...
La page est en cours de chargement...
La page est en cours de chargement...
La page est en cours de chargement...
La page est en cours de chargement...
La page est en cours de chargement...
La page est en cours de chargement...
La page est en cours de chargement...
La page est en cours de chargement...
La page est en cours de chargement...
La page est en cours de chargement...
La page est en cours de chargement...
La page est en cours de chargement...
La page est en cours de chargement...
La page est en cours de chargement...
La page est en cours de chargement...
La page est en cours de chargement...
La page est en cours de chargement...
La page est en cours de chargement...
La page est en cours de chargement...
La page est en cours de chargement...
La page est en cours de chargement...
La page est en cours de chargement...
La page est en cours de chargement...
La page est en cours de chargement...
La page est en cours de chargement...
La page est en cours de chargement...
La page est en cours de chargement...
La page est en cours de chargement...
La page est en cours de chargement...
La page est en cours de chargement...
La page est en cours de chargement...
La page est en cours de chargement...
La page est en cours de chargement...
La page est en cours de chargement...
La page est en cours de chargement...
La page est en cours de chargement...
La page est en cours de chargement...
La page est en cours de chargement...
La page est en cours de chargement...
La page est en cours de chargement...
La page est en cours de chargement...
La page est en cours de chargement...
La page est en cours de chargement...
La page est en cours de chargement...
La page est en cours de chargement...
La page est en cours de chargement...
La page est en cours de chargement...
La page est en cours de chargement...
La page est en cours de chargement...
La page est en cours de chargement...
La page est en cours de chargement...
La page est en cours de chargement...
La page est en cours de chargement...
La page est en cours de chargement...
La page est en cours de chargement...
La page est en cours de chargement...
La page est en cours de chargement...
La page est en cours de chargement...
La page est en cours de chargement...
La page est en cours de chargement...
La page est en cours de chargement...
La page est en cours de chargement...
La page est en cours de chargement...
-
 1
1
-
 2
2
-
 3
3
-
 4
4
-
 5
5
-
 6
6
-
 7
7
-
 8
8
-
 9
9
-
 10
10
-
 11
11
-
 12
12
-
 13
13
-
 14
14
-
 15
15
-
 16
16
-
 17
17
-
 18
18
-
 19
19
-
 20
20
-
 21
21
-
 22
22
-
 23
23
-
 24
24
-
 25
25
-
 26
26
-
 27
27
-
 28
28
-
 29
29
-
 30
30
-
 31
31
-
 32
32
-
 33
33
-
 34
34
-
 35
35
-
 36
36
-
 37
37
-
 38
38
-
 39
39
-
 40
40
-
 41
41
-
 42
42
-
 43
43
-
 44
44
-
 45
45
-
 46
46
-
 47
47
-
 48
48
-
 49
49
-
 50
50
-
 51
51
-
 52
52
-
 53
53
-
 54
54
-
 55
55
-
 56
56
-
 57
57
-
 58
58
-
 59
59
-
 60
60
-
 61
61
-
 62
62
-
 63
63
-
 64
64
-
 65
65
-
 66
66
-
 67
67
-
 68
68
-
 69
69
-
 70
70
-
 71
71
-
 72
72
-
 73
73
-
 74
74
-
 75
75
-
 76
76
-
 77
77
-
 78
78
-
 79
79
-
 80
80
-
 81
81
-
 82
82
-
 83
83
-
 84
84
-
 85
85
-
 86
86
-
 87
87
-
 88
88
-
 89
89
-
 90
90
-
 91
91
-
 92
92
-
 93
93
-
 94
94
-
 95
95
-
 96
96
-
 97
97
-
 98
98
-
 99
99
-
 100
100
-
 101
101
-
 102
102
-
 103
103
-
 104
104
-
 105
105
-
 106
106
-
 107
107
-
 108
108
-
 109
109
-
 110
110
-
 111
111
-
 112
112
-
 113
113
-
 114
114
-
 115
115
-
 116
116
-
 117
117
-
 118
118
-
 119
119
-
 120
120
-
 121
121
-
 122
122
-
 123
123
-
 124
124
-
 125
125
-
 126
126
-
 127
127
-
 128
128
-
 129
129
-
 130
130
-
 131
131
-
 132
132
-
 133
133
-
 134
134
-
 135
135
-
 136
136
-
 137
137
-
 138
138
-
 139
139
-
 140
140
-
 141
141
-
 142
142
-
 143
143
-
 144
144
-
 145
145
-
 146
146
-
 147
147


Hoover HOZ7173IN WF/E Manuel utilisateur
- Taper
- Manuel utilisateur
dans d''autres langues
- italiano: Hoover HOZ7173IN WF/E Manuale utente
- English: Hoover HOZ7173IN WF/E User manual
- español: Hoover HOZ7173IN WF/E Manual de usuario
- Deutsch: Hoover HOZ7173IN WF/E Benutzerhandbuch
- polski: Hoover HOZ7173IN WF/E Instrukcja obsługi
- čeština: Hoover HOZ7173IN WF/E Uživatelský manuál
- Türkçe: Hoover HOZ7173IN WF/E Kullanım kılavuzu
Documents connexes
Autres documents
-
Candy FCE 848 VX WF/E Manuel utilisateur
-
ROSIERES RFDC8571IN Manuel utilisateur
-
-
-
-
-
-
-
-