Pfaff hobby 1022 Le manuel du propriétaire
- Catégorie
- Machines à coudre
- Taper
- Le manuel du propriétaire
Ce manuel convient également à

hobby
1022
1032
1042
Instruction manual

This household sewing machine is designed to comply with IEC/EN 60335-2-28 and UL1594
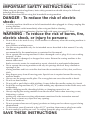
IMPORTANT SAFETY INSTRUCTIONS
When using an electrical appliance, basic safety precautions should always be followed,
including the following:
Read all instructions before using this household sewing machine.
DANGER - To reduce the risk of electric
shock:
• A sewing machine should never be left unattended when plugged in. Always unplug this
sewing machine
from the electric outlet immediately after using and before cleaning.
• Always unplug before relamping. Replace bulb with same type rated 15 Watt.
WARNING - To reduce the risk of burns, À re,
electric shock, or injury to persons:
• Do not allow to be used as a toy. Close attention is necessary when this sewing machine is
used by or
near children or inÀ rm person.
• Use this sewing machine only for its intended use as described in this manual. Use only
attachments
recommended by the manufacturer as contained in this manual.
• Never operate this sewing machine if it has a damaged cord or plug, if it is not working
properly, if it has
been dropped or damaged, or dropped into water. Return the sewing machine to the
nearest authorized
dealer or service center for examination, repair, electrical or mechanical adjustment.
• Never operate the sewing machine with any air openings blocked. Keep ventilation
openings of the
sewing machine and foot controller free from the accumulation of lint, dust, and loose
cloth.
• Keep À ngers away from all moving parts. Special care is required around the sewing
machine needle.
• Always use the proper needle plate. The wrong plate can cause the needle to break.
• Do not use bent needles.
• Do not pull or push fabric while stitching. It may deÁ ect the needle causing it to break.
• Switch the sewing machine off (“0”) when making any adjustment in the needle area, such
as threading
needle, changing needle, threading bobbin, or changing presser foot, etc.
• Always unplug the sewing machine from the electrical outlet when removing covers,
lubricating, or when
making any other user servicing adjustments mentioned in the instruction manual.
• Never drop or insert any object into any opening.
• Do not use outdoors.
• Do not operate where aerosol (spray) products are being used or where oxygen is being
administrated.
• To disconnect, turn all controls to the off (“0”) position, then remove plug from outlet.
• Do not unplug by pulling on cord. To unplug, grasp the plug, not the cord.
SAVE THESE INSTRUCTIONS

Congratulations! You have bought a quality
product made by Pfaff which is sure to bring you
countless hours of sewing pleasure. Your new
sewing machine features the very latest in de-
sign and technology. Furthermore, it has numer-
ous practical features which will make sewing
much easier for you.
Your sewing machine is as simple to operate as
this instruction manual is to follow. Before you
start sewing, please take the time to read these
instructions carefully. It is certainly time well
spent, and is the best way to find out just what
your machine can do and make full use of all its
features.
If you have any further questions, just ask your
Pfaff dealer, who will be happy to assist you with
help or advice.
We wish you many enjoyable hours creating your
very own fashion ideas.
Sewing for fun
hobby

1
13
12
11
10
9
8
7
6
5
4
3
2
18
17
16
15
14
20
19
29
28
27
26
25
24
23
22
21
32
31
30

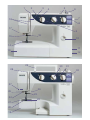
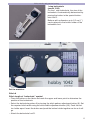
Parts of the sewing machine hobby 1042
1 Thread guide
2 Bobbin winder tension
3 Needle thread tension
4 Adjustment field
5 Spool holder
6 Bobbin winder
7 Handwheel
8 Stitch pattern chart with presser foot
9 Pattern adjustment button
10 Reverse key
11 Connection bushing
12 Master switch
13 Detachable work support with accessory box
14 Needle plate
15 Thread guide
16 Thread guide
17 Thread cutter
18 Threading slot
19 Hook cover (enclosing sewing hook)
20 Presser foot holder with presser foot
21 Free-arm
22 Feed dog
23 Needle holder with fixing screw
24 Buttonhole lever
25 Thread guide
26 Presser bar lifter
27 Sewing lamp (max. 15 W)
28 Take-up lever
29 Carrying handle
30 Stitch length adjustment button
31 Adjustment field
32 Stitch width adjustment button

1
13
12
11
10
9
8
7
6
5
4
3
2
18
17
16
15
14
20
19
29
28
27
26
25
23
22
21
30

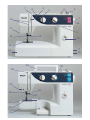
Parts of the sewing machine hobby 1022 and 1032
1 Thread guide
2 Bobbin winder tension
3 Needle thread tension
4 Adjustment field
5 Spool holder
6 Bobbin winder
7 Handwheel
8 Stitch pattern chart with presser foot
9 Pattern adjustment button
10 Reverse key
11 Connection bushing
12 Master switch
13 Detachable work support with accessory box
14 Needle plate
15 Thread guide
16 Thread guide
17 Thread cutter
18 Threading slot
19 Hook cover (enclosing sewing hook)
20 Presser foot holder with presser foot
21 Free-arm
22 Feed dog
23 Needle holder with fixing screw
25 Thread guide
26 Presser bar lifter
27 Sewing lamp (max. 15 W)
28 Take-up lever
29 Carrying handle
30 Stitch length adjustment button

hobby – Sewing for fun
A
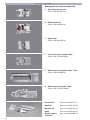
Accessories and needles 53
Accessory compartment 11
B
Bias tape binder 56
Blind-stitch foot 28
Bobbin case 14-15
Borders, embroidering 50
Buttonholes 33-37
Buttons 29
C
Changing the needle 20
Changing the sewing lamp 63
Cleaning and oiling 62
Closed overlock stitch 32
Control panel 21
Cording foot 57
D
Darning 42
Detachable work support 11
Drawing up the bobbin thread 18
E
Edge guide 26
Elastic blind stitch 28
Elastic stitch 31
Elastic stitches 30-32
Electrical connection 10
Embroidering with the twin needle 50
F
Fancy stitches 22
Feed dog, lowering 20
Felling foot 57
Foot control 10
Free arm 11
G
Gathering with the elastic thread 41
Gathering with the straight stitch 40
General sewing aids 25
H
Handwheel, releasing 12
Hemming with the twin needle 38
Hemstitching 52
Honeycomb stitch 31
Hook, removing 62
K
Knit-edge foot 58
L
Lace-work 47
Linen buttonhole 34
Linen buttonhole with gimp thread 34
M
Maintenance 61
Master switch 10
N
Needle charts 59-60
Needle plate, removing 63
Needle thread tension 26
Index

hobby – Sewing for fun
O
Oiling the machine 62
One step buttonhole 35-37
Open overlock stitch 32
Overlock stitches 32
P
Patchwork quilt 51
Practical sewing 25
Presser bar lifter 17
Q
Quilt and patchwork foot 58
R
Repairing tears 43
Reverse sewing 24
Richelieu 50
Roll hemming 46
RufÁ er 56
S
Safety notes 2
Serging with the blind stitch foot 28
Serging with the zigzag stitch 27
Setting utility stitches 22
Sewing feet (normal accessories) 54
Sewing feet (special accessories) 55
Sewing lamp 63
Sewing on patches 42
Sewing problems and their solutions 64
Shell edging 48
Smocking 39
Special accessories chart 55
Spool placement 12
Stitch chart 6, 7, 8
Stitch density 23
Stitch length adjustment button 23
Stitch width adjustment button 24
Straight stitch 27
Stretch stitches, adjusting 23
Stretch triple straight stitch 30
Stretch triple zigzag stitch 30
T
Thread cutter 18
Thread tension 14
Threading 16-17
Threading the needle thread 16
Topstitching 26
Traditional embroidery techniques 49
Troubleshooting 64
Twin needle 38
W
Winding the bobbin 12-13
Z
Zigzag stitch 27
Zippers 44-45

hobby – Sewing for fun
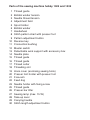
hobby 1022 – Stitch chart
For these programs the stitch length can be set anywhere between 0 and 4 mm with
the aid of the stitch length adjustment button (30).
Program Name Application
Buttonhole A
3,
A
4/2,
A
1
Standard buttonhole for e.g. blouses
and bed linen
B Straight stitch For all straight stitch
needle position middle and lockstitch work up to 4 mm
C Straight stitch For all sewing and topstitch work requiring a
needle position left left needle position, stitch width 2 mm
D Zigzag stitch For serging and appliqué, stitch width 5 mm
E Elastic stitch For stitching on elastic band,
darning tears and patches
F Elastic blind stitch For invisible hem attachment and
simultaneous serging.
Also for stretch fabrics.
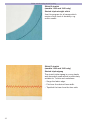
G Blindstitch For invisible hem attachment
H Shell-edging stitch For decorative hems on À ne materials, e.g. linen

hobby – Sewing for fun
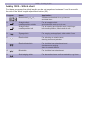
Program Name Application
Buttonhole A
3
A
4/2
A
1
Standard buttonhole for e.g. blouses and
bed linen
B Straight stitch For all straight stitch and lockstitch work
needle position middle up to 4 mm
C Straight stitch For all sewing and topstitch work
needle position left requiring a left needle position
D Zigzag stitch For serging and appliqué, stitch width 5 mm
E Elastic stitch For stitching on elastic band,
darning tears and patches
F Elastic blind stitch For invisible hem attachment and simultaneous
serging. Also for stretch fabrics
G Blind stitch For invisible hem attachment
H Shell-edging stitch For decorative hems on À ne materials,
e.g. linen
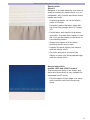
J Greek stitch A classical decorative stitch e.g. for borders
and towels
B Stretch triple straight For stretch seams, e.g. crotch seams on sports-
stitch, needle pos. middle and workwear
C Stretch triple straight For stretch seams requiring a left needle position
stitch, needle position left
D Stretch triple- For attaching elastic tape on elastic materials
zigzag stitch
E Honeycomb stitch For sewing on elastic threads, overlocking and for
decorative hem seams
F Edge stitch For closing and serging one or more fabric layers
wide
G Edge stitch For closing and serging one or more fabric layers
narrow
H Open overlock stitch A closing and serging seam for stronger
or non-fraying materials
J Closed overlock stitch A closing and serging seam for fraying materials
hobby 1032 – Stitch chart
For these programs the stitch length can be set anywhere between 0 and 4 mm
with the aid of the stitch length adjustment button (30).

hobby – Sewing for fun
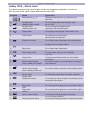
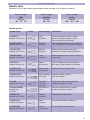
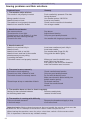
hobby 1042 – Stitch chart
For these programs the stitch length can be set anywhere between 0 and 4 mm with
the aid of the stitch length adjustment button (30).
To alter the stitch width from 0 to 5, use the stitch width adjustment button (32).
Program Name Application
A Buttonhole Standard buttonhole for e.g. blouses and bed linen
B Straight stitch, For all straight stitch and lockstitch work up to
needle position middle to 4 mm
C Straight stitch, For all sewing and topstitch work requiring a left
needle position left needle position.
D Zigzag stitch For serging and appliqué
E Elastic stitch For stitching on elastic band,
darning tears and patches
F Elastic blind stitch For invisible hem attachment and simultaneous
serging. Also for stretch fabrics.
G Blind stitch For invisible hem attachment
H Shell-edging stitch For decorative hems on À ne materials, e.g. linen
J Greek stitch A classical decorative stitch e.g. for
borders on towels
B Stretch triple straight For stretch seams,
stitch, needle pos. middle
e.g. crotch seams on sports- and workwear
C Stretch triple straight For stretch seams requiring a left needle position
stitch, needle pos. left
D Stretch triple For attaching elastic tape on elastic materials
zigzag stitch
E Honeycomb stitch For sewing on elastic threads,
overlocking towelling
and for decorative hem seams
F Edge stitch For closing and serging one or more fabric layers
wide
G Edge stitch For closing and serging one or more fabric layers
narrow
H Open overlock stitch A closing and serging seam for stronger or
non-fraying materials
J Closed overlock stitch A closing and serging seam for fraying materials
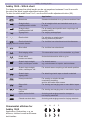
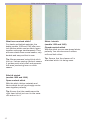
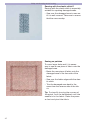
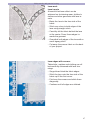
Ornamental stitches for
hobby 1042
Application: Embroidery, e.g. on
blouses, children·s wear and house-
hold textiles.
M N O P

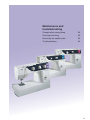
9
Operating the machine
Bobbin winding 12-13
Bobbin case 14
Changing the needle 20
Changing the presser foot 19
Control panel 21
Detachable work support 11
Drawing up the bobbin thread 18
Electrical connection 10
Free arm 11
Lowering the feed dog 20
Needle thread tension 20
Presser bar lifter 17
Reverse serging 24
Setting the utility stitches 22
Setting the stretch stitches 23
Threading the needle thread 16-17
Thread cutter 18

Operating the machine
10
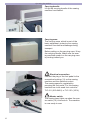
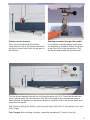
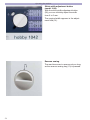
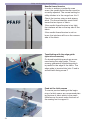
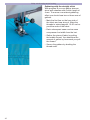
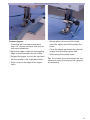
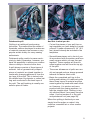
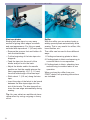
Carrying handle
Lift up the carrying handle of the sewing
machine from behind.
Carrying case
The carrying case, which is part of the
basic equipment, protects your sewing
machine from dust and damage during
transport.
Before putting on the carrying case, lift up
the carrying handle. Make sure the sew-
ing machine symbol on the carrying case
is pointing toward you.
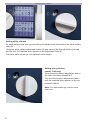
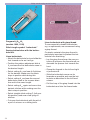
Electrical connection
Connect the plug of the foot pedal to the
connection bushing (11) on the sewing
machine and the electrical socket.
The sewing speed is regulated by
pressing the foot pedal. For this sewing
machine has to be used foot controller
TJC-211 (220-240V) or TJC-150 (120V).
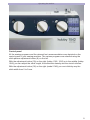
Master switch
The sewing lamp lights up when the mas-
ter switch (12) is turned on. The machine
is now ready to sew.
120 V
220 V

Operating the machine
11
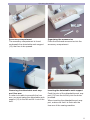
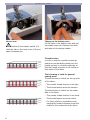
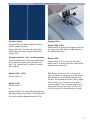
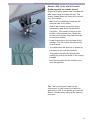
Accessory compartment
The accessory compartment is found
underneath the detachable work support
(13), that has to be opened.
Organizing the accessories
Place the enclosed accessories into the
accessory compartment.
Removing the detachable work sup-
port /free arm
In order to be able to sew with the free
arm, you must swing the detachable work
support (13) to the left and lift it out of the
hole.
Inserting the detachable work support
Push the pins of the detachable work sup-
port (13) from the left fully into the holes
provided.
When inserting the detachable work sup-
port, make sure that it is Á ush with the
free arm of the sewing machine.

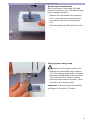
Operating the machine
12
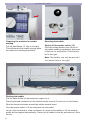
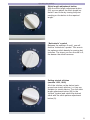
Preparing the machine for bobbin
winding
Pull the handwheel (7) fully to the right.
This will prevent the needle moving while
the machine is winding the bobbin.
Mounting the bobbin
Switch off the master switch (12)
Place the empty bobbin onto the pin of
the bobbin winding mechanism and press
it down as far as possible. Push the bob-
bin to the right.
Note: The bobbin can only be wound if
it is moved fully to the right.
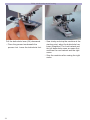
Winding the bobbin
Pull the spool holder (5) up and place a spool on it.
Place the thread clockwise into the bobbin winder tension (2) and run it to the bobbin.
Wind the thread clockwise around the bobbin several times.
Turn the master switch (12) on and press the foot pedal.
Let go of the thread after a few revolutions. As soon as the bobbin is full the winding
action will be stopped automatically. Press the full bobbin to the left and remove it from
the pin.

Operating the machine
13
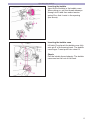
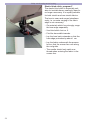
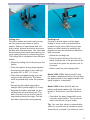
Winding a bobbin through the needle
It is possible to wind bobbins even when
the machine is threaded. Raise the press-
er bar lifter (26) to the top position. Pull
the thread underneath the presser foot.
Bobbin winder tension
Pass the thread through the bobbin
thread tension (2) in a clockwise direction,
so that it crosses over itself on the way to
the bobbin.
Pull the thread upward through the left-hand threader slot (18). Place the thread from
left to right through the take-up lever (28). Wind the beginning of the thread several
times around the bobbin in a clockwise direction. Hold the end of the thread À rmly and
press the foot pedal.
Tip: While winding the bobbin, gently push down the front of the presser foot with
your finger.
Don·t forget: After winding a bobbin, press the handwheel (7) back to the left!

Operating the machine
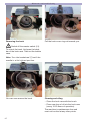
14
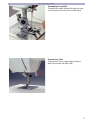
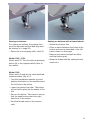
Hook cover
Switch off the master switch (12).
Hold the side of the hook cover (19) and
open it towards you.
Taking out the bobbin case
Lift the latch of the bobbin case and pull
the bobbin case out. Release the latch
and take out the empty bobbin.
Thread tension
In order to achieve a perfect seam ap-
pearance and durability make sure the
needle tension is correctly adjusted, so
that the thread interlace is not visible on
both sides of the fabric.
The following is valid for general
sewing work:
Thread interlace is visible on the top side
of the fabric:
• The needle thread tension is too tight .
• The thread tension must be lowered.
Thread interlace is visible on the under-
side of the fabric:
• The needle thread tension is too loose.
• The thread tension must be raised.
• For fancy stitches, buttonholes and
darning the thread interlace should be
visible on the underside of the fabric.

Operating the machine
15
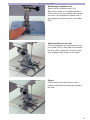
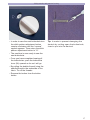
Inserting the bobbin
Insert the full bobbin in the bobbin case.
When doing so, pull the thread sideways
through slot A and then under tension
spring B so that it rests in the opening
(see arrow).
Inserting the bobbin case
Lift latch D and push the bobbin case fully
onto pin E of the sewing hook. The bobbin
case À nger F must point into cutout G.
Check:
Pull the bobbin thread sharply. The bobbin
case must not fall out of the hook.

Operating the machine
16
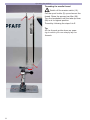
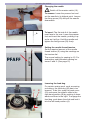
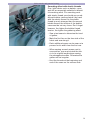
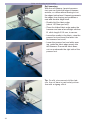
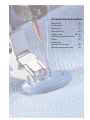
Threading the needle thread
Switch off the master switch (12).
Pull the spool holder (5) up and mount the
thread. Raise the presser bar lifter (26).
Turn the handwheel until the take-up lever
(28) is at its highest position.
Thread by following the steps A to E.
Tip:
All the thread guides have an open-
ing in which you can simply lay the
threads.
E
D
B
C
A
La page est en cours de chargement...
La page est en cours de chargement...
La page est en cours de chargement...
La page est en cours de chargement...
La page est en cours de chargement...
La page est en cours de chargement...
La page est en cours de chargement...
La page est en cours de chargement...
La page est en cours de chargement...
La page est en cours de chargement...
La page est en cours de chargement...
La page est en cours de chargement...
La page est en cours de chargement...
La page est en cours de chargement...
La page est en cours de chargement...
La page est en cours de chargement...
La page est en cours de chargement...
La page est en cours de chargement...
La page est en cours de chargement...
La page est en cours de chargement...
La page est en cours de chargement...
La page est en cours de chargement...
La page est en cours de chargement...
La page est en cours de chargement...
La page est en cours de chargement...
La page est en cours de chargement...
La page est en cours de chargement...
La page est en cours de chargement...
La page est en cours de chargement...
La page est en cours de chargement...
La page est en cours de chargement...
La page est en cours de chargement...
La page est en cours de chargement...
La page est en cours de chargement...
La page est en cours de chargement...
La page est en cours de chargement...
La page est en cours de chargement...
La page est en cours de chargement...
La page est en cours de chargement...
La page est en cours de chargement...
La page est en cours de chargement...
La page est en cours de chargement...
La page est en cours de chargement...
La page est en cours de chargement...
La page est en cours de chargement...
La page est en cours de chargement...
La page est en cours de chargement...
La page est en cours de chargement...
La page est en cours de chargement...
La page est en cours de chargement...
La page est en cours de chargement...
La page est en cours de chargement...
-
 1
1
-
 2
2
-
 3
3
-
 4
4
-
 5
5
-
 6
6
-
 7
7
-
 8
8
-
 9
9
-
 10
10
-
 11
11
-
 12
12
-
 13
13
-
 14
14
-
 15
15
-
 16
16
-
 17
17
-
 18
18
-
 19
19
-
 20
20
-
 21
21
-
 22
22
-
 23
23
-
 24
24
-
 25
25
-
 26
26
-
 27
27
-
 28
28
-
 29
29
-
 30
30
-
 31
31
-
 32
32
-
 33
33
-
 34
34
-
 35
35
-
 36
36
-
 37
37
-
 38
38
-
 39
39
-
 40
40
-
 41
41
-
 42
42
-
 43
43
-
 44
44
-
 45
45
-
 46
46
-
 47
47
-
 48
48
-
 49
49
-
 50
50
-
 51
51
-
 52
52
-
 53
53
-
 54
54
-
 55
55
-
 56
56
-
 57
57
-
 58
58
-
 59
59
-
 60
60
-
 61
61
-
 62
62
-
 63
63
-
 64
64
-
 65
65
-
 66
66
-
 67
67
-
 68
68
-
 69
69
-
 70
70
-
 71
71
-
 72
72


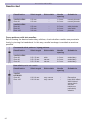
Pfaff hobby 1022 Le manuel du propriétaire
- Catégorie
- Machines à coudre
- Taper
- Le manuel du propriétaire
- Ce manuel convient également à
dans d''autres langues
- English: Pfaff hobby 1022 Owner's manual
Documents connexes
-
Pfaff select 150 Le manuel du propriétaire
-
Pfaff select 4.0 Le manuel du propriétaire
-
Pfaff classicstyle 1525 Le manuel du propriétaire
-
-
-
-
-
Pfaff powerquilter 1600 Mode d'emploi
Autres documents
-
Husqvarna H-CLASS 100Q Manuel utilisateur
-
ELNA eXperience 620 Manuel utilisateur
-
Baby Lock Jazz II Mode d'emploi
-
Viking Emerald 116 Manuel utilisateur
-
JANOME Memory Craft 8000 Le manuel du propriétaire
-
Kenmore 385.18330 Le manuel du propriétaire
-
-
-
-
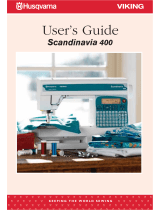 Husqvarna Viking Scandinavia 400 Manuel utilisateur
