Duux Beam 2 Le manuel du propriétaire
- Catégorie
- Humidificateurs
- Taper
- Le manuel du propriétaire

1
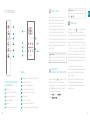
Beam 2
smart ultrasonic humidier
user manual | gebruikershandleiding | manuel d’utilisation
manual de usuario | Bedienungsanleitung
WATCH THE
INSTRUCTION
MOVIES

32
Thank you for
choosing Duux.
We’re so glad you decided to read the instructions to your new Duux ultrasonic humidier! Many users
casually dismiss instructions and seek to gure it out on their own. But studies show that people who read
instructions will get up to speed more quickly and eciently than those who poke around with trial and
error.
At Duux we believe in the importance of a comfortable and healthy living environment. Enhancing your
wellbeing by designing appealing, functional and eective products is the passion that drives us every day.
With our range of innovative air treatment products we aim to provide you the best possible indoor air
quality.
Dry skin, dry throat or regular headaches? Chances are the air inside your home is too dry. Meet Beam 2,
the versatile high-capacity humidier with a minimal footprint. Its large water tank capacity of 5 liters and
high mist output of 350 ml/h ensure optimum performance. Filling the Beam 2 is easy thanks to its top
lling capability. And its built-in hygrostat and built-in temperature sensor work wonders when it comes to
ease of use.
Read this manual carefully to get the most out of your Beam 2 ultrasonic humidier.
1. Product overview 4
2. Installation & use 5
3. Functions 8
4. Maintenance 13
5. Technical specications 16
6. FAQ 17
Table of
contents
EN

54
• Do not cover the air inlet and the mist outlet with
items such as towels;
• This is not a toy. To avoid accidents, keep it away
from babies and children. Do not put it in a crib,
stroller or playpen. Please do not let children and
babies play and use the device;
• Do not use the device on a sloping table, it should
be placed in a at and stable surface;
• Do not add avors or similar substances
produced or supervised by the company to the
water tank and water tank in the device; You can
use the designated aroma tray underneath the lid
to add aromatherapy.
• Do not use in the kitchen. Please keep away
from heat sources, avoid direct sunlight, and
keep away from furniture and other household
appliances 2 meters away from moisture.
• Be aware that high humidity levels may
encourage the growth of biological organisms in
the environment.
• Do not permit the area around the humidier
to become damp or wet. If dampness occurs,
turn the output of the humidier down. If the
humidier output volume cannot be turned
down, use the humidier intermittently. Do not
allow absorbent materials, such as carpeting,
curtains, drapes, or tablecloths, to become damp.
• Never leave water in the reservoir when the
appliance is not in use.
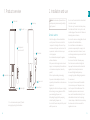
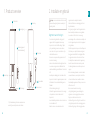
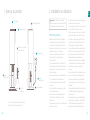
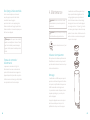
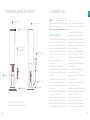
1. Product overview 2. Installation and use
Note: Please take notice of below instructions
and the separately included warning sheet before
using the product.
General cautions
• Check the voltage on the device label before
use. Only connect the device to sockets that
correspond to the voltage of the device. If you
are unsure whether your connections meet the
requirements, consult an electrician or your
electricity supplier.
• Do not disassemble and repair the appliance
without authorization.
• If the power cord is damaged, in order to avoid
danger, it must be replaced by the manufacturer
or its maintenance department, and not by
yourself.;
• If there is any abnormality, please unplug
the power cord immediately and it must be
repaired by the manufacturer or its maintenance
department.
• Regularly clean the dust on the power cord plug;
• Before cleaning or moving, please turn o the
power and unplug the power cord;
• When pulling the plug, hold the power plug
instead of pulling the power cord;
• Do not touch the water and parts of the product
while the power is on;
EN
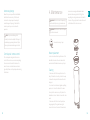
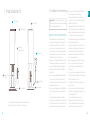
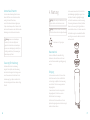
Power button
Mist outlet
Aroma tray
Control panel /
remote control*
Water inlet
Water tank
1
2
3
5
6
4
Ambient light
* = To use the remote control, please lift from the
dock by gently pulling out from the bottom
7Aluminum foot
8
Power cord
9

76
• Empty and clean the humidier before storage.
Clean the humidier before next use.
Warning: Micro-organisms that may be
present in the water or in the environment where
the appliance is used or stored, can grow in the
water reservoir and be blown in the air causing
very serious health risks when the water is not
renewed and the tank. Renew water every 3 days.
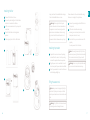
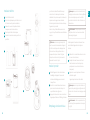
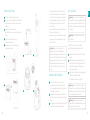
Installing the product
Unpack the device and remove the packing
materials from the device. Store the packing
materials for possible future transportation.
Plug the power cord in a wall outlet. You will
hear a beep and the power indicator will blink.
Press the power button to switch on the device
and the display will light up.
Filling the water tank
Note: Always remove the plug when lling the
water tank. Preferably use clean tap- or distilled
water to prevent bacteria and scale inside the water
tank.
Warning: Only ll with cold or lukewarm water.
Hot or boiling water will damage the device.
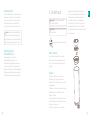
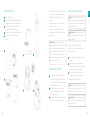
Installing the lter
Take out the lter from the box
Remove the plastic bag from the lter holder
and rinse 5 minutes before rst use
Lift the cover and water inlet tray to open the
water tank
Place the lter holder in the designated
position
Push and gently turn to x the lter holder
Please add water to the water tank before using
the device according to the steps below:
Remove the power plug and take o the lid on
the top side;
Fill the water tank with water using a
watering can or container (do not exceed the
transparent water inlet cover)
Place back the top cover and make sure it ts
properly.
You may now switch on the device.
Note: When using the device for the rst time,
the water may have a slight smell and discoloration.
This is normal and not harmful for your health.
Warning: Never use any other liquid than water.
Only use aroma in the dedicated aroma tray.
1
1
2
2
3
3
3
EN
4
4
5
1
2
3
1
2
2
5

98
C
°
%
1 2 4 6 8H
EN
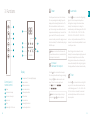
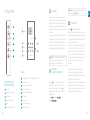
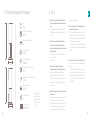
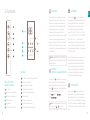
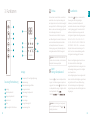
3. Functions
Power
Increase mist output
Decrease mist output
Auto mode
Timer
Ambient light / WIFI mode
1
2
3
4
1
2
3
4
5
6
Temperature (°C) / Humidity (%) display
Power indicator
Rell water indicator
Auto mode indicator
Mist output level bars
WIFI indicator
Timer indicator
Ambient light indicator
Timer hour(s) indicator
1
2
3
4
5
6
7
8
9
Control panel /
remote control
Display
5
6
1
2
3
4
5
6
7
8
9
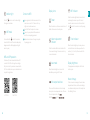
Auto mode
Press the button to activate the self-regulating
hygrostat. The mist output intensity will now
self-regulate according to the ambient relative
humidity. Press multiple times to change the
desired humidity in the following order: 40% > 45%
> 50% > 55% > 60% > 65% > 70% > 75% > 80% >
85% > 90% > ACTUAL HUMIDITY > 40% > 50% > ...
and so on. Each press will increase with 5%. Once
released, the selected humidity will blink 3 seconds
to conrm your choice.
When the hygrostat is set above the actual
humidity, the device will operate in high speed until
the desired humidity has been reached. When
the hygrostat is set below the actual humidity, the
device will not humidify. After setting the hygrostat,
the display will show the ambient relative humidity.
Timer
Press the key to activate the timer setting. With
every touch the timer will increase with one hour
in the following sequence: 1h > 2h > 4h > 6h > 8h >
OFF. Once the timer is activated, the device will
automatically shut down after the set timer has
been completed.
Power
Press the power button to switch on the device.
The corresponding indicator will light up on the
display and the ambient light will switch on. The
WIFI indicator will blink to look for devices to
pair. The monitoring screen will show the actual
temperature and humidity every 5 seconds. Press
again to switch o the device (the device will
remain in stand-by mode until the plug is removed
from the wall outlet). The default humidity setting is
MEDIUM output.
Note: you can also switch on the device with
the touch button on the device, located behind the
control panel / remote control.
Increase /
decrease mist output
Press the button increase the mist output.
The mist output level bars will change accordingly.
Pressing the button will decrease the mist
output. The are three mist output levels:
LOW , MEDIUM ,
HIGH
Note: The mist output setting will not cycle
when pressing or button multiple times.

1110
EN
Ambient light
Press the button to active the ambient light.
Press again to deactivate.
WIFI mode
Press and hold the button for 5 seconds to
activate the WIFI mode. The indicator will quickly
disappear and then ash rapidly (searching for
devices to pair)
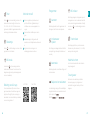
WIFI and APP operation
Scan below QR code to download the Duux APP
or search DUUX APP in the App Store or Google
Play Store to start the procedure to download the
APP. Once installed, enter your e-mail address and
complete the registration.
Connect to WIFI
Once registered, click “add duux device” on the
main screen or use the “+” button in the top
right corner to add a new device.,
Search for “Beam” and press to continue
Connect to your preferred WiFi network and
enter the corresponding password
Follow the instructions in the app to complete
the pairing process.
1
2
3
4
APP STORE PLAY STORE
WIFI indicator
When the indicator light blinks, it means it’s idle
and looking for a device to pair. If it’s solid, it
means the device is connected. Press and hold
the button for 5 seconds to cancel the pairing
operation.
Timer indicator
When the indicator lights up, it means you have
entered the timer mode. Below you will see the
number (1, 2, 4, 6 or 8H) of hours on which the
timer is activated.
Display brightness
The display will automatically dim after the last
touch or press.
Water shortage
If there is no water remaining in the water tank, a
beep will sound 3 times, and the water shortage
icon will automatically return to the standby state
after ashing 50 times.
Display icons
Power
When the indicator on, the device is switched on. If
it blinks, the device is in stand-by mode
Water replacement
indicator
When the indicator ashes red, it indicates that
there is water shortage. Please remove the top
cover and add water.
Auto mode
When this indicator light is on, it means the
humidier is operating in AUTO mode.
Mist output level bars
The amount of bars determine the mist output
intensity set in manual operation mode. There are
three mist output levels: LOW ,
MEDIUM , HIGH

1312
EN
Aroma tray/sponge
Below the top cover you will nd a small handle
which hides the aroma tray. Lift the handle
to release the tray and pour a few drops of
aromatherapy on the sponge. Place back the
aroma tray and top cover to continue the
operation.
Note: Only use aromatherapy that is
suitable for ultrasonic humidiers. Other types of
aromatherapy may damage the device. Refrain
from using oil-based aromatherapy at all times!
Control panel / remote control
The control panel is integrated in the remote
control. When not in use, we recommend placing
the remote control back in the holder on the
device. Remote control batteries are included
(type: AAA). Please note the polarity when inserting
the batteries.
Important: Be sure to remove the power plug
from the outlet before carrying out maintenance.
Important: Do not soak or immerse the power
plug or the device in water.
Clean water tank every 3 days
Water replacement
In order to maintain the best performance of the
humidier, the water in the water tank and the
water tank itself should be cleaned every 3 days.
Cleaning
• Please use a soft cloth to wipe the dust on the
body; If the surface is too dirty, it is better to wipe
it clean with a damped cloth mixed with neutral
detergent.
• Do not use chemical solvents, gasoline, polishing
powder, etc. to clean the surface of the device.
Do not place the device or any of it’s parts in the
dishwasher to clean. It is best to clean it with clean
water.
• Please use a soft cloth to clean the parts (see
image) regularly. If the regular cleaning can’t
remove the scale on the inside of the water tank,
4. Maintenance mix some lemon vinegar with lukewarm water
(water and lemon vinegar ratio 10ml:1g) Pour
everything into a large container and let it soak for
5 minutes. Then gently scrub the scale surface with
a soft brush until the scale is removed.

1514
Storage
When the appliance is not used for a long time,
please clean all the components, dry them, and put
them into the original box and store them in a dry
place.
Spare parts
Spare parts and accessories can be requested at
the point of purchase or local distributor.
The smart
and powerful
humidier with
minimal footprint
The European directive 2012 / 19 / CE on Waste
Electrical and Electronic Equipment (WEEE),
requires that old household electrical appliances
must not be disposed in the normal unsorted
municipal waste stream. Old appliances must
be collected separately in order to optimize the
recovery and recycling of the materials they
contain and reduce the impact on human health
and the environment. The crossed out “wheeled
bin” symbol on the product reminds you of your
obligation, that when you dispose of the appliance
it must be separately collected. Consumers
should contact their local authority or retailer for
information concerning the correct disposal of
their old appliance.
Disposal

1716
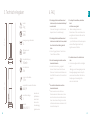
5. Technical specications
The appearance
and specication of
the device may be
changed without
notice.
EN
Model no.:
DXHU10/11
Power consumption:
28W
Weight:
2 kg
Water tank capacity:
5L
Main materials:
ABS, PP
Eective area:
40m²
Mist output (max.):
350ml/h
Max. operation time:
25h
Output settings:
3
22 cm
67,5 cm
Power cord length:
1,5m
22 cm
67,5 cm
6. FAQ
The power/water supply indicator does
not light up and mist does not come out.
Insert the power plug all the way to the back of
the socket or check if there is a power cut.
The power/water supply indicator is red
and the power is o, even though the
power button is pushed.?
There is not enough water. Please ll the water
tank with water.
Strange noises accompany the use of the
product.
A “burbling” sound comes out of the main
body. This sound is the sound of water being
supplied from the water tank to the main body
and does not mean the product is defective.
A strange noise can be heard from the
removed water tank.
When you remove an empty or nearly-empty
water tank from the main body, an abnormal
sound from the water tank can be heard.
This sound is related to pressure within the
water tank and does not mean the product is
defective.
Q.
Q.
Q.
A.
A.
Mist can’t be seen even when the power is
connected.
- Is the power/water supply display ashing
red? There is insucient water, if it is ashing
red. Please ll the water tank with water.
- The mist may not be visible depending on the
balance between the room temperature and
humidity.
The oor is wet / There is a water leakage.
Is the oor wet due to excessive humidity?
- Wet oors from mist can occur due to the
room environment and conditions of use.
Please switch the mist volume to minimum
output or AUTO mode.
A.
A.
Q.
A.
Q.
Q.
A.

1918
Bedankt dat je voor
Duux hebt gekozen.
We zijn blij dat je hebt besloten de handleiding bij je nieuwe luchtbevochtiger van Duux door te lezen! Veel
gebruikers laten de instructies links liggen en proberen er zelf achter te komen. Uit onderzoek blijkt echter
dat mensen die de handleiding lezen sneller en beter snappen hoe een apparaat werkt dan mensen die er
met vallen en opstaan achterkomen.
Bij Duux geloven we in het belang van een comfortabele, gezonde leefomgeving. Jouw welzijn verhogen
door aantrekkelijke, functionele en eectieve producten te ontwikkelen: dat is de passie die ons iedere
dag opnieuw drijft. Met ons aanbod aan innovatieve luchtbehandelingsproducten willen we je de best
denkbare luchtkwaliteit binnenshuis bieden.
Een droge huid, droge keel of regelmatig hoofdpijn? Dan bestaat er een kans dat de lucht in je huis te
droog is. Maak kennis met Beam 2, de veelzijdige, krachtige luchtbevochtiger met de minimale voetafdruk.
Met zijn grote tankinhoud van 5 liter en hoge neveluitstoot van 350 ml/u staat hij voor optimale prestaties.
Je vult Beam 2 eenvoudig van bovenaf bij. En de ingebouwde hygrostat en temperatuursensor zorgen voor
optimaal gebruiksgemak.
Lees deze handleiding goed door om alles uit je ultrasone Beam 2 luchtbevochtiger te halen.
1. Productoverzicht 20
2. Installatie en gebruik 21
3. Functies 24
4. Onderhoud 29
5. Technische specicaties 32
6. Veelgestelde vragen 33
Inhouds
opgave
NL

2120
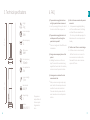
1. Product overview
Aan/uit-knop
Neveluitgang
Aromatray
Bedieningspaneel/
afstandsbediening*
Waterinlaat
Watertank
1
2
3
5
6
4
Sfeerlampje
* = Afstandsbediening uit de dock verwijderen door
voorzichtig van onderaf naar buiten te trekken
7Aluminium voet
8
Stroomkabel
9
apparaat niet aan terwijl het aanstaat;
• Sluit de luchtinlaat en neveluitgang niet af met
bijv. handdoeken;
• Dit is geen speelgoed. Houd het apparaat uit de
buurt van baby’s en kinderen om ongelukken
te voorkomen. Plaats het niet in een wieg,
wandelwagen of box. Laat kinderen en baby’s niet
met het apparaat spelen en laat ze het apparaat
niet gebruiken;
• Plaats het apparaat niet op een schuin aopende
tafel maar op een platte, stabiele ondergrond;
• Voeg geen smaakstoen of soortgelijke stoen
toe geproduceerd door of onder toezicht van
het bedrijf aan de watertank in het apparaat. Je
kunt de hiervoor bestemde aromatray onder
het deksel gebruiken om aromatherapie toe te
voegen.
• Niet in de keuken gebruiken. Houd uit de buurt
van warmtebronnen, vermijd direct zonlicht en
en houd uit de buurt van meubels en andere
huishoudelijke apparatuur. Plaats op twee meter
afstand van vocht.
• Wees u ervan bewust dat een hoge
vochtigheidsgraad de groei van biologische
organismen in de omgeving kan bevorderen.
• Zorg ervoor dat de ruimte rond de
luchtbevochtiger niet vochtig of nat wordt. Als er
vochtigheid optreedt, zet dan de uitgang van de
luchtbevochtiger lager. Als het uitgangsvolume
2. Installatie en gebruik
Let op: Lees de onderstaande instructies en het
losse waarschuwingsvel goed door voordat je dit
product gebruikt.
Algemene waarschuwingen
• Controleer vóór gebruik het voltage op het
apparaat. Sluit het apparaat alleen aan op
stopcontacten met hetzelfde voltage. Twijfel
je of je aansluitingen aan de eisen voldoen,
neem dan contact op met een elektricien of je
elektriciteitsleverancier.
• Demonteer en repareer het apparaat niet zelf
zonder toestemming.
• Indien de stroomkabel is beschadigd, dient deze
te worden vervangen door de fabrikant of de
onderhoudsafdeling van de fabrikant. Doe dit niet
zelf;
• Haal bij iedere afwijking direct de stekker uit het
stopcontact en laat het apparaat repareren door
de fabrikant of de onderhoudsafdeling van de
fabrikant.
• Stof de stekker regelmatig af;
• Schakel het apparaat uit alvorens het te reinigen
of verplaatsen en trek de stekker uit het
stopcontact;
• Houd de kabel bij de stekker vast en trek niet aan
de stroomkabel zelf;
• Raak het water en de onderdelen van het
NL

2322
van de luchtbevochtiger niet lager kan worden
gezet, gebruik de luchtbevochtiger dan met
tussenpozen. Zorg ervoor dat absorberende
materialen, zoals tapijten, gordijnen, vitrage of
tafelkleden, niet vochtig worden.
• Laat nooit water in het reservoir staan wanneer
het apparaat niet in gebruik is.
• Leeg en reinig de luchtbevochtiger voordat u
hem opbergt. Reinig de luchtbevochtiger voor het
volgende gebruik.
Waarschuwing: micro-organismen die
aanwezig kunnen zijn in het water of in de
omgeving waar het apparaat wordt gebruikt of
opgeborgen, kunnen in het waterreservoir groeien
en in de lucht worden geblazen. Hierdoor kunnen
zeer ernstige gezondheidsrisico’s ontstaan wanneer
het water in het reservoir niet wordt ververst.
Ververs het water elke 3 dagen.
Installatie van het product
Pak het apparaat uit en verwijder al
het verpakkingsmateriaal. Bewaar het
verpakkingsmateriaal voor toekomstig vervoer.
Steek de stroomkabel in een stopcontact.
Je hoort een piepje en de stroomindicator
knippert. Druk op de aan/uit-knop om het
apparaat aan te zetten. Het scherm is nu
verlicht.
Watertank vullen
Let op: Trek altijd de stekker uit het stopcontact
bij het vullen van de watertank. Gebruik bij voorkeur
schoon kraan- of gedestilleerd water om bacteriën
en kalkaanslag in de watertank te voorkomen.
Waarschuwing: Alleen vullen met koud of
lauw water. Heet of kokend water beschadigt het
apparaat.
Vul de watertank vóór gebruik
op de volgende manier met water:
Trek de stekker eruit en verwijder het deksel
aan de bovenkant;
Vul de watertank met water met behulp
van een kan of bak (niet breder dan het
doorzichtige deksel van de waterinlaat)
Plaats het deksel terug en controleer of het
goed aansluit.
Je kunt het apparaat nu aanzetten.
Let op: Wanneer je het apparaat voor het eerst
gebruikt, kan het water licht ruiken en verkleurd zijn.
Dit is normaal en niet schadelijk voor de gezondheid.
Waarschuwing Gebruik nooit een andere
vloeistof dan water. Gebruik aroma alleen in de
daarvoor bestemde aromatray.
1
2
3
1
2
3
Installeren van de lter
Neem het lter uit de doos
Verwijder de plastic zak van de lterhouder en
spoel 5 minuten voor het eerste gebruik
Til het deksel en de waterinlaat op om het
waterreservoir te openen
Plaats de lterhouder in de daarvoor bestemde
positie
Druk en draai voorzichtig om de lterhouder
vast te zetten
1
2
3
3
4
4
5
1
2
2
5
NL

2524
C
°
%
1 2 4 6 8H
NL
3. Functies
Aanzetten
Neveluitstoot verhogen
Neveluitstoot
Verlagen Automodus
Timer
Sfeerlampje/wi-modus
1
2
3
4
1
2
3
4
5
6
Temperatuur (°C)/luchtvochtigheid (%) van scherm
Stroomindicator
Indicator voor wat bijvullen
Indicator automodus
Balkjes sterkte neveluitvoer
Wi-indicator
Timerindicator
Indicator sfeerlampje
Indicator uren timer
1
2
3
4
5
6
7
8
9
Bedieningspaneel/
afstandsbediening
Display
5
6
1
2
3
4
5
6
7
8
9
Let op: De cyclus begint niet opnieuw door
meermaals op of te drukken.
Automodus
Druk op om de zelfregulerende
hygrostat te activeren. De neveluitstoot wordt nu
automatisch gereguleerd op basis van de relatieve
omgevingsluchtvochtigheid. Druk meerdere malen
voor het aanpassen van de
gewenste luchtvochtigheid in deze volgorde: 40%
> 45% > 50% > 55% > 60% > 65% > 70% > 75% >
80% > 85% > 90% > ACTUAL HUMIDITY > 40% >
50% > ...etc. Met elke druk wordt de uitstoot met
5% verhoogd. Zodra je de knop loslaat, knippert
de gekozen uitstoot driemaal om je keuze te
bevestigen.
Wanneer de hygrostat boven de aanwezige
luchtvochtigheid wordt ingesteld, draait het
apparaat op hoge snelheid totdat de gewenste
luchtvochtigheid is bereikt. Wordt
de hygrostat onder de aanwezige luchtvochtigheid
ingesteld, dan is het apparaat niet actief. Na het
instellen van de hygrostat toont het scherm de
relatieve luchtvochtigheid in de ruimte.
Aanzetten
Druk op de aan/uit-knop om het apparaat aan te
zetten. De bijbehorende indicator op het scherm
gaat branden en het sfeerlampje gaat aan. De
wi-indicator knippert op zoek naar apparaten om
verbinding mee te maken. Het scherm toont elke
vijf seconden
de temperatuur en luchtvochtigheid in de ruimte.
Druk nogmaals om het apparaat uit te zetten (het
apparaat staat in stand-by totdat de stekker uit
het stopcontact wordt getrokken. De standaard
luchtvochtigheidsinstelling is MEDIUM uitstoot.
Let op: je kunt het apparaat ook aanzetten
met de touchknop op het apparaat, achter het
bedieningspaneel / de afstandsbediening.
Verhogen /
verlagen neveluitstoot
Druk op om de neveluitstoot te verhogen.
De balkjes met het uitstootniveau worden
overeenkomstig aangepast. Door op te
drukken, verlaag je de neveluitstoot. Er zijn drie
mogelijkheden:
LOW , MEDIUM ,
HIGH

2726
Timer
Druk op om de timerinstelling te activeren. Per
druk neemt de timer als volgt met één uur toe:
1h > 2h > 4h >6h > 8h > OFF. Zodra de timer is
geactiveerd, schakelt het apparaat automatisch uit
nadat de ingestelde duuris verstreken.
Sfeerlampje
Druk op om het sfeerlampje te activeren. Druk
nogmaals om uit te schakelen.
Wi-modus
Houd de knop vijf seconden ingedrukt om
de wi-modus te activeren. De indicator dooft en
knippert vervolgens snel (op zoek naar apparaten
om mee te verbinden)
Bediening van wi en app
Scan de onderstaande QR-code om de Duux-
app te downloaden of zoek de Duux-app in de
App Store of Google Play Store om de app te
downloaden. Voer na de installatie je e-mailadres
in en rond de registratie af.
NL
Verbinden met wi
Klik na de registratie op ‘add duux device’
op het hoofdscherm of gebruik de knop ‘+’
rechtsboven om een nieuw apparaat toe te
voegen.
Zoek naar ‘Beam’ en klik hierop om door te
gaan.
Maak verbinding met het gewenste wi-
netwerk en voer het bijbehorende wachtwoord
in.
Volg de instructies in de app om de
verbindingsprocedure te voltooien.
1
2
3
4
APP STORE PLAY STORE
Wi-indicator
Als het lampje knippert, is het apparaat op zoek
naar apparaten om mee te verbinden. Brandt het
continu, dan is het apparaat verbonden. Druk vijf
seconden op om de verbindingsprocedure te
annuleren.
Timerindicator
Als dit lampje oplicht, ben je in de timermodus.
Daaronder zie je het aantal uren (1, 2, 4, 6 of 8H)
waarop de timer is ingesteld.
Helderheid scherm
Het scherm dimt automatisch nadat de laatste
knop is aangeraakt.
Te weinig water
Als het water in de watertank op is, klinkt er
driemaal een piepje. Het pictogram keert
automatisch terug naar stand-by na 50 keer
knipperen.
Pictogrammen
Aanzetten
Als dit lampje brandt, staat het apparaat aan. Als
het knippert, staat het in de stand-bymodus
Indicator water
bijvullen
Als dit lampje rood knippert, betekent dit dat het
waterpeil te laag is. Verwijder het deksel en vul
water bij.
Automodus
Als dit lampje brandt, is de luchtbevochtiger actief
in de automodus.
Balkjes sterkte neveluitstoot
In de handmatige modus geeft het aantal balkjes
de ingestelde sterkte van de neveluitstoot aan. Er
zijn drie opties: LOW ,
MEDIUM , HIGH

2928
NL
Aromatray/spons
Onder het deksel vind je een hendeltje waaronder
de aromatray verborgen zit. Trek aan de hendel
om de tray te verwijderen en laat wat druppels
aromatherapie op de spons vallen. Plaats de
aromatray en het deksel terug om door te gaan.
Let op: gebruik uitsluitend aromatherapie
die geschikt is voor ultrasone luchtbevochtigers.
Andere soorten kunnen het apparaat beschadigen.
Gebruik nooit aromatherapie op basis van olie.
Bedieningspaneel/
afstandsbediening
Het bedieningspaneel is verwerkt in
de afstandsbediening. Wanneer je de
afstandsbediening niet gebruikt, adviseren we
je om hem terug te zetten in de houder op het
apparaat. De batterijen voor de afstandsbediening
zijn meegeleverd (type AAA). Let bij het plaatsen
van de batterijen op de symbolen voor de polen.
Belangrijk: trek vóór ieder onderhoud de
stekker uit het stopcontact.
Belangrijk: dompel de stekker of het apparaat
nooit onder in water.
Reinig het waterreservoir elke 3 dagen.
Water verversen
Om de luchtbevochtiger in optimale conditie
te houden, moet het water regelmatig worden
ververst en de watertank elke 3 dagen worden
gereinigd;
Reinigen
• Gebruik een zachte doek om stof van de
behuizing te vegen. Is de buitenkant te vuil,
gebruik dan een vochtige doek met een neutraal
reinigingsmiddel.
• Gebruik geen chemische oplosmiddelen, benzine,
polijstmiddel, enz. om de buitenkant van het
apparaat te reinigen.
Plaats het apparaat of enig onderdeel ervan niet in
de afwasmachine. Je kunt het apparaat het beste
reinigen met schoon water.
• Gebruik een zachte doek om de onderdelen
4. Onderhoud regelmatig te reinigen (zie afbeelding). Lukt het
niet om met regelmatig reinigen de kalkaanslag
in de watertank te verwijderen, meng dan wat
citroenazijn met lauw water (verhouding water
en citroenazijn 10ml:1g). Giet het mengsel in een
grote bak en laat vijf minuten weken. Borstel dan
voorzichtig het oppervlak met de kalkaanslag totdat
deze is verdwenen.

3130
Opbergen
Ben je van plan het apparaat langere tijd niet te
gebruiken, reinig dan alle onderdelen, maak ze
droog, plaats ze in de originele doos en zet deze
op een droge plek.
Reserveonderdelen
Reserveonderdelen en accessoires kunnen worden
aangeschaft bij het verkooppunt of de plaatselijke
distributeur.
De slimme
en krachtige
luchtbevochtiger
met de minimale
voetafdruk
Afvoer
Volgens de Europese richtlijn 2012/19/
EU betreende afgedankte elektrische en
elektronische apparatuur (AEEA) mogen oude
elektrische huishoudelijke apparaten niet via de
gemeentelijke diensten als normaal ongesorteerd
huishoudelijk afval worden afgevoerd. Oude
apparaten moeten gescheiden worden
ingezameld om hergebruik en recycling van de
materialen in de apparaten te optimaliseren en
de eecten op de gezondheid van mensen en
het milieu te beperken. Het symbool van een
container met een kruis erdoor herinnert je
aan je verplichting om het afgedankte apparaat
aan te bieden voor gescheiden afvalinzameling.
Consumenten dienten contact op te nemen met
de plaatselijke overheid of hun detailhandelaar
voor meer informatie over de correcte afvoer van
oude apparaten.

3332
5. Technische specicaties
Het uiterlijk en de
specicaties van het
apparaat kunnen
zonder voorafgaande
kennisgeving worden
gewijzigd
NL
Modelnr.:
DXHU10/11
Stroomverbruik:
28W
Gewicht:
2 kg
Inhoud watertank:
5L
Hoofdmaterialen:
ABS, PP
Eectieve ruimte:
40m²
Neveluitstoot (max.):
350ml/u
Max. gebruikstijd:
25u
Instellingen uitstoot:
3
22 cm
67,5 cm
Lengte stroomkabel:
1,5m
22 cm
67,5 cm
6. Veelgestelde vragen
De stroom-/waterindicator brandt niet en
er komt geen nevel uit.
Steek de stekker helemaal in het stopcontact of
controleer of er een stroomstoring is.
De stroom-/waterindicator brandt rood
en de stroom is uit, zelfs als ik op de aan/
uit-knop druk.
Het waterpeil is te laag. Vul water bij
in de watertank.
Ik hoor vreemde geluiden wanneer ik het
apparaat gebruik.
Het apparaat maakt een ‘borrelend’ geluid. Dit
is het geluid van water dat vanuit de watertank
naar het apparaat wordt geleid en betekent
niet dat het apparaat defect is.
Er komt een vreemd geluid uit de
verwijderde watertank.
Wanneer je een lege of bijna lege watertank
van de machine haalt, kan de tank een vreemd
geluid voortbrengen. Dit geluid heeft te maken
met druk in de watertank en betekent niet dat
het apparaat defect is.
V.
V.
V.
A.
A.
Ik zie geen nevel, zelfs niet als het
apparaat op stroom is aangesloten.
- Knippert de stroom-/waterindicator rood? In
dat geval is het waterpeil
te laag. Vul water bij in de watertank.
- De nevel is mogelijk niet zichtbaar vanwege
de balans tussen de temperatuur en de
luchtvochtigheid in de kamer.
De vloer is nat/er heeft water gelekt.
Is de vloer nat door overmatige
luchtvochtigheid?
- Natte vloeren door nevel kunnen
voorkomen als gevolgvan de temperatuur en
gebruiksomstandigheden. Zet het nevelvolume
op minimale uitstoot of AUTO-modus.
A.
A.
V.
A.
V.
V.
A.

3534
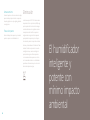
Merci d’avoir
choisi Duux.
Nous sommes ravis que vous ayez décidé de lire les instructions relatives à votre nouvel humidicateur
d’air Duux ! De nombreux utilisateurs ne prêtent pas attention aux instructions et veulent trouver eux-
mêmes comment fonctionne l’appareil. Cependant, des études démontrent que les personnes qui lisent
les instructions pourront se familiariser avec l’appareil plus rapidement et plus ecacement que celles qui
procèdent par tâtonnements.
Chez Duux, nous sommes convaincus de l’importance d’un environnement de vie confortable et sain.
La passion qui nous anime jour après jour est d’améliorer votre bien-être en concevant des produits
attrayants, fonctionnels et ecaces. Grâce à notre gamme d’appareils de traitement de l’air innovants,
nous visons à vous fournir la meilleure qualité d’air intérieur possible.
Peau sèche, gorge sèche ou maux de tête réguliers ? Il se pourrait bien que l’air à l’intérieur de votre
maison soit trop sec. Nous vous présentons Beam 2, l’humidicateur polyvalent de grande capacité pour
un encombrement minimal. Son réservoir d’eau grande capacité de 5 litres et son débit de brume élevé
de 350 ml/h garantissent des performances optimales. Remplir le Beam 2 est facile grâce à sa capacité de
remplissage optimale. De plus, son hygrostat et son capteur de température intégrés excellent en termes
de facilité d’utilisation.
Lisez attentivement ce manuel pour tirer le meilleur parti de votre humidicateur à ultrasons Beam 2.
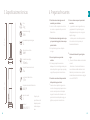
1. Aperçu du produit 36
2. Installation et utilisation 37
3. Fonctions 40
4. Maintenance 45
5. Spécications techniques 48
6. FAQ 49
Table des
matières
FR

3736
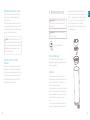
1. Aperçu du produit
Bouton
d’alimentation
Sortie de brume
Bac à huiles essentielles
Panneau de commande
/ télécommande*
Entrée d’eau
Réservoir d’eau
1
2
3
5
6
4
Lumière
d’ambiance
* = Pour utiliser la télécommande, veuillez la retirer
de son socle en tirant doucement par le bas
7Pied en aluminium
8
Cordon
d’alimentation
9
• Ne touchez pas l’eau et les éléments de l’appareil
lorsque celui-ci est sous tension ;
• Ne pas couvrir l’entrée d’air et la sortie de brume
avec des objets tels que des serviettes ;
• Ceci n’est pas un jouet. Pour éviter les accidents,
éloignez-le des bébés et des enfants. Ne pas le
placer dans un berceau, une poussette ou un
parc pour enfants. Ne pas laisser les enfants et
les bébés jouer avec l’appareil et l’utiliser ;•
• Ne pas utiliser l’appareil sur une table penchée, il
doit être placé sur une surface plane et stable ;
• Ne pas ajouter des arômes ou des substances
similaires produites ou supervisées par
l’entreprise dans le réservoir d’eau de l’appareil
; Vous pouvez utiliser le bac à huiles essentielles
dédié sous le couvercle pour ajouter des
essences.
• Ne pas utiliser dans la cuisine. Éloigner l’appareil
des sources de chaleur, de la lumière directe
du soleil, des meubles et des autres appareils
électroménagers. Tenir à 2 mètres des sources
d’humidité.
• Sachez qu’un taux d’humidité élevé peut favoriser
la croissance d’organismes biologiques dans
l’environnement.
• Ne laissez pas la zone autour de l’humidicateur
devenir humide ou mouillée. En cas d’humidité,
réduisez la puissance de l’humidicateur. Si le
volume de sortie de l’humidicateur ne peut
2. Installation et utilization
Remarque: Veuillez prendre en compte les
instructions ci-dessous et la feuille d’avertissement
fournie séparément avant d’utiliser l’appareil.
Précautions générales
• Vérier la tension sur l’étiquette de l’appareil
avant l’utilisation. Ne brancher l’appareil que
sur des prises correspondant à la tension de
l’appareil. Si vous ne savez pas si vos connexions
répondent aux exigences, consultez un
électricien ou votre fournisseur d’électricité.
• Ne pas démonter ni réparer l’appareil
sans autorisation.
• Si le cordon d’alimentation est endommagé, il
doit être remplacé par le fabricant ou son service
de maintenance, et non par vous-même an
d’éviter tout danger.
• Si une anomalie se présente, veuillez débrancher
le cordon d’alimentation immédiatement. Il
doit être réparé par le fabricant ou son service
d’entretien.
• Nettoyer régulièrement la poussière sur la che
du cordon d’alimentation ;
• Avant de nettoyer ou de déplacer l’appareil,
veuillez l’éteindre et débrancher le cordon
d’alimentation ;
• Lorsque vous retirez la che, tenez la che au lieu
de tirer sur le cordon ;
FR

3938
pas être réduit, utilisez l’humidicateur par
intermittence. Ne laissez pas les matériaux
absorbants, tels que la moquette, les rideaux, les
draperies ou les nappes, devenir humides.
• Ne laissez jamais d’eau dans le réservoir lorsque
l’appareil n’est pas utilisé.
• Videz et nettoyez l’humidicateur avant de le
ranger. Nettoyez l’humidicateur avant l’utilisation
suivante.
Attention : des micro-organismes présents
dans l’eau ou dans l’environnement où l’appareil
est utilisé ou stocké, peuvent se développer dans
le réservoir d’eau et être projetés dans l’air en
provoquant des risques sanitaires très graves
lorsque l’eau du réservoir n’est pas renouvelée.
Renouvelez l’eau tous les 3 jours.
Installer le produit
Déballer l’appareil et retirer les matériaux
d’emballage de l’appareil. Conserver les
matériaux d’emballage pour un éventuel
transport futur.
Brancher le cordon d’alimentation dans une
prise murale. Vous entendrez un bip et le
voyant d’alimentation clignotera.
Appuyez sur le bouton de mise en marche sur
l’appareil pour l’allumer et l’achage s’éclairera.
Remplissage du réservoir d’eau
Remarque: Toujours retirer le bouchon lors du
remplissage du réservoir d’eau. Utiliser de préférence
de l’eau du robinet propre ou de l’eau distillée
pour éviter les bactéries et le tartre à l’intérieur du
réservoir d’eau.
Avertissement : Remplir uniquement avec de
l’eau froide ou tiède. L’eau chaude ou bouillante
endommagerait l’appareil.
Veuillez ajouter de l’eau dans le réservoir d’eau
avant d’utiliser l’appareil selon les étapes ci-
dessous :
Débrancher le cordon d’alimentation et retirer
le couvercle sur le dessus ;
Remplir le réservoir d’eau avec de l’eau à
l’aide d’un arrosoir ou d’un récipient (ne
pas dépasser le couvercle d’entrée d’eau
transparent)
Replacer le couvercle supérieur et s’assurer
qu’il est bien ajusté.
L’appareil peut maintenant être allumé.
Remarque: Lors de la premiére utilisation de
l’appareil, l’eau peut dégager une légère odeur et se
décolorer. Ceci est normal et sans danger pour votre
santé.
Avertissement : utilisez uniquement de l’eau.
Utilisez les parfums uniquement dans le bac prévu
à cet eet.
1
2
3
1
2
3
Installation du ltre
Sortez le ltre de la boîte
Retirez le sac plastique du porte-ltre et rincez-
le 5 minutes avant la première utilisation.
Soulevez le couvercle et le plateau d’entrée
d’eau pour ouvrir le réservoir d’eau.
Placez le porte-ltre à l’endroit prévu
Poussez et tournez doucement pour xer le
porte-ltre.
1
2
3
3
4
4
5
1
2
2
5
FR
La page est en cours de chargement...
La page est en cours de chargement...
La page est en cours de chargement...
La page est en cours de chargement...
La page est en cours de chargement...
La page est en cours de chargement...
La page est en cours de chargement...
La page est en cours de chargement...
La page est en cours de chargement...
La page est en cours de chargement...
La page est en cours de chargement...
La page est en cours de chargement...
La page est en cours de chargement...
La page est en cours de chargement...
La page est en cours de chargement...
La page est en cours de chargement...
La page est en cours de chargement...
La page est en cours de chargement...
La page est en cours de chargement...
La page est en cours de chargement...
La page est en cours de chargement...
La page est en cours de chargement...
La page est en cours de chargement...
-
 1
1
-
 2
2
-
 3
3
-
 4
4
-
 5
5
-
 6
6
-
 7
7
-
 8
8
-
 9
9
-
 10
10
-
 11
11
-
 12
12
-
 13
13
-
 14
14
-
 15
15
-
 16
16
-
 17
17
-
 18
18
-
 19
19
-
 20
20
-
 21
21
-
 22
22
-
 23
23
-
 24
24
-
 25
25
-
 26
26
-
 27
27
-
 28
28
-
 29
29
-
 30
30
-
 31
31
-
 32
32
-
 33
33
-
 34
34
-
 35
35
-
 36
36
-
 37
37
-
 38
38
-
 39
39
-
 40
40
-
 41
41
-
 42
42
-
 43
43


Duux Beam 2 Le manuel du propriétaire
- Catégorie
- Humidificateurs
- Taper
- Le manuel du propriétaire
dans d''autres langues
- English: Duux Beam 2 Owner's manual
- español: Duux Beam 2 El manual del propietario
- Deutsch: Duux Beam 2 Bedienungsanleitung
Documents connexes
-
Duux Beam Le manuel du propriétaire
-
-
-
-
-
-
-
-
Autres documents
-
 Pro Breeze PB-12-UK-FBA Manuel utilisateur
-
ProfiCare PC-LK 3088 Mode d'emploi
-
 Air&me CLARENCE Humidifier Manuel utilisateur
-
-
Boneco U650 Le manuel du propriétaire
-
Air And Me CLEVAIR 2 Manuel utilisateur
-
Air-O-Swiss AOS U650 Manuel utilisateur
-
Xbrand Music fountain aromatherapy machine Manuel utilisateur
-
ALPATEC AF 01 L Manuel utilisateur

