
Compactor
Owner's Manual
0
du
Manuel du
propri_taire
compacteur
GCG1500P
GCG1580P
GCG1700P
ZCGS150P
ZCGP150P
O
Nodel number
/Num4ro de modUe
Serial number
/Num4ro de s4rie
WIOI90338A 165D4700P677 49-55055 9-08

TABLE OF CONTENTS
COMPACTORSAFETY....................................................................................2
INSTALLATIONINSTRUCTIONS...................................................................3
Unpacking ..........................................................................................................................3
Location Requirements .............................................................................................../4
Electrical Requirements ..............................................................................................4
Undercounter Installation ..........................................................................................5
COMPACTORUSE..........................................................................................7
How Your Compactor Works....................................................................................7
Loading ................................................................................................................................7
Starting Your Compactor ............................................................................................7
Using Solid(Locked)Cgcle..........................................................................................7
Using the Air Filter..........................................................................................................8
Removing a Filled Bag..................................................................................................8
Installing a New Bag .....................................................................................................8
COMPACTORCARE.......................................................................................9
Changing the Air Filter..................................................................................................9
Cleaning...............................................................................................................................9
TROUBLESHOOTING...................................................................................10
WARRANTY...................................................................................................11
CONSUMERSERVICES................................................................................12
GESERVICEPROTECTIONPLUSTM ............................................................13
CONSUMERPRODUCTOWNERSHIPREGISTRATION...........................14
TABLE DES MATIERES
SI_CURITI_DUCOMPACTEUR....................................................................15
INSTRUCTIONSD'INSTALLATION............................................................16
D6ballage .........................................................................................................................16
Exigences d'emplacement .....................................................................................16
Sp6cifications 61ectriques.......................................................................................17
Installation sous un comptoir ...............................................................................18
UTILISATIONDUCOMPACTEUR...............................................................20
Fonctionnement du compacteur ........................................................................20
Chargement ...................................................................................................................20
iVtiseen marche du compacteur .........................................................................20
Utilisation du programme Solid(compression solide)
(Verrouill6)........................................................................................................................20
Utilisation du filtre _ air.............................................................................................21
Enl_vement d'un sac rempli...................................................................................21
Installation d'un nouveau sac...............................................................................21
ENTRETIENDUCOMPACTEUR..................................................................22
Changement du filtre _ air......................................................................................22
Nettogage .......................................................................................................................22
DI_PANNAGE................................................................................................24
GARANTIE.....................................................................................................25
SERVICE/_LACLIENTI_LE...........................................................................26
SERVICEPROTECTIONPLUSTM DEGE......................................................27
ENREGISTREMENTDU PROPRII_TAIREDE
PRODUITAU CONOMMATEUR.................................................................28
COMPACTOR SAFETY
Your safety and the safety of others are very important.
We have provided many important safety messages in this manual and on your appliance. Always read and obey all safety
messages.
This is the safety alert symbol.
This symbol alerts you to potential hazards that can kill or hurt you and others.
All safety messages will follow the safety alert symbol and either the word "DANGER" or "WARNING."
These words mean:
You can be killed or seriously injured if you don't immediately
follow instructions.
You can be killed or seriously injured if you don't follow
instructions.
All safety messages will tell you what the potential hazard is, tell you how to reduce the chance of injury, and tell you what can
happen if the instructions are not followed.

IMPORTANT SAFETY INSTRUCTIONS
WARNING: When using an electrical appliance, basic precautions should always be followed, including the following:
• Read all instructions before using the compactor.
• Close supervision is necessary when used by or near
children. Do not allow to be used as a toy, or to run
unattended at any time. Lock Key Switch when not in use
and store key out of reach of children.
• Do not touch moving parts.
• Do not operate with a damaged cord set, plug, motor, or
after damage in any manner. Have the compactor
examined, repaired or adjusted by an authorized
serviceperson.
• Use only for intended use as described in this manual. Do
not use other than manufacturer's recommended
attachments.
• Do not compact toxic or volatile flammable material such as
oily rags and insect sprays. Do not compact lighted
cigarettes, cigars, or other hot or burning items. Do not
overload the compactor.
• Do not take apart the compactor. Incorrect reassembly can
cause electric shock when subsequently used.
• Handle a loaded trash bag with care. Sharp objects can
pierce the bag and cause injury. Do not overload trash bag
with heavy material such as glass.
• This compactor is intended for household use only.
SAVE THESE INSTRUCTIONS
INSTALLATION INSTRUCTIONS
Installer: Leave Use and Care Guide with the homeownen Homeowner: Keep Use and Care Guide for future reference and for
local electrical inspector's use, if required.
Excessive Weight Hazard
Use two or more people to move and install compactor.
Failure to do so can result in back or other injury.
IMPORTANT:
I.
2.
Do not grasp console to move compactor.
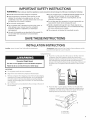
Begin in the room where the compactor will be located.
Remove compactor from shipping carton. Remove all packaging
materials such as tape and shipping pads. Use a mild detergent
and warm water to remove waxg residue caused bg shipping
material. Drg thoroughly with a soft cloth. For more information,
see "Cleaning."
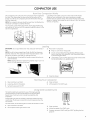
Be sure the power cord is attached to the cord clip on the rear of
the compactor.
A |
A.Cord clip
3.
4°
Place the 2 corner posts from the carton on the floor near the
compactor. Open the compactor drawer and remove ang
shipping materials or other items from the drawer. Do not remove
the compactor bag. Grasp the handle and raise the front of
drawer until it clears the drawer stops. Grasp sides of drawer and
lift drawer out of compactor. Place the drawer on the 2 corner
posts.
\
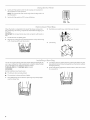
Place the other 2 corner posts on the floor to the side of the
compactor. Grasp the sides of the compactor cabinet and put
compactor on its side on top of the corner posts. Remove the
shipping base from the bottom of the compactor.
A. Leveling legs
B.Shipping base

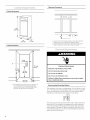
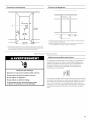
Product Dimensions
341/8''
(86.7 cm)
Cutout Dimensions
\
3" min,
(7.6 cm)--_
24" min.
(61cm)
f 18,,iin.
(45.7 cm)
/
15V4" min.
(36.7 crn)
A. Grounded electrical outlet must be a minimum of
3" (7.6 cm) away from surrounding cabinets or
nearby walls as shown. It can be placed either to
the left or the right side of the compactor.
Clearance Dimensions
i
I
A. Leave 6" (15.2 cm) of clearance space to the right side of the
compactor in order to remove the compactor bags.
B. Leave 23" (58.4 cm) of clearance in front of the compactor in
order to fully open or remove the compactor drawer.
Electrical Shock Hazard
Plug into a grounded 3 prong outlet.
Do not remove ground prong.
Do not use an adapter.
Do not use an extension cord.
Failure to follow these instructions can result in death,
fire, or electrical shock.
Recommended Grounding Method
This compactor isfor use on a single phase, 11S-volt, 60 Hz,AConly,
15- or 20-amp fused and properly grounded circuit and is equipped
with a grounding plug as shown below. It is recommended that a
separate circuit serving only this appliance be provided.
This compactor must be grounded while in useto reduce the risk of
electric shock. The compactor isequipped with a three-conductor
cord and 3 prong grounding-type plug to fit the proper grounding-
type receptacle. The green (or green and yellow) conductor in the
cord is the grounding wire. Do not connect the green (or green and
yellow) wire to a live terminal.
4

U de counte" nst(s cston
NOTE:Proper installation is your responsibility. Hake sure you have
everything necessary for correct installation. It isthe personal
responsibility and obligation of the customer to contact a qualified
installer to assure that electrical installation meets all national and
local codes and ordinances.
Tools needed:
Gather the required tools and ports before starting installation.
• Level
• Tope measure
• Pliers
• Scissors
IMPORTANT:
• Phillips No. 2screwdriver
• Flat-blade screwdriver
• 5/16"Box-end wrench
• Utility knife
Do not grasp control panel to move compactor.
Slide compactor onto cardboard or hardboard before moving
compactor across floor to avoid floor covering damage.
Do not allow the rear frame of the compactor to touch the floor
covering when lifting or moving compactor.
Undercounter Installation
NOTE:Installation hardware is not provided with full cabinet models.
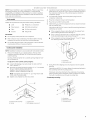
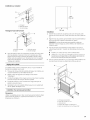
1. Heasure the height of your cabinet opening. Thetop of the
compactor should be at least 1/8"(3 mm)from the top of the
cabinet opening.
The rear wheels are preset for a cabinet opening height of 341/4"
(87 cm)(Position 1).
Toadjust for other cabinet opening heights:
• Loosen self-tapping screw just enough to clear stud from
hole in position "1."
Hove the rear wheel and stud to position "2" or "3" as needed
for your cabinet opening measurement:
Position 2: 3/4¼"to 34V16"(87to 87.5 cm)
Position 3:347/i6'' to 34%" (87.5 to 88 cm)
NOTE:To level the unit in position "3," you may need to add
shims under the leveling legs.
Tighten screw. Repeat for other rear wheel.
2. Use pliers to lower leveling legs away from cabinet. Adjust legsso
there will be a 1/8"(3 mm) to 1/4"(6.4 mm) space between the top of
the compactor and the top of the cabinet opening. Stand the
compactor upright.
3. For model with cabinet, remove the plastic plugs from the
compactor cabinet top.
4. Hove the compactor close to its final position.
5. Plug into a grounded 3 prong outlet.
6. Determine if you want the compactor frame or drawer front flush
with the cabinet front.
Using the two #8-18 x %d' screws, install the retaining brackets to
cabinet top as needed:
• If the compactor frame is to be flush with the cabinet front,
place retaining bracket screws through "1."
• If the compactor drawer front isto be flush with the cabinet
front, place retaining bracket screws through "3."
• If the compactor is to be midway between "1" and "3," place
the retaining bracket screws through "2/'
A. Countertop
B.Retaining bracket
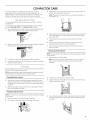
7,
Slowly lift the front slightly and roll compactor into the cabinet
opening.
Using the two #8-18 x 1/2"screws, fasten the retaining brackets to
the countertop with the mounting screws.
If brackets cannot be attached to the underside of countertop,
attach mounting clips to brackets. Fasten compactor to cabinet
front with mounting screws through mounting clips.
Countertop mounting
A
D
A Wheel bracket assembly C.Locating stud
B.Cabinet D.Self-tapping screw (pivot)
A Countertop
B.Retaining bracket
C.Mounting screw

Cabinet-front mounting
A
A Mounting clip C.Retaining bracket
B. Cabinet D. Mounting screw
8.
Grasp sides of compactor drawer and place bottom of drawer
into tracks. Lift at the handle sodrawer will go over drawer stops.
Close drawer. Check to see if drawer opens freelg. If the toe plate
rubs against floor, see "Adjusting the Toe Plate" for further
instructions.
Adjusting the Toe Plate
If the toe plate rubs the floor covering, the toe plate clearance mag
be changed as follows:
1. Mark on each side of the toe plate the amount of toe plate that
rubs the floor covering.
2. Remove the drawer from the unit. (SeeStep 3 in the "Unpacking"
section.)
3. Use a ruler and a pencil or chalk to draw a line between the
marks on each side of toe plate.
4. Use scissors or utilitg knife to cut toe plate along line.
5. Replace drawer. Iftoe plate still rubs floor covering, repeat steps
1-4.
Installing a Custom Panel
Dimensions
Use these dimension drawings to create a custom panel for use
without a trim kit. The panel should be a minimum of 1/2"(13 mm)
thick.
Installation
1. Remove the 2 rubber bumpers from the lower corners of the
inside drawer front. Set aside the bumpers and discard the
screws.
2.
Align the bottom of the custom panel with the bottom of the
exterior drawer front and rest the panel on the rest tab.
NOTE:The bottom of the custom panel should not extend below
the bottom rest tab at the lower center of the exterior drawer
front.
3.
4.
Secure the custom panel to the exterior drawer front bg using
four #8 x 1"wood screws from the inside drawer front.
Install the top 2wood screws as shown.
Use the bottom 2 wood screws to also reinstall the 2 rubber
bumpers on each side of the lower inside drawer while
attaching to the custom panel.
Attach a 15" x 1/2"quarter-round filler along the top inside edge of
the drawer front using glue or screws.
A Custom panel
B.15" x ½" quarter round
C.Drawer front
D. Four #8 x 1" wood screws placement
E.Rubber bumper (one on each side)
293/8 ''
(74.6 crn)
_.__ 15" __.
(36.1 cm)

COMPACTOR USE
The compacting ram is the part of the compactor which compresses
the trash. The compacting ram does not go to the bottom of the
drawer. You will not see compacting of trash the first few times you
load the compactor.
NOTE:The compactor drawer should be more than V2full before the
compactor can begin to compress the load.
You may hear a noise when glass breaks. Strong glass bottles may
not break at all. The trash in afull compactor bag will be about V4the
size of its original bulk.
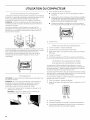
Load bulky trash, bottles, and cans in the center of the drawer.
Bottles or cans not placed in the center may become caught
between the ram and the drawen The Drawer Monitor Switch then
senses a "misload" and causes the ram to return to the "up" position
without compacting.
I _ _ f_'_'_-d _ _
',lL l fl
j_ _l.-----Jll
IMPORTANT:Do not push items down into compactor with hands or
feet.
NOTE: You will not see compacting of trash the first few times you
load the compacton The compactor drawer should be about V2full
before the compactor can begin to compress the load.
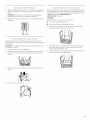
1. Open the drawee Lift and pull the handle or press the toe bar to
open the drawee
NOTE: Pressing the toe bar opens the container only 3" to 6" (7.6
cm to 15.2 cm), depending on the load.
\
2,
Place trash in compacton
• Wrap or cover wet or messy trash.
• Do not compact items that may develop offensive odors
such as raw meat, fish, grapefruit rinds, disposable diapers,
or personal hygiene items.
• Load bottles or cans on their sides in the center of the drawer.
Do not load bottles in an upright position.
3. Close the drawen
1. Open containen Load trash.
2. Leave Key-Knob in ON position.
3. Set Solid Cycle switch to OFF.
Sto rt ng Vos,,,t"Compactor"
4. Close container.
5. Lift foot pedal UP to STARTcycle.
UsngSo d
The Solid (Locked) Cycle extends the use of the bag by putting
constant pressure on the trash to keep it from springing back.
Regular use of solid cycle can increase bag capacity up to
25 percent.
During Solid Cycle, the ram will stay in the down position for extra
compacting. The drawer is locked and cannot be opened when the
ram isdown.
For best results, use the Solid Cycle for at least _0 minutes at a time.
1. Open container. Load trash. 3.
2. Set compactor Solid Cycle switch to ON. 4.
5°
Solid Air
Cycle Filter
Close container.
Lift the foot pedal UPto STARTcycle.
Container remains LOCKEDuntill you RESETby lifting the foot
pedal UR

Usng ;;
1. Set the Air Filter switch to ON.The fan creates air movement in
the compactor for odor removal.
NOTE:The charcoal Air Filter works only when the Key-Knob isin
the ON position.
2. Set the Air Filter switch to OFFto turn off the fan.
Solid Air
Cycle Filter
F c:@Remov <}/ ........
When the trash iscompacted to the top of the drawer, remove the
bag. If the bag istoo heavy, compact lesstrash before emptying it in
the future.
IMPORTANT:Do not push items down into compactor with hands or
feet.
1. Pull the drawer completely open.
2. Remove top of bag from bag retainer buttons. Pull up all four bag
cuffs. Close bag with twist tie provided.
3.
4.
Push Side-Lock Latch down and tilt drawer side open.
Lift out bag.
_t_ ¸ R_
Do not use any kind of bag other than those designed especially for
use in your compactor. Order replacement compactor bags through
your local dealer or by calling the toll-free number
1-800-626-2002(U.S.),1-800-661-1616(Canada).
IMPORTANT:
Before installing a new bag, be sure:
• The drawer side issecurely locked.
• The container isclean and free of debris.
2. Lock bag in place by pulling the four prepunched holes over the
bag retainer buttons. Holes will expand over the buttons without
damaging the bag.
3. Press inside of bag against the drawer bottom, sides and corners
for a smooth fit.
I. Place folded bag into the drawen Open bag and pull top edges
over the drawer top.

COMPACTOR CARE
Your new compactor is designed to give you many years of
dependable service. However, there are a few things you are
expected to do in order to properly maintain your compactor. This
section will tell you how to clean and care for your compactor.
It is recommended that you use the charcoal air filter in the filter
compartment.
Toorder the correct replacement charcoal filters, call the toll-free
number 1-800-626-2002 (U.S.),1-800-661-1616 (Canada).
1. Insert fingertips in the air filter cover and pull until the side tabs
release. Then, lift the cover to release the bottom tabs.
2.
Remove the air filter by pulling the top edge of the filter. The filter
should pull out easily. Throw away used filter.
3. To replace air filter, pushthe replacement filter into place.
4. Insert the bottom tabs of the air filter cover and push in until the
side tabs snap into place.
Before cleaning the compactor, turn the Key-Knob (or Key-Switch) to
the OFF& LOCKposition and remove it.
NOTE:Any services other than those outlined in this section should
be performed by a designated service representative.
Cleaning Exterior Surfaces
1.
Wash exterior surfaces (including stainless steel) with a clean
sponge or soft cloth and a mild detergent in warm water. Do not
use abrasive or harsh cleaners. Rinse and dry thoroughly with a
soft cloth.
2. Wipe up spills right away. Some foods can damage the finish if
left on the compactor surface.
Cleaning Inside the Drawer
NOTE:You may want to wear gloves since there may be bits of glass
in the drawer.
1. Remove the bag. Seethe "Removing a Filled Bag."
2. Pressdown on the lever-action lock (or Side-Lock latch).
3.
4.
Hold the lever-action lock down and tilt the side ofthe drawer out
until the lock clears the drawer front.
NOTE:If desired, the drawer side can be removed by tilting it up,
then lifting it out.
Wash the interior of the drawer with a clean sponge or soft cloth
and a mild detergent in warm water. Rinse and dry thoroughly
with a soft cloth.
5. If the drawer side was removed, slide it back into the tilted
position.
6. Pressthe lever-action lock (or Side-Lock Latch) down while
pushing the drawer side to the upright position.
7. Latch the drawer side by pushing up the lever-action lock (or
Side-Lock Latch).
Cleaning Inside the Cabinet
NOTE:You may want to wear gloves since there may be bits of glass
in the cabinet.
1.
Pullthe drawer out until it stops.
NOTE:Look to see how the drawer rollers move in the tracks. It
will be easier to replace the drawer after you have finished
cleaning.
N_
2.
3.
Lift the front of the drawer to clear the stops.
Grasp the drawer on the sides and pull it out the rest of the way.
Set the drawer down gently.
4.
Vacuum the inside of the cabinet. Liquid spills or wet trash should
be cleaned up by hand, or by using a vacuum designed to pick
up liquids.

5. Washtheinsideofthecabinetwithacleanspongeorsoftcloth
andamilddetergentinwarmwater.Rinseanddrythoroughly
withasoftcloth.
6. Toreplacethedrawer,graspitbgthesidesandinserttherollers
ontothetracks.
7. Liftthefrontofthedrawerandpushitinfullypastthestops.
Cleaning the Ram
NOTE:You may want to wear gloves since there may be bits of glass
on the ram cover.
1. Wipe glass particles off of the ram cover with a cloth or paper
towels.
2. Remove foods with aclean sponge or soft cloth and a mild
detergent in warm water. Rinseand dry thoroughly with a soft
cloth.
c.=J
Cleaning Before a Vacation
If you will be away for more than a couple of days, remove the
compactor bag. Remove the Key-Knob (or Key-Switch) and store it
out of children's reach.
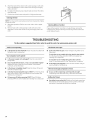
TROUBLESHOOTING
Try the solutions suggested here first in order to avoid the cost of an unnecessary service call.
Trash is not compacting The drawer won't open
• Is the drawer less than half-full? Drawer must be more than half
full before trash iscompacted.
Your compactor won't operate
Is the power supply cord unplugged? Plug into a grounded 3
prong outlet.
Has a household fuse blown, or has a circuit breaker tripped?
Replace the fuse or reset the circuit breaker. Ifthe problem
continues, call an electrician.
Is the drawer completely closed? Closethe drawer firmlg and
start the compactor again.
Is the Key-Knob turned all the way to START?Turn the Keg-Knob
(Keg-Switch) fullg to STARTand release (onsome models). See
"Starting Your Compactor."
Did you press ON before pressing START?PressON before
pressing START(onsome models). See "Starting Your Compactor."
Is the ram all the way up? Drawer will open onlg when ram is
fullg raised.
To raise the ram on models with a Key-Knob (or Key-Switch):
Turn the Keg-Knob (Keg-Switch) to STARTand release. See
"Starting Your Compactor."
To raise the ram on models with push button controls:
PressOFF,and then press ON.See "Starting Your Compactor."
Is the Solid Cycle engaged? Drawer remains LOCKEDuntil gou
reset bg lifting the foot pedal up.
There is not enough compaction or force
• Do you use the compacting cycle frequently enough?
Compacting works best when onlg a few items are loaded.
Bottles don't break
• How often do you notice this? Bottles will not break everg time.
The thickness of the bottle's glass and the content of the trash
load below it mag keep the bottle from breaking.
10

Warranty
Compactor
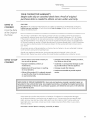
YOUR COMPACTOR WARRANTY
Staple sales slip or canceled check here. Proof of original
purchase date is needed to obtain service under warranty.
WHAT IS
COVERED
From the Date
of the Original
Purchase
ONE-YEAR
Any part of the compactor which fails due to a defect in materials or workmanship. During this
limited one-year warranty, GEwill also provide, free of charge, all labor and in-home service to
replace the defective part.
This warranty is extended to the original purchaser and any succeeding owner for the products
purchased for ordinary home use in the 48 mainland states, Hawaii, Washington, D.C.;or Canada.
If the product is located in an area where service by a GEAuthorized Servicer is not available, you
may be responsible for a trip charge or you may be required to bring the product to an Authorized
GEService Location for service. InAlaska the warranty is the same except that it is LIMITEDbecause
you must pay to ship the product to the service shop or for the service technician's travel cost to
your home.
All warranty service will be provided by our Factory Service Centers or by our authorized Customer
Care®servicers during normal working hours.
Should your appliance need service, during warranty period or beyond, in the U.S.A.call
800.444.1845. Please have serial number and model number available when calling for service.
WHAT IS NOT
COVERED
• Service trips to your home to teach you
how to use the product.
• Improper installation, delivery or
maintenance.
• Replacement of house fuses or resetting
of circuit breakers.
• Failure of the product if it is abused, misused,
or used for other than the intended purpose
or used commercially.
• Damage to the product caused by accident,
fire, floods or acts of God.
• Incidental or consequential damage caused
by possible defects with this appliance.
• Damage caused after delivery.
• Product not accessible to provide required
service.
EXCLUSION OF INPLIED WARRANTIES--Your sole and exclusive remedy is product repair as
provided in this Limited Warranty. Any implied warranties, including the implied warranties
of merchantability or fitness for a particular purpose, are limited to one year or the shortest
period allowed by law.
Some states do not allow the exclusion or limitation of incidental or consequential damages,
so the above limitation or exclusion may not apply to you. This warranty gives you specific legal
rights, and you may also have other rights which vary from state to state. To know what your
legal rights are in your state, consult your local or state consumer affairs office or your state's
Attorney General.
Warrantor: General Electric Company, Louisville, KY 40225.
11

ge.com
Consumer Services
Compoctor
With the purchase of your new appliance, receive the
assurance that if you ever need information or assistance
from GE, we'll be there. All you have to do is cell--toll-free!
GE Answer
Center ®
In the USA:
800.626.2000
Whatever your question about any GEmajor appliance, GEAnswer Center ®information service
is available to help. Your call-and your question-will be answered promptly and courteously.
GEAnswer Center®service is open 8:00 a.m. to 10:00 p.m. Monday-Friday and 8:00 a.m. to
7:00 p.m. on Saturday.
OR
Visit our Website at: ge.com (U.S.),ge.com/ca (Canada)
In-Home
Repair Service
In the USA:
800.444.1845
A GE consumer service professional will provide expert repair service, scheduled at a time that's
convenient for you. Many GEConsumer Service company-operated locations offer you service
today or tomorrow, or at your convenience (7:00a.m. to 7:00 p.m. weekdays, 9:00 a.m. to
2:00 p.m. Saturdays). Our factory-trained technicians know your appliance inside and out
-so most repairs can be handled in just one visit.
For Customers
With Special
Needs...
In the USA:
800.626.2000
sEcyno_ A-A
GEoffers Braille controls for a variety of GEappliances, and a brochure to
assist in planning a barrier-free kitchen for persons with limited mobility.
Consumers with impaired hearing or speech who have access to a
TDD or a conventional teletypewriter may call 800.TDD.GEAC
(800.833.4322) to request information or service.
Service
Contracts
In the USA:
800.626.2224
You can have the secure feeling that GEConsumer Service will still be there after your warranty
expires. Purchase a GE contract while your warranty is still in effect, and you'll
receive a substantial discount. With a multiple-year contract, you're assured of future
service at today's prices.
Parts and
Accessories
In the USA:
800.626.2002
Individuals qualified to servicetheir own appliances can have parts or accessories sent directly
to their home. The GEparts system provides access to more than 47,000 parts...and all GEGenuine
Renewal Parts are fully warranted.
User maintenance instructions contained in this manual cover procedures intended to be
performed by any user. Other servicing generally should be referred to qualified service
personnel. Caution must be exercised, since improper servicing may cause unsafe operation.
12

GE Service ProtectionPIUS T"
GE,a name recognized worldwide for high quality and dependability, offers you
Service Protection PlusTM--comprehensive protection on all of your appliances-
No Hatter What Brand!
Benefits Include:
* Backed by GE
* All brands covered
, Unlimited service calls
. All parts and labor costs included
, No out-of-pocket expenses
, No hidden deductibles
, One 800 number to call
You will be completely satisfied with our service protection or you may request your money back
on the remaining value of your contract. No questions asked. It's that simple.
Protect your refrigerator, dishwasher, washer and dryer, range, TV,VCRand much more-any brand!
Plusthere's no extra charge for emergency service and low monthly financing is available. Evenice maker
coverage and food spoilage protection is offered. You can rest easy, knowing that all of your valuable household
products are protected against expensive repairs.
Placeyour confidence in GEand call us in the U.S.toll-free at 800.626.2224
for more information.
*All brands covered, up to 20 years old, in the continental U.S.
..... _Cut here
Please place in envelope and mail to:
General Electric Company
Warranty Registration Department
P.O.Box 32150
Louisville, KY40232-2150

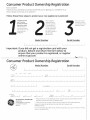
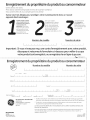
Consumer Product Ownership Registration
Dear Customer:
Thank you for purchasing our product and thank you for placing your confidence in us.
We are proud to have you as a customer!
Follow these three steps to protect your new appliance investment:
Complete and mail
your Consumer
Product Ownership
Registration today.
Have the peace of
mind of knowing we
can contact you in the
unlikely event of a
modification,
After mailing the
registration below,
store this document
in a proper place. It
contains information
you will need should
you require service.
Our service number is
800 GE CARES
(800.432.2737).
Read your Owner's
Manual. It will help
you operate your new
appliance properly.
Model Number Serial Number
1 I ! ! t ! ! ! t ! ! I I I I I
Important: If you did not get a registration card with your
product, detach and return the form below to
ensure that your product is registered, or register
online at ge.com.
Cut here
Consumer Product Ownership Registration
Model Number Serial Number
I I,, I I, , i i , , I i , , i i ,
Mn Ns. Mrs. Miss_ !
First Last
Namel t I I ! I I ! I I I Name I
I I I I I I I
Street J
Address I I I I I I I I I I I I I I t 1 I 1
Apt. # J I 1 I I I I I I F-mail Address*
I
city, , , I I 1 I I , , , I , I I StateI
Date Placed
In Use[ 1 I Day I_______J I , I Phone
__ Number,I I I
Month Year
Zip
Code I I I I
GE Consumer & Industrial
Appliances
General Electric Company
Louisville, KY/40225
ge.com
I-I,, I-I,,, I
* Please provide your e-mail address to receive, via e-mail, discounts, special offers and other
important communications from GEAppliances (GEA).
Z Check here if you do not want to receive communications from GEA's selected partners.
FAILURETOCOMPLETEAND RETURNTHIS CARDDOESNOTDIMINISH YOUR
WARRANTYRIGHTS.
For more information about GEA's privacy and data usage policy, go to ge.com and click on "Privacy
Policy" or call 800.626.222/4

SECURITE DU COMPACTEUR
Votre securite et celle des autres est tres importante.
Nous donnons de nombreux messages de s_curit_ importants dans ce manuel et sur votre appareil m_nager. Assurez-vous de
toujours lire tousles messages de s_curit_ et de vous y conformer.
Voici le symbole d'alerte de s_curit&
Ce symbole d'alerte de s_curit_ vous signale les dangers potentiels de d_c_s et de blessures graves &vous
et & d'autres.
Tousles messages de s_curit_ suivront le symbole d'alerte de s_curit_ et le mot "DANGER" ou
"AVERTISSEMENT". Ces mots signifient •
Risque possible de d_cbs ou de blessure grave si vous ne
suivez pas imm_diatement les instructions.
Risque possible de d_cbs ou de blessure grave si vous
ne suivez pas les instructions.
Tous les messages de s_curit_ vous diront quel est le danger potentiel et vous disent comment r_duire le risque de blessure et
ce qui peut se produire en cas de non-respect des instructions.
IMPORTANTES iNSTRUCTiONS DE SECURITi
AVERTiSSEMENT • Lors de I'utilisation d'appareils 61ectrom6nagers, il convient d'observer certaines pr6cautions
616mentaires dont les suivantes :
m Lire toutes les instructions avant d'utiliser le compacteur.
m Une surveillance etroite est necessaire, Iorsque I'appareil
est employ6 par ou pros d'enfants. Ne pas permettre
d'utiliser I'appareil comme un jouet, ou le faire fonctionner
sans surveillance. Verrouiller I'interrupteur & cle Iorsque
I'appareil n'est pas utilise et garder la cle hors d'atteinte
des enfants.
m Ne pas toucher les pieces mobiles.
m Ne pas faire fonctionner le compacteur si le cordon
d'alimentation, la fiche de branchement, le moteur sont
endommages ou apres tout dommage quelconque. Faire
examiner, reparer ou ajuster le compacteur par un
technicien autoris&
m Utiliser uniquement pour I'usage auquel il est destine, tel
que decrit darts ce manuel. Ne pas utiliser des accessoires
autres que ceux qui sont recommandes par le fabricant.
m Ne pas utiliser cet appareil pour compacter des produits
toxiques ou fluides inflammables tels que chiffons imbibes
d'huile et vaporisateurs insecticides. Ne pas soumettre au
compacteur les articles comme cigarettes ou cigares
allumes, ou autres objets en combustion ou chauds. Ne pas
surcharger le compacteur.
m Ne pas demonter le compacteur. Un remontage incorrect
peut _tre & I'origine d'un choc electrique, Iors de I'utilisation
subsequente.
m Manipuler avec soin un sac rempli de dechets. Des objets
pointus peuvent percer le sac et causer des blessures. Ne
pas surcharger le sac de dechets avec des materiaux
pesants tels que le verre.
m Ce compacteur est destine & I'usage domestique
uniquement.
CONSERVEZ CES iNSTRUCTiONS
15

INSTRUCTIONS D'INSTALLATION
InstallGteur : Laissez le Guide d'utilisation et d'entretien au
propri_taire.
Propri_tGire :Gardez le Guide d'utilisation et d'entretien pour
r_f@ence ult@ieure et pour I'usage de I'inspecteur local d'_lectricit_,
au besoin.
Risque du poids excessif
Utiliser deux ou plus de personnes pour d_placer et
installer le compacteur.
Le non=respect de cette instruction peut causer
une blessure au dos ou d'autte blessure.
IMPORTANT :
1.
2,
Ne pas saisir la console pour d_placer le compacteur.
Commencer dans la piece oO le compacteur sera installS.
Retirer le compacteur de son emballage de carton. Enlever tous
les mat@iaux d'emballage comme ruban adh_sif et cales. Avec
une solution d'eau tilde et de produit de nettogage m_nager
doux, enlever les r_sidus de cire laiss_s par les mat@iaux. S_cher
compl_tement avec un chiffon doux. Pour de plus amples
renseignements, voir la section "Nettogage".
V@ifier que le cordon d'alimentation _lectrique est fix_ 5 I'agrafe
I'arri@e du compacteur.
\
4°
Placer les 2autres corni@es de protection sur le plancher, prosdu
compacteur. Saisir les c6t_s de la caisse du compacteur et placer
le compacteur sur le c6t_, sur les corni@es de protection. Retirer
la base plac_e au fond du compacteur avant I'exp_dition.
B
A.Piedsdenivdlement
B.Bosed'exp4dition
F:× Ci{;;!_l-,lcesd p,l,'sqD C_,p,l,'t,s@ysl,*
Oimensions du produit
3°
A.Agro@ du cordon d'olimentotion
Placer les 2corni@es de protection sur le plancher, pros du
compacteur. Ouvrir le tiroir du compacteur et retirer tous les
mat@iaux d'emballage ou autres articles exp@di@sdans le tiroir.
Ne pas retirer le sac du compacteur. Saisir la poign@eet soulever
I'avant du tiroir pour le faire passer au-dessus des buttes. Saisir
les c6t@sdu tiroir et soulever le tiroir pour le retirer du
compacteur. Placer le tiroir sur les 2 poteaux corniers.
341/8''
(86,7 cm)
15"
(38,1 cm)
(61 cm)
16

DimensionsdeI'encastrement Dimensionsded_gagement
A
\
3"
(7,6 cm)--_ I
24" min.
(61cm)
18,,iin,
(45,7 cm)
151/4" rnin.
(38,7 crn)
341/4" rain.
(87 cm)
A. Prise dectrique reli@ _ la terre qui dolt _tre _ une distance minimum de
3" (7,6cm) des armoires voisines ou des murs latdraux tel qu'illustr4. Elle
peut _tre plac@ du c6td droit ou du c6td gauche du produit.
e'
v
I '
4. kaisser un espace libre de 6" (15,2cm) du c6td droit du compacteur pour
extraire les sacs du compacteur.
B.Laisser un espace libre de 23" (58,4cm) en avant du compacteur pour
ouvrir comp@tement ou retirer le tiroir du compacteur.
Risque de choc _lectrique
Brancher sur une prise a 3 alv_oles reli_e a la terre.
Ne pas enlever la broche de liaison a la terre.
Ne pas utiliser un adaptateur.
Ne pas utiliser un cable de rallonge.
Le non=respect de ces instructions peut causer
un d_c_s, un incendie ou un choc _lectrique.
6 ecru" ques
M_thode recommQnd_e de mise a IQterre
Le compacteur est aliment@par un circuit de 115 V CAseulement
monophas@,60 Hz, 15 ou 20 A;le circuit dolt @treprot@g@par un
fusible et convenablement reli@5 la terre par I'interm@diaire de la
fiche de branchement avec broches de liaison 5 la terre (voir
I'illustration ci-dessous). !1est pr@f@rableque cet appareil salt
aliment@par un circuit distinct.
Le compacteur dolt @trereli@5 la terre Iorsqu'il est utilis@pour r@duire
le risque de choc @lectrique.Le compacteur est @quip@d'un cordon 5
trois conducteurs et d'une fiche 5 trois broches de liaison 5 la terre,
pour convenir 5 la prise de courant appropri@e reli@e5 la terre. Le
conducteur vert (ouvert etjaune) dans le cordon est lefil de liaison 5
la terre. Ne pas connecter le fil vert (ouvert etjaune) 5 une borne
active.
17

REMARQUE: C'est _ I'utilisateur qu'incombe la responsabilit_
d'assurer une installation convenable. S'assurer d'avoir tout le
n_cessaire pour une installation correcte. C'est la responsabilit_ et
I'obligation personnelle du client de contacter un installateur qualifi_
pour s'assurer que I'installation _lectrique r_pond aux codes et
r_glements nationaux et Iocaux.
Outillage n_cessaire :
Rassembler les outils et pi@cesn@cessairesavant de commencer
I'installation.
• Niveau • Tournevis Phillips N°2
• Ruban6 mesurer • Tournevis6 lame plate
• Pince • CI@polygonalede%d'
• Ciseaux • Couteautout usage
2.
Utiliser la pince pour abaisser les pieds de nivellement hors de
I'armoire. Ajuster les pieds de sorte qu'il y ait un espace de W'
(3 mm) 6 ¼" (6,4mm) entre le sommet du compacteur et le
sommet de I'ouverture de I'armoire. Placer le compacteur 6 la
verticale.
3. Pour le mod@leavec armoire, enlever les pitons en plastique du
sommet de la caisse du compacteur.
4. Mettre le compacteur pr@sde son emplacement d@finitif.
5. Brancher sur une prise reli@e6 la terre (6 trois alv@oles).
6. D@erminer si vous voulez que le cadre du compacteur ou le
devant du tiroir soit en affleurement avec le devant de I'armoire.
/_I'aide des deux vis n° 8 de 18x %d' (8 mm), installer les brides
qui restent au sommet de la caisse au besoin :
• Si lechassis du compacteur doit _tre en affleurement avec
I'avant de I'armoire, placer les vis de retenue de la bride dans
les trous "1".
IMPORTANT:
• Ne pas saisir la console pour d@placer lecompacteun
• Faire glisser le compacteur sur le carton ou panneau en bois dur
avant de d@placerle compacteur sur le plancher, pour emp@cher
d'endommager le rev@tement de sol.
Si le devant du tiroir du compacteur doit @treen affleurement
avec I'avant de I'armoire, placer les vis de retenue de la bride
dans les trous "3".
Si le compacteur doit @treinstall@5 une position
interm@diaire entre "1" et "3",placer les vis de retenue de la
bride dans le trou "2".
• Ne pas laisser le chassis arri@e du compacteur toucher le
rev@tement de sol Iorsqu'on soul@veou d@placele compacteun
Installation sous un comptoir
REMARQUE: La quincaillerie d'installation n'est pas fournie avec les
mod@lespour armoire compl@te.
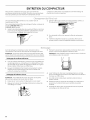
1. Mesurer la hauteur de I'ouverture de I'armoire. Le sommet du
compacteur devrait @tre5 au moins W' (3 mm) du sommet de
I'ouverture de I'armoire.
Les roues arri@e sont pr@r@gl@espour I'ouverture d'une armoire
d'une hauteur de 34¼" (87cm)(Position 1).
Ajustement pour d'autres hauteurs d'ouverture d'armoire :
• Desserrer la vis,juste assez pour pouvoir extraire le piton du
trou de positionnement "1"
• D@placerla roue arri@reet le piton 6 la position "2" ou "3" au
besoin, pour la mesure d'ouverture de I'armoire :
Position 2 : 341/4'' 5 347A6'' (87 5 87,5 cm)
Position 3 : 347Ad'6 34%" (87,5 6 88 cm)
REHARQUE: Pour mettre I'appareil d'aplomb en position 3,
vous devez peut-@treajouter des cales sous les pieds de
nivellement.
Serrer la vis. R@p@terces op@ations pour I'autre roue arri@e.
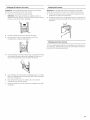
7.
A. Comptoir
B.Bride de retenue
Soulever lentement et I@g@rementle devant et faire rouler le
compacteur dans I'ouverture de I'armoire.
/_I'aide des deux vis n° 8 - 18 x ½" (12 mm), fixer les brides de
retenue au comptoir avec les vis de montage.
Si les brides ne peuvent pas @trefix@esau-dessous du comptoir,
fixer les agrafes de montage aux brides. Fixer le compacteur 6
I'avant de I'armoire avec les vis dans les brides de montage.
A
A. Bride porte-roue
B.Armoire
D
C.Piton de positionnement
D.Vis outotoroudonte (pivot)
18

Installation sur comptoir
A. Comptoir
B.Bride de retenue
C.Vis de montage
Montage 6 I'avant de I'armoire
A. Bride de montage C.Bride de retenue
B.Caisse D. Visde montage
8.
Saisir les c6t_s du tiroir du compacteur et placer le fond du tiroir
dans les glissi_res. Soulever le tiroir par la poign_e pour faire
passer I'avant du tiroir au-dessus des buttes. Fermer le tiroir.
V_rifier qu'il est possible d'ouvrir facilement le tiroir. Si la p_dale
frotte contre le plancher, voir d'autres instructions 6 la section
"R_glage de la p_dale".
R_glage de la p_dale
Si la p_dale frotte contre le rev_tement de sol,on peut modifier la
hauteur de la p_dale comme suit :
1. iVtarquerde chaque c6t_ de la p_dale la largeur du mat_riau qui
cause le frottement sur le rev_tement de sol.
2. Retirer le tiroir de I'appareil. (Voir I'_tape 3 6 la section
"D_ballage".)
3. /_I'aide d'une r_gle et d'un cragon ou d'une craie, tracer une ligne
entre les marques de chaque c6t_ de la p_dale.
4. /_I'aide de ciseaux ou d'un couteau tout usage, d_couper la
p_dale le long de la ligne.
5. R_installer le tiroir. Si lap_dale frotte toujours sur le rev_tement
de sol, r_p_ter les _tapes 1 6/4.
Installation d'un panneau personnalis_
Dimensions
Utiliser ces graphiques pour crier un panneau personnalis_ 6 utiliser
sans trousse de garniture. Le panneau doit mesurer ½" (13mm)
d'_paisseur au minimum.
293/8"
(74,6 crn)
-(------ 15"
(38,1 crn)
Installation
1. Enlever les 2butoirs en caoutchouc des coins en has du c6t_
int_rieur de I'avant du tiroir. Garder les butoirs de c6t_ etjeter les
vis.
2.
Aligner le bas du panneau personnalis_ avec le bas de I'ext_rieur
de I'avant du tiroir et placer le panneau sur I'appui.
REMARQUE: Le bas du panneau personnalis_ ne doit pas
d_passer le bas de I'appui au centre inf_rieur de I'ext_rieur de
I'avant du tiroir.
3.
4.
Fixer le panneau personnalis_ 6 I'avant ext_rieur du tiroir en
utilisant quatre vis de 1",6 partir du c6t_ int_rieur de I'avant du
tiroir.
• Installer 2vis 5 bois du haut comme 6 I'illustration.
• Utiliser les 2 vis du bas pour r_installer aussi les 2 butoirs en
caoutchouc de chaque c6t_ du c6t_ int_rieur de I'avant du
tiroir tout en fixant le panneau personnalis_.
Fixer un quart de rand de 15" x 1?2" lelong du rebord int_rieur au
haut de I'avant du tiroir en utilisant de la colle ou des vis.
A. Panneau personnalis4
B.Ouart de rand de 15"x ½"
C.Avant du tiroir
D. Position des quatre vis_ bois #8 x 1"
E.Butoir en caoutchouc (unde chaque c6t4}
19

UTILISATION DU COMPACTEUR
La presse de compactage est la partie du compacteur qui compresse
les d_chets, ka presse de compactage ne descend pasjusqu'au fond
du tiroin Les premiers d_chets charges ne seront donc pas
comprim_s les premieres fois que vous charges le compacteuE
REMARQUE : ke tiroir du compacteur dolt _tre rempli _1plus de la
moiti_ avant que le compacteur de d_chets puisse commencer &
compresser la charge.
Vous pouvez entendre un bruit Iorsque le verre se brise. Des
bouteilles en verre robuste peuvent ne passe briser du tout. kes
d_chets dans un sac plein de compacteur occuperont environ le
quart du volume original.
2.
Placer les d_chets dans le compacteun
• Envelopper de papier ou recouvrir les d_chets humides ou
salissants.
Ne pas mettre dans le compacteur des mati@ressusceptibles
de d@gagerdes mauvaises odeurs, telles que de la viande
crue, du poisson, des pelures de pamplemousse, des couches
jetables ou des articles d'hggi@nepersonnelle.
• Charger les bouteilles ou canettes sur le c6t@au centre du
tiroir. Ne pas placer les bouteilles dans une position verticale.
, I I
Charger les d6chets volumineux, bouteilles et Canettes au centre du
tiroir. Les bouteilles ou les canettes qui n'ont pas @t@mises au centre
du tiroir peuvent @trecoinc@esentre la presse et le tiroir. Le
commutateur du tiroir peut d@ecter une "erreur de charge" et
renvoyer la presse 6 la position "sup@ieure" sans qu'il y ait
compactage.
3. Fermer letiroir.
1. Ouvrir le contenant - d@poserles d@chets.
2. Laisser le bouton @cl@@la position ON (marche).
3. R@glerI'interrupteur du programme Solid (compression solide)
OFF(arr_t).
4. Fermerlecontenant.
5. SOULEVERla p@dalepour HETTREle programme EN HARCHE.
IMPORTANT: Ne pas enfoncer les articles dans le compacteur avec
les pieds ou les mains.
REMARQUE:Vous ne verrez pas les d_chets se faire presser les
premi@es fois que vous chargerez le compacteun Letiroir du
compacteur dolt _tre environ _ moiti_ rempli avant que le
compacteur puisse commencer @presser la charge.
1. Ouvrir letiroir. So@ever et tirer la poign@eou appuyer sur la
p@dalepour ouvrir le tiroir.
REMARQUE: L'appui sur la p_dale ouvre le contenant de
3"_ 6" (7,6 cm _ 15,2 cm),selon la charge.
\
Le programme Solid (verrouill@)prolonge I'utilisation du sac en
exercant une pression constante sur les d@chetspour les emp@cher
de se d@compressen L'utilisation r@guli@edu programme Solid peut
accro_tre la capacit@du sacjusqu'@ 25 pour cent.
Durant le programme Solid, le bras de compression reste en position
abaiss@epour un compactage suppl@mentaire. Letiroir est verrouill@
et ne peut @treouvert quand le bras est abaiss@.
Pour les meilleurs r@sultats,utiliser le programme Solid pendant des
p@iodes d'au moins 30 minutes.
1. Ouvrir le contenant - d@oser lesd@chets.
2. R@glerI'interrupteur du programme Solid du compacteur sur ON
(marche).
Solid Air
Cycle Filter
3. Fermer lecontenant.
4. SOULEVERla p@dalepour IVtETTREle programme EN IVtARCHE.
5. Le contenant reste VERROUILL4jusqu'@ce que I'on proc@deau
REENCLENCHEIVtENTen SOULEVANTla p@dale.
2O
La page est en cours de chargement...
La page est en cours de chargement...
La page est en cours de chargement...
La page est en cours de chargement...
La page est en cours de chargement...
La page est en cours de chargement...
La page est en cours de chargement...
La page est en cours de chargement...
-
 1
1
-
 2
2
-
 3
3
-
 4
4
-
 5
5
-
 6
6
-
 7
7
-
 8
8
-
 9
9
-
 10
10
-
 11
11
-
 12
12
-
 13
13
-
 14
14
-
 15
15
-
 16
16
-
 17
17
-
 18
18
-
 19
19
-
 20
20
-
 21
21
-
 22
22
-
 23
23
-
 24
24
-
 25
25
-
 26
26
-
 27
27
-
 28
28


GE ZCGS150PSS-00 Le manuel du propriétaire
- Taper
- Le manuel du propriétaire
- Ce manuel convient également à
dans d''autres langues
- English: GE ZCGS150PSS-00 Owner's manual
Documents connexes
Autres documents
-
Jenn Air TC507W1 Le manuel du propriétaire
-
Jenn Air TC507Q1 Le manuel du propriétaire
-
Jenn-Air Trash Compactor TC507 Manuel utilisateur
-
-
-
Jenn Air TC607X1 Le manuel du propriétaire
-
-
Jenn Air TC707S0 Manuel utilisateur
-
JennAir TC607X Le manuel du propriétaire