
How to Program
Orbit
®
SuperStar and WaterMaster
®
dual program
sprinkler timers with built-in wireless remote control
Cómo programar
Reguladores para aspersores de doble programación
Orbit
®
SuperStar y WaterMaster
®
con control remoto
inalámbrico integrado
Comment Programmer
Les systemes d’arrosage Orbit
®
SuperStar
et WaterMaster
®
programmateurs à double
programmation avec télécommande incorporée
Model 57096, 57586, 57592, 91006
User’s Manual
Sprinkler timers by Orbit
®
Manual para el Usuario
Reguladores para aspersores de riego de Orbit
®
Manuel de l’utilisateur
Programmateurs pour systemes d’arrosage par Orbit
®
p 801 295 9820
f 801 951 5815
www.fluid-studio.net
1065 South 500 West
Bountiful, Utah 84010
proof no: 3
date: 11.02.11
des: MZ
client: Orbit
sku: 57096
upc: N/A
file name: 57096-24T rG.indd
software: InDesign CS5
colors
additional instructions:
·
·
·
color
non printing
PMS
???
PMS
????
color
non printing
PMS
????
Registration
Black
Printers are responsible for
meeting print production
requirements. Any changes
must be approved by the
client and Fluid Studio.
printed piece must meet
designated specifications
on this form.
dimensions:
flat: w: 14.5" h: 5"
finished: w: 7.25" d: 0.0" h: 5"
© 2011 Fluid Studio. This
work is the property of Fluid
Studio, and cannot be used,
reproduced or distributed
in any way without their
express permission.

ESPAÑOL
Sección uno: Introducción .............................................................................................................................. 16
Sección dos: Para comenzar ..........................................................................................................................18
Sección tres: Programación ...........................................................................................................................19
Sección cuatro: Operación manual ............................................................................................................... 22
Sección cinco: Características del control remoto inalámbrico ...................................................................25
Sección seis: Instalación ................................................................................................................................27
Solución de problemas ................................................................................................................................. 30
Otros productos y accesorios de calidad ......................................................................................................31
La información de este manual se ha preparado primordialmente para el usuario que vaya a establecer un programa de riego y lo adapte al
Regulador. Este producto se ha preparado para usarse como controlador automático de regulador para activar válvulas de irrigación de 24
VCA, según se describe en este manual.
Sugerencia: Antes de devolver este Regulador al almacén, sírvase ponerse en contacto con la sección de servicio técnico de Orbit
®
, llamando a:
Servicio técnico:: 1-800-488-6156 or 801-299-5555
Aviso de marca registrada: WaterMaster
®
es marca registradas de la compañía Orbit
®
Irrigation Products, Inc.
TABLE OF CONTENTS
ENGLISH
Section One: Introduction .................................................................................................................................1
Section Two: Getting Started ............................................................................................................................2
Section Three: Programming ...........................................................................................................................4
Section Four: Manual Operation ......................................................................................................................7
Section Five: Wireless Remote Features .........................................................................................................9
Section Six: Installation ..................................................................................................................................12
Trouble-Shooting ............................................................................................................................................14
Other Quality Products and Accessories .......................................................................................................15
The information in this manual is primarily intended for the user who will establish a watering schedule and enter that schedule into
the Controller. This product is intended to be used as an automatic timer controller for activating 24 VAC irrigation valves, as described in
this manual.
Help: Before returning this timer to the store, contact Orbit
®
Technical Service at: Orbit
®
Technical Service: 1-800-488-6156 or 801-299-5555
Trademark Notice: WaterMaster
®
is a
registered trademark of Orbit
®
Irrigation Products, Inc.

Section One
INTRODUCTION
Thank you for selecting an Orbit
®
Sprinkler Controller. Orbit
®
designers have combined the simplicity of mechanical switches
with the accuracy of digital electronics to give you a Controller
that is both easy to program and extremely versatile. The Orbit
®
Controller provides convenience and flexibility, letting you run a
fully automatic, semi-automatic, or a manual watering program
for all your watering needs. This Controller also adds the
convenience and flexibility of wireless remote control.
Please read this manual completely before you begin to program
and use the Controller. A few of the most notable design features
include:
Arm Chair Programmable
By inserting two AA alkaline batteries you may program the timer
prior to installing it in its permanent location.
Wireless Remote Control
With the use of the wireless remote transmitter, the Controller
can be operated via wireless remote control, up to 200 feet from
the controller. You may initiate a manual watering cycle of 2, 10,
30 or 60 minutes for all or any individual station. This feature is
useful for maintenance, repairs and system start-up and shut-
down. The Controller allows up to 6 independent transmitters.
The convenient LED light on the Controller face verifies wireless
transmission.
Fuse
The 0.75 amp slow-blow fuse provides circuit protection. For
replacement, use WaterMaster
®
0.75 amp fuse or equivalent.
Features of the Timer
1. Reset Button
The reset button clears the time and date but does not remove the
factory installed fail-safe program. To prevent an accidental reset,
the button is recessed into the panel and must be pressed with a
small pointed object such as a pen or pencil tip.
2. Digital Display
A large LCD (Liquid Crystal Display) shows the time of day and
indicates many of the programming settings. The display is
completely interactive with all other controls.
3. Programming Keys
The Timer has seven push button keys for setup and program
entry. Working in conjunction with the rotary dial, the keys are
used to set the time of day, watering time, watering days, start
times, and other functions.
4. Rotary Dial
The heart of the Timer is the rotary dial. This makes it easy to
see which function is currently selected and/or in which mode the
Timer is set to operate.
Figure 1: Location of Controls on the Timer
FRANCAIS
Section un: Introduction ...................................................................32
Section deux: Pour commencer .............................................................34
Section trois: Programmation ..............................................................35
Section quatre: Manuel d’utilisation..........................................................38
Section cinq: Fonctions de contrôle à distance.................................................41
Section six: Installation ....................................................................43
Dépannage ..............................................................................46
Autres accessoires et produits de qualité ....................................................47
L’information contenue dans ce manuel a été rédigée principalement pour l’utilisateur qui veut établir un programme d’arrosage et
introduire ce programme sur le programmateur. Ce produit est conçu de manière à être utilisé comme programmateur automatique pour
l’activation de vannes d’irrigations de 24 VCA, comme décrit dans ce manuel.
Aide: Avant de retourner ce programmateur au détaillant, contactez le service technique d’Orbit
®
au numéro suivant: Service technique d’Orbit
®
:
1-800-488-6156 or 801-299-5555
Avis de marque enregistrée: WaterMaster
®
est des marques enregistrées de la compagnie Orbit
®
Irrigation Products, Inc.
1

Set the Time of Day and Date
If this is the first time the Timer has been programmed, you
should press the small recessed button labeled RESET. Pressing
RESET does not affect the factory installed fail-safe program [See
Figure 2].
Figure 2: Programming Keys
Do not press the reset button again unless you want to completely
remove all your programming.
• TurntherotarydialtotheTime/Dateposition.
• 12:00AMwillappearinthedisplaywiththreearrowspointing
to the year (Y), month (M), and day (D) [See Figure 3].
• Pressandholdthe+keytoadvancetheclocktothecorrect
time of day. Use the – key to go in reverse. When the correct
time of day is reached, press the enter key to lock in the time.
To increase or decrease more rapidly, hold down either the + or
– keys until the display goes into rapid advance mode.
• Ablinkingcursorwillappearabovethearrowfortheyear(Y),
month (M), or date (D) when programming [See Figure 4].
• Usethe+and–buttonstosetthecorrectyear,thenpress
ENTER.
• Usethe+and–buttonstosetthecorrectmonth,thenpress
ENTER.
• Usethe+and–buttonstosetthecorrectdayoftheweek,then
press ENTER.
Figure 3: LCD Display with Surrounding Information
Figure 4
CAUTION: If a watering schedule is not entered into the Timer, the
factory installed fail-safe program will turn on each station every day
for 10 minutes. To avoid accidental valve activation, either:
1) turn the rotary dial to OFF
2) enter a watering schedule
Establish a Watering Plan
To help you visualize how best to program the Timer, it might
be helpful to make a watering plan on paper. This will help you
establish which days and times you want to water.
3
Notable Programming Features
Two Watering Programs
The Timer gives you the option of using any or all of these
independent programs: Note that each station can independently
be set to either A or B or both A and B programs.
Program A—Days
This program lets you schedule selected stations to water on
specific days of the week or to water every 2nd day. Program-A
repeats itself continuously in successive weeks.
Program B—Interval, Odd, Even
Provides two options: One for odd or even day watering or one for
intervals ranging from everyday to every 28th day. This feature is
designed to meet the growing needs and restrictions imposed by
local governments and to conserve water. The Timer automatically
calculates odd and even days (by date) for each month and makes
adjustments for leap years to provide true odd and even watering
through the year 2100.
Start-Time Stacking
The Timer has the intelligence to “stack” start times that overlap.
If you enter two or more start times that overlap (in the same or
in different programs), the Timer will not activate two stations at
the same time. Instead, the Timer activates the first station and
then activates the next station(s) in sequence after the first station
finishes its preset watering duration.
The Timer will NOT stack to the next calendar day. This prevents
the Timer from violating an odd or even day watering schedule.
Manual and Semi-Automatic Modes
The Timer gives you a number of manual and semi-automatic
modes for flexibility in watering. You can override the Timer’s
automatic programming in a variety of ways.
Section Two
GETTING STARTED
Programming the Timer can be accomplished in just a few basic
steps. Before you begin programming, it is important to install
the battery, set the time of day and date, and establish a watering
plan.
Install the Batteries
The Timer requires two AA batteries to maintain the time and date
in case of AC power loss. In a typical installation, fully charged
batteries should provide sufficient power for approximately one
year of operation.
• Toaccessthebatterycompartmentslidelowerfrontcover
down.
• InserttwoAAalkalinebatteriesintothebatterycompartment.
• Returnthebatterycovertoitsclosedposition.
NOTE: if you have the model 57586 remove the lower shroud by
pulling toward you and then remove cover as instructed above.
Weak or missing batteries can cause the time and date to be
erased after a power failure. If this happens, you will need to
install fully charged batteries and re-enter the time and date. All
other program settings will be maintained in non-volatile memory.
2
ENGLISH

Figure 6: Station Duration for Program A
•
You can set the watering duration from 1 to 99 minutes. Press
andholdthe+keytoadvancethenumberofminutes,oruse
the - key to go in reverse, then press enter. When the minutes
are set, a solid “A” or “B” will appear over station 1 and the
cursor will advance to station 2 and continue blinking
• Simplyrepeatthesestepstosetwateringdurationsforstations
2 through 6 (or 2 - 12).
• Toskipastation,presstheNextkey.
• Toerasepreviouslyprogrammedwateringdurations,pressthe
Clear key.
Assigning Watering Days for Program A
• TurntherotarydialtoWateringDaysinprogramA.Thedisplay
will show an “A” and the cursor will blink under the days of
week M, T, W, T, F, S, S Monday, Tuesday, etc [See Figure 7 ].
Figure 7: LCD Display with Watering Days
• PressentertoactivatewateringonMonday.Anarrowappears
under M and the cursor will advance to Tuesday (“T”), press
enter to activate watering on this day. Repeat these steps for
all days of the week.
• Toskipaday,pressnext.
• Todeleteapreviouslyenteredday,pressclear.
• Ifyouwanttowatereverysecondday,pressthenextkeyto
advance the cursor to “2nd”, then press
Note: If you choose to water every 2nd day, you cannot set specific
days of the week for watering.
Assigning Watering Intervals for Program B
Program B is used to water at specific intervals between days (1 to
28), or on odd or even calender dates. The Timer has a leap-year
compensator and will ensure conformance to the odd and even
schedule through the year 2100.
5
Section Three
PROGRAMMING
The Timer has two programs you can setup to control a variety of
watering plans. Depending on your needs, you can use either or
both programs.
Enter the Watering Schedule in Any Order
You have the option of entering your watering schedule in whatever
order you like. This feature makes it very easy to review and
change your watering schedule. Your settings can be changed at
any time—while you’re setting up the initial schedule, or after years
of operation.
Start Times for Program A or B
Note: A start time is the time of day that the program begins
watering the first station, and all other stations will then follow
in sequence. There are not separate start times for each station.
Start times do not correspond to specific stations. If you enter
more than one start time, all stations programmed to operate will
water again (in sequence).
• Thewayyousetthestarttimeisthesameforbothprograms.
Turn the rotary dial to the Start Times position in the program
that you want to set up. The display will show an A or B
depending on which program you have selected.
The display will show – – :– –, and a blinking cursor in
Start
1
location [See Figure 5].
• Setthetimeyouwanttobeginwateringforstarttime1using
the + or – keys, then press the
enter
key. The display will
advance to
Start 2
. For additional start times, simply repeat
this procedure by using the + and – keys to enter the time,
then press
enter
.
Remember, each start time will activate all stations that are
programmed to operate. There are not separate start times for
each station. Start times do not correspond to specific stations.
Figure 5: LCD Display with Start Time
Watering Durations for Program A or B
Note: Both programs require watering durations to be programmed.
• TurntherotarydialtotheStationDurationpositionineither
the A or B program. The display will show which program
you have selected with an “A” or “B” and the - - MINS and the
cursor blinking at
station “1” [See Figure 6].
4
ENGLISH

• TurntherotarydialtoWateringInterval.Thecursorwillblink
to the left of the word Interval [See Figure 8].
Figure 8: LCD Display with Watering Interval
• Pressandholdthe+or-keystoselectthenumberofdays
between watering. Example: If you want to water once every
10 days, set the interval at 10.
• Toactivatethewateringinterval,pressenter.
Note: If an interval of “3” is entered today, the Timer will water for the
first time today, and then again every “3” days.
• Toselectoddorevendaywatering,pressnext.Thecursorwill
move to either the odd or even setting, then press enter.
• Toeraseaschedule,pressclear.Toenteranewschedule,
press next.
Reviewing and Changing Your Program
The Orbit
®
Timer lets you easily review a complete watering plan.
For example, to review Program-A watering start times, simply
turn the rotary dial to the Start Times position in Program-A and
check the times that have been entered. Using the next key, you
can advance through the schedule without fear of disturbing any
programming.
If you want to change the start times, watering days, or interval,
simply follow the directions for that program.
After reviewing or changing a watering schedule, remember
to turn the rotary dial back to auto if you want the Timer to
automatically follow your program.
Ready for Automatic Operation
After programming is complete, turn the rotary dial to auto
[See Figure 9].
The Timer is now fully programmed and ready to use in the
automatic mode. In automatic mode, each program will operate
sequentially, starting with Program-A.
Figure 9: Ready for Automatic Operation.
Section Four
SEMI-AUTOMATIC AND
MANUAL OPERATION
The Orbit
®
Timer has the ability to override the automatic program
without disturbing the preset program.
Using the Semi-Automatic Mode (All stations cycle once both
A & B programs)
• Turntherotarydialtoauto,thenpressthemanualkey.The
display will show “AB”, “MANUAL”, and “ALL” will be blinking
[See Figure 10]. This indicates all six (or twelve) stations in
the A and B programs will semi-automatically water for their
assigned durations in sequence.
Figure 10: Semi-Automatic Watering for Stations
Assigned to A and B Programs
• ToactivatetheassignedwaterdurationsintheAandB
programs for each station, press enter.
Assigned to A and B Programs
Note: Water durations assigned to station 1 in program A will water
first, then move to station 1 in program B before advancing to the
second station and will continue alternating. Only those stations
assigned a watering duration will water when using the manual or
semi-automatic mode [See Figure 11].
Figure 11: Semi-Automatic Watering Entered for A and B
Programs, All Stations
All Stations
(All stations cycle once, A program only)
• ToactivateeachstationsassignedwateringdurationsfortheA
program only, press the manual key, followed by the next key.
This will activate stations with assigned watering durations in the
A program only. To initiate this semi-automatic watering, press
enter [See Figure 12].
(All stations cycle once, B program only)
• ToactivateeachstationsassignedwateringdurationsfortheB
program only, press the manual key, followed by pressing the
next key two distinct times. This will activate only those stations
with assigned watering durations in the B program only. To
initiate this semi-automatic watering, press enter.
7
6
ENGLISH

Interrupting or Halting Timer Output
The Timer has several built-in features that allow the user to
momentarily interrupt or halt the electrical output to the station
valves.
• Tomomentarilyinterrupttheelectricaloutputtothestations,
press the off/auto resume button on the hand held wireless
transmitter. This is useful for making a quick repair or pattern
adjustment in the sprinkler system. To restart the electrical
output, simply press the off/auto resume button once again.
NOTE: The program will return where it would have, had the
interruption not occurred. For instance, the Timer does not try
to recapture any automatic watering which is lost due to the
interruption.
• Tohaltordiscontinuesemi-automaticormanualwatering,
press the clear key once. The Timer will revert to your original
automatic watering plan.
Using the User Selectable Rain Delay Mode
To stop automatic watering for 24, 48, or 72 hours, use the rain
delay mode key.
• Withtherotarydialsettoauto,presstheraindelaykeyonce.
The Timer will force a 24-hour interruption of all scheduled
watering. After 24 hours, the Timer will automatically return to
its initial watering schedule.
• Toincreasetheraindelayto48or72hourssimplypressthe
rain delay key again until the desired delay time is displayed.
• Tocanceltheraindelaymode,pressclear[SeeFigure15].
• Note:Whileinraindelaymode,thetimerwilldisplaythe
remaining hours (counting down) to the end of the accepted
delay alternating with the current time and date. No other key
besides clear is accepted while the Timer is in the rain delay
mode. (Wireless operation is still possible)
Figure 15: Display Showing Rain Delay
Complete System Shut Down
To shut the system down, turn the rotary dial to the off
position. The Timer remains programmed but will not water.
Section Five
USING REMOTE
Setting up the Wireless Features
The Wireless Remote features of the Timer allow you to operate
the Timer from up to 200 feet away using the hand held Wireless
Transmitter. You can turn on all stations or a specific station,
for a number of minutes. This feature is especially helpful in
troubleshooting, making adjustments and repairs, performing
additional watering, and for start-up and shut-down of the
sprinkler system.
• First,installa9-voltalkalinebatteryintothehandheld
Transmitter [see Figure 16]. To test the battery, press the off/
auto resume button on the Transmitter. The red light on the
9
Figure 12: Manual Watering in Either the A or B Program Only
Using Manual Operation
The manual operation mode allows you to set
durations in any of the six stations from 1 to 99 minutes.
• Turntherotarydialtoauto.
• Pressthemanualkey.Thenpressnextthreetimes.Thedisplay
will show a blinking cursor on station 1 along with - - MINS [See
Figure 13].
Figure 13
• Tosetthenumberofminutesforwateringduration,press
andholdthe+keytoadvancetodesirednumberofwatering
minutes. Use the - key to go in reverse. Press enter to begin
watering.
• Toskipastation,pressnextuntilthecursorisblinkingover
the station number you wish to program. Example: To set
station 3 for five minutes, press the manual key; then press
the next key five times to select the manual operation mode
andadvancetowateringforstation3;usingthe+or-key,set
the manual watering duration to five minutes; then press enter
[See Figure 14].
Figure 14: Manual Watering Station 3 for Five Minutes
Note: After the manual key has been pushed, if a selection is not
made within 60 seconds the display returns to the time of day.
8
ENGLISH

times to confirm the command. The Timer’s red light will flash
several times to acknowledge receipt of the wireless signal
[See Figure 17]. During wireless watering, the Timer display
will show the active station being watered (an “A” above the
station number), show remote, and count down the number of
minutes remaining for each station. Note that each station will
be activated, regardless of the programming in the Timer.
• Tostopwirelesswatering,simplypresstheoffbuttononthe
Transmitter.
Figure 17: Watering Using Wireless Remote Features
(Notes About Using the Wireless Remote Features)
• Rememberthatthewirelessfeatureshavepriorityover
normal Timer operations. Although the Timer will return to the
automatic program, the time spent during an wireless cycle
will be lost. For this reason, interrupting a currently running
automatic (or semi-automatic or manual) program may cause
some stations of the currently running automatic program not
to water at this time.
• Thewirelesswateringfeaturesdonot“Stack”asdotheTimer
programs. A new wireless command will cancel the currently
running wireless command.
• Aftersustaineduse(approx.oneyear)thehandheld
Transmitter battery will weaken, and the red light will dim.
Replace the battery when the light begins to dim or if the
operating distance begins to lessen.
If the Transmitter and Timer do not respond appropriately,
check power sources. It may also be necessary to program the
Transmitter to the Timer (see Programming the Transmitter
below).
• ThenormaldistanceyourTransmitterwilloperateis200feet
line of sight. The range is reduced when transmitting through
walls, shrubbery, metal siding, etc. For best results hold the
Transmitter above your head or immediately in front of you.
Programming the Transmitter
It may not be necessary to use this procedure for models sold
with a Transmitter included, since the Transmitter and Timer
have already been programmed to work together. However, if you
replace your Transmitter you must code the Transmitter to the
Timer.
11
Transmitter will light up for two seconds, and three audible
beeps will be heard. After sustained use (approx. one year) the
battery will weaken, and the red light will dim. Replace the
battery when the light begins to dim or if the operating distance
begins to lessen.
Figure 16: Installing Transmitter Battery
• Totestthewirelesssystem,holdtheTransmitternear
the Timer (the Timer must have the transformer installed)
and press the off/auto resume button on the Transmitter.
If powered correctly, the red light on the face of the Timer
(labeled RF Active) will flash several times, as will the red
light on the Transmitter. NOTE: If the Transmitter and Timer
do not respond accordingly, check power sources. It may also
be necessary to program the Transmitter to the Timer (see
Programming the Transmitter).
Operating the Timer Using the Wireless Features
The wireless feature allows you to perform semi-automatic timed
watering cycles. The normal automatic program of the Timer
and the wireless feature operates independently. However, the
wireless operation has priority over any other Timer program.
(To turn on one station for a specific watering duration using the
wireless Transmitter)
• PressthedesiredstationbuttonontheTransmitter(number1,
2, 3, etc.). The Transmitter will beep once, and the red light will
turn on [See Figure 17].
• Pressthedesiredwateringdurationonbutton(choose2,10,
30, or 60 minute durations). The Transmitter will beep three
times to confirm the command. The Timer’s red light will flash
several times to acknowledge receipt of the wireless signal
[See Figure 17]. During wireless watering, the Timer display
will show the active station being watered (an “A” above the
station number), show remote, and count down the number of
minutes remaining for that station.
• Notethattheonbuttonmustbepressedwithin10secondsof
the desired station button (while the red indicator light is still
lit) or you will need to repeat the steps.
• NOTE: The wireless watering has priority over any other Timer
function (including automatic, semi-automatic, or manual). If the
wireless feature interrupts a functioning automatic program, the
wireless watering will occur, and afterwards the Timer will revert
back to the automatic program. However, any time occurring
during the wireless watering will be lost. The wireless feature will
also override the rain delay, or Timer off modes.
• Tostopwirelesswatering,simplypresstheoff/autoresume
button on the Transmitter.
(To turn on all stations for a specific watering duration using the
wireless Transmitter)
• PresstheallbuttonontheTransmitter.TheTransmitterwill
beep once, and the red light will turn on [See Figure 17].
• Pressthedesiredwateringdurationonbutton(choose2,10,
30, or 60 minute durations). The Transmitter will beep three
10
ENGLISH

• Eachvalvehastwowires.Onewireistobeconnectedas
the common. The common wires for all the valves can be
connected together to one common wire going to the timer.
The other valve wire is to be connected to the specific station
wire that will control that valve [See Figure 19].
• Allwiresshouldbejoinedtogetherusingwirenuts,solder,or
vinyl tape. For additional protection to waterproof connections
a WaterMaster
®
grease cap can be used.
• Toavoidelectricalhazards,onlyonevalveshouldbeconnected
to each station.
Figure 19: Wiring Valves
Connecting Valve Wires to the Timer
• Removecoverbyslidingitdown.
• Determinewhichvalveyouwanttoconnecttowhichstation.
Connect each valve wire to its station terminal (labeled 1-6 or
1-12) by inserting the bare wire.
• Itmaybenecessaryto“open”theterminaltoallowfor
wire insertion or removal. To do this, simply take a Phillips
screwdriver and turn the screw two to three turns counter
clockwise. After inserting wire turn the screw clockwise. Do
not over tighten.
• Connectthecommonwiretotheterminallabeled“com”[See
Figure 20].
Figure 20: Connecting Valve Wires
13
To program the Transmitter:
• WhileholdingtheTransmitterinonehand,pressandrelease
the transmitter program button found to the right of the RAIN
DELAY button. The red indicator light on the Timer will turn on.
Press the off button on the Transmitter. The Transmitter will
beep three times and the red indicator light on the Timer will
blink, indicating the program coding is complete.
Section Six
INSTALLATION
Timer Location
• Selectalocationnearastandardelectricaloutlet.Avoidusing
an outlet controlled by an On/Off switch.
• Thetimershouldnotbeexposedtotheweatheroroperatedat
temperaturesbelow32°orabove113°Fahrenheit.(0°c+45°c)
• Installationworksbestinsideagarageorprotectedarea.The
Timer should not be mounted outdoors.
Note: The distance that the Transmitter and Timer will operate at is
approximately 200 feet line of sight. This distance can be affected by
obstacles such as walls, automobiles, metal siding, etc. To achieve
the maximum amount of range, mount the Timer as high on the wall
as is convenient for operation and service.
Mounting the Timer
• ScrewaNo.8screwateyelevelleavingthescrewhead
extended out from the wall about 1/8 inch. Use expanding
anchors in plaster or masonry if necessary.
• Slipthekeyholeinthebackofthetimerovertheextended
screw.
• ScrewaNo.8screwthrougheachofthetwoholesatthe
bottom of the timer box into the wall [See Figure 18].
• InstalltwoAAbatteries,andre-enterthetimeanddate
as required.
Figure 18: Mounting the Timer
Wiring the Electric Valves
• Ifthedistancebetweenthetimerandvalvesisunder700feet,
use WaterMaster
®
sprinkler wire or 20 gauge plastic jacketed
thermostat wire to connect the timer to the valves. If the
distance is over 700 feet, use 16 gauge wire. The wire can
be buried in the ground; however, for more protection wires
can be pulled through PVC pipe and buried underground. Be
careful to avoid burying the wires in locations where they could
be damaged by digging or trenching in the future.
12
ENGLISH
Keyhole
Screwholes
No. 8 Screw
Wall

Valves continue to turn on and off when they are not
programmed to:
1. More than one start time is programmed with overlapping
schedules.
2. Excessive pressure.
Fuse blows repeatedly:
1. Short in wiring or solenoids.
Other Quality Products and Accessories
Automatic Rain Shut-Off
For automatic rain shut-off, contact your Orbit
®
dealer to purchase an Orbit
®
automatic rain shut-
off switch. The rain shut-off easily connects to the
Timer and prevents over-watering during rainy
periods.
Weather Resistant Timer Box
Allows outdoor installation of most brands of indoor
mount timers, UL listed.
Automatic Valves
Durable, non-corrosive plastic construction,
automatic valves are available in anti-siphon or
straight valves, with safe, low voltage.
Automatic Converters
Durable non-corrosive plastic construction, converts
most brands of plastic or brass valves to automatic.
Grease Caps
Protects low voltage wires from corrosion or shorts.
Questions?
Please call toll-free
1-800-488-6156
Orbit
®
Irrigation Products Inc.
845NorthOverlandRd.•NorthSaltLake,Utah84054
www.orbitonline.com
15
Connecting the Transformer
• Withthecoveroff,findthetwoterminalholeslabeled“24vac.”
Make sure the transformer is not plugged in. Insert one of the
two power leads from the transformer into each terminal.
• Plugintransformer[SeeFigure21].
Figure 21: Connecting Transformer
WARNING: DO NOT LINK TWO OR MORE TIMERS TOGETHER WITH
ONE TRANSFORMER.
• Slidethecoverbackonuntilitsnaps.
TROUBLE SHOOTING
Problem/Possible Causes
One or more valves do not turn on:
1. Faulty solenoid.
2. Wire broken or not connected.
3. Flow control stem screwed down, shutting valve off.
4. Programming is incorrect.
Stations turn on when they are not supposed to:
1. Water pressure is too high.
2. More than one start time is programmed.
One station is stuck on and will not shut off:
1. Faulty valve.
2. Particles of dirt or debris stuck in valve.
3. Valve diaphragm faulty.
All valves do not turn on:
1. Transformer defective or not connected.
2. Programming is incorrect.
3. The fuse is blown.
Timer will not power up:
1. The fuse is blown.
2. Transformer not plugged into an operational AC outlet.
14
ENGLISH

la hora del día, la hora de riego, los días de riego, las horas de
inicio y otras funciones.
3. Selector giratorio
El elemento principal del Regulador es el selector giratorio.
Este elemento tipo dial facilita ver cuál de las funciones se
ha seleccionado actualmente y/o en qué modo se ha fijado el
Regulador para su funcionamiento.
4. Botón para reposicionar
El botón para reposicionar borra la hora y la fecha pero no quita
el programa de protección contra fallas instalado por la fábrica.
Para evitar que se hagan accidentalmente cambios, el botón está
incrustado en el panel y se debe oprimir con un objeto pequeño
puntiagudo, como la punta de un lapicero o de un lápiz.
Funciones importantes de programación
Dos programas de riego--Resumen
El Regulador le da la opción de usar cualquiera o TODAS estos
programas independientes: Tenga en cuenta que cada estación se
puede fijar independientemente ya sea en los programas A o B o
en los dos A y B.
Programa-A
Este programa le permite programar estaciones seleccionadas
para regar en días específicos de la semana o para regar cada
segundo día. El programa A se repite continuamente en semanas
sucesivas.
Programa-B
Proporciona dos opciones: Una para el riego en días pares o
impares o para intervalos que van de entre el riego diario a cada
28 días. Esta característica está diseñada para satisfacer las
continuas necesidades y restricciones impuestas por los gobiernos
locales con el objeto de conservar agua. El Regulador calcula
automáticamente los días pares e impares (por fecha) para cada
mes y hace los ajustes necesarios en el caso de años bisiestos,
para proporcionar el riego exacto en dichos días hasta el año 2100.
Acumulación de horas de inicio
El Regulador está diseñado para “acumular” horas de inicio
que se sobrepongan. Si usted entra dos o más horas de inicio
que se sobrepongan (en el mismo o en diferentes programas),
el Regulador no activará dos estaciones al mismo tiempo. Al
contrario, el Regulador activará en secuencia la primera estación
y luego la(s) siguiente(s), tan pronto como la primera estación
termine el período de duración de riego preestablecido.
El Regulador NO acumula hasta el día de calendario siguiente.
Esto evita que el Regulador viole el horario de riego de días pares
o impares.
Modos manual y semiautomático
El regulador le proporciona cierto número de modos de operación
manual y semiautomática para dar flexibilidad de riego. Usted
puede anular la programación automática del Regulador en
distintas maneras.
Sección dos
PARA COMENZAR
La programación del Regulador se puede lograr siguiendo
simplemente algunos pasos básicos. Antes de iniciar la
17
Sección uno
INTRODUCCIÓN
Gracias por seleccionar un Controlador para aspersores de
Orbit
®
. Los diseñadores de Orbit
®
han combinado la simplicidad
de interruptores mecánicos con la exactitud de elementos
electrónicos digitales para proporcionarle un Controlador que
es tanto fácil de programar como extremadamente versátil. El
Controlador de Orbit
®
proporciona conveniencia y flexibilidad,
permitiéndole hacer uso de un programa de riego completamente
automático, semi-automático o manual, para satisfacer todas
sus necesidades de riego. Este Controlador también incorpora la
conveniencia y la flexibilidad del control remoto inalámbrico.
Sírvase leer todo este manual antes de empezar a programar
y a usar el Regulador. Entre algunas de las más notables
características del diseño se incluyen las siguientes:
Simplicidad en diseño
Haciendo girar el dial a cualquiera de las nueve posiciones, usted
puede examinar la programación o hacer cambios con facilidad.
Programación a control remoto
Insertando dos baterías (pilas) alcalinas AA usted puede
programar el Controlador antes de instalarlo en la ubicación
permanente.
Control remoto inalámbrico
Con el uso del transmisor remoto inalámbrico, el Controlador
puede hacerse funcionar por medio del control remoto
inalámbrico, a una distancia máxima de 200 pies (60 metros) del
controlador. Usted puede iniciar un ciclo de riego manual de 2,
10, 30 ó 60 minutos, para todas las estaciones o para cada una en
forma individual. Es excelente para mantenimiento, reparaciones
y para encender y apagar el sistema. El Controlador permite que
se use hasta un máximo de 6 transmisores independientes. La
conveniente luz LED que está en el frente del Controlador verifica
la transmisión inalámbrica.
Fusible
El Fusible de Fusi.n lenta de 0.75 amperios protégé el circuito.
Cuando tenga quecambiarlo, use un fusible WaterMaster
®
de 0,75
amperios o uno equivalente.
Ilustración 1: Ubicación de controles en el Regulador
1. Pantalla digital
Una pantalla grande LCD muestra la hora del día e indica la
mayoría de los valores de programación. Existe reciprocidad
completa entre la pantalla y TODAS los demás controles.
2. Teclas de programación
El Regulador tiene siete teclas para la programación. Cuando se
usan en conjunto con el selector giratorio, las teclas pueden fijar
16
ESPAÑOL

lustración 4
ADVERTENCIA: Si no se entra un programa de riego en el Regulador,
el programa de protección contra fallas instalado por la fábrica
encenderá cada estación TODAS los días por diez minutos. Para
evitar la activación accidental de la válvula, siga cualquiera de los
pasos siguientes:
1) haga girar el dial a APAGADO
2) entre un programa de riego
Para establecer un plan de riego
Para ayudarle a visualizar la mejor manera de programar el
Regulador, sería de gran ayuda trazar un plan de riego. Esto le
ayudará a establecer los días y las horas en que desee regar.
Sección tres
PROGRAMACIÓN
El Regulador tiene dos programas que usted puede fijar para
controlar toda una variedad de planes de riego. Según sus
necesidades, usted puede usar cualquiera de los programas o los
dos.
Para entrar el programa de riego en cualquier secuencia
Usted tiene la opción de entrar el programa de riego en la
secuencia que desee. Esta característica facilita el examinar y
cambiar el programa de riego. Los valores pueden cambiarse
en cualquier momento, cuando esté fijando el programa inicial, o
después de años de funcionamiento.
Horas de inicio para el programa A o el B
Nota: Una hora de inicio se refiere a la hora del día en que el
programa comienza el riego en la primera estación, siguiendo las
demás estaciones en secuencia. Cada estación no tiene horas de
inicio distintas. Las horas de inicio no corresponden a estaciones
específicas. Si usted entra más de una hora de inicio, todas las
estaciones programadas volverán a regar (en secuencia).
• Lamaneraenqueustedfijelahoradeinicioeslamismapara
los dos programas. Haga girar el dial a la posición de Horas de
inicio del programa que desee fijar. La pantalla mostrará una
A o una B, según el programa que haya seleccionado.
En la pantalla se leerá --:--, y aparecerá un cursor intermitente en
la posición Inicio 1 [Vea la ilustración 5].
• Fijelahoraenquedeseeiniciarelriegoparalahoradeinicio
1,usandolasteclas+o-,luegooprimalatecha
entrada
. La
pantalla avanzará hasta Inicio 2. En el caso de desear horas
de inicio adicionales, simplemente repita este procedimiento
usandolasteclas+y-paraentrarlahora,luegooprima
entrada
.
Recuerde que cada hora de inicio activará todas las estaciones que
se hayan programado para funcionar. Cada estación no cuenta con
horas de inicio distintas. Las horas de inicio no corresponden a
estaciones específicas.
19
programación, es importante instalar la batería, fijar la hora del
día y la fecha y establecer un plan de riego.
Instalación de baterías
El Regulador necesita dos baterías AA para mantener la hora y
la fecha en caso de que haya un corto de electricidad. En una
instalación típica, las baterías completamente cargadas deben
proporcionar suficiente energía para funcionar aproximadamente
por un año.
• Quitelatapaocubiertadelaterminal.
• InsertedosbateríasAAenelcompartimientoparabaterías.
• Vuelvaacerrarlacubiertadelaterminal.
Baterías descargadas o la falta de ellas pueden hacer que la
hora y la fecha se borren después de un corto de electricidad. Si
esto sucede, usted tendrá que instalar baterías completamente
cargadas y volver a entrar la hora y la fecha. TODAS los demás
valores del programa se mantendrán en la memoria no volátil.
Para fijar la hora del día y la fecha
Si esta es la primera vez que se ha programado el Regulador,
usted debe oprimir el pequeño botón que está incrustado y que
está marcado con el nombre
repoSicionar
. El oprimir
repoSicionar
no
afectará el programa de protección contra fallas instalado por la
fábrica [Vea la ilustración 2].
Ilustración 2: Teclas de programación
• Hagagirareldialalaposiciónhora/fecha.
• Enlapantallaseleerá12:00AMcontresflechasseñalandoel
año (Y), el mes (M), y el día (D) [Vea la ilustración 3].
• Oprimaysotengalatecladelsigno+parahaceravanzarel
reloj hasta la hora correcta del día. Use la tecla del signo -
para ir hacia atrás. Cuando se llegue a la hora correcta del día,
oprima la tecla
entrada
para fijar la hora.
Para aumentar o disminuir con mayor rapidez, mantenga oprimida
latecladelsigno+oladelsigno-,hastaquelapantallapaseal
modo de avance rápido.
• Alprogramar,uncursorintermitenteaparecerásobrelaflecha
para determinar el año (Y), el mes (M) o la fecha (D) [Vea la
ilustración 4].
• Uselasteclas+y-parafijarelañocorrectoyluegopulse
entrada
.
• Uselasteclas+y-parafijarelmescorrectoyluegopulse
entrada
.
• Uselasteclas+y-parafijarlafechacorrectayluegopulse
entrada
.
Ilustración 3: Pantalla LCD con información correspondiente
18
ESPAÑOL

• Oprima
entrada
para activar el riego el lunes. Debajo de la
M aparecerá una flecha y el cursor avanzará hasta el martes
(“T”); oprima
entrada
para activar el riego en dicho día. Repita
estos pasos para TODAS los días de la semana.
• Parapasarporaltoundía,oprima
Siguiente.
• Paraborrarundíaquesehayaentradopreviamente,oprima
borrar
.
• Sidesearegarcadadosdías,oprimalatecla
Siguiente
para
avanzar el cursor hasta “2nd”, luego oprima
entrada
.
Nota: Si usted decide regar cada dos días, no puede fijar días
específicos de la semana para el riego.
Asignación de intervalos de riego para el programa B
El programa B se usa para regar durante intervalos específicos
entre días (1 a 28), o en fechas pares o impares del calendario. El
Regulador tiene un compensador para años bisiestos y asegurará
que se siga el plan de días pares e impares hasta el año 2100.
•
Haga girar el dial a Intervalo de riego. El cursor parpadeará a
la izquierda de la palabra Interval [Vea la ilustración 8].
Ilustración 8: Pantalla LCD con intervalo de riego
• Oprimaymantengaenesaposiciónlasteclas+o-para
seleccionar el número de días entre riego. Por ejemplo, si
usted desea regar una vez cada 10 días, fije el intervalo en 10.
• Paraactivarelintervaloderiego,oprima
entrada
.
Nota: Si hoy se entra un intervalo de “3”, el Regulador regará por
primera vez hoy, y de nuevo regará cada “3” días.
• Paraborrarunprograma,oprima
borrar
. Para entrar un nuevo
programa, oprima
Siguiente
.
Repaso y cambio del programa
El Regulador de Orbit
®
le permite repasar un plan de riego
completo.
Por ejemplo, para repasar las horas de comienzo de riego del
programa A, simplemente haga girar el dial a la posición de Horas
de inicio en el programa A y compruebe las horas que se hayan
entrado. Usando la tecla
Siguiente
, usted puede avanzar por todo el
programa sin temor a cambiar la programación.
Si usted desea cambiar las horas de inicio, los días de riego o los
intervalos, simplemente siga las instrucciones para ese programa.
Después de repasar o de cambiar un programa de riego, no
olvide volver a pasar a
auto
el dial, si desea que el Regulador siga
automáticamente su programa.
Listo para la operación automática
Después de que se haya completado la programación, haga girar a
auto
el dial [Vea la ilustración 9].
El Regulador está entonces completamente programado y
listo para usarse en el modo automático. En este modo, cada
programa funcionará en secuencia, empezando con el programa
A.
21
Ilustración 5: Pantalla LCD con hora de inicio
Duración de riego para el programa A o el B
Nota: Los dos programas requieren que se programe la duración de
riego para cada una.
• HagagirareldialalaposiciónDuración de estación ya sea en
el program A o en el B. La pantalla mostrará el programa que
usted haya seleccionado con una “A” o una “B” y los - - MINS y
el cursor intermitente en la estación “1” [Vea la ilustración 6].
Ilustración 6: Duración de la estación para el programa A
• Ustedpuedefijarladuracióndelriegode1a99minutos.
Oprimaymantengaoprimidalatecla+paraaumentarel
número de minutos, o use la tecla - para disminuir, y luego
oprima
entrada
. Cuando se hayan fijado los minutos, aparecerá
una “A” o una “B” sobre la estación 1 y el cursor avanzará
hasta la estación 2 y continuará parpadeando.
• Simplementerepitaestospasosparafijarlasduracionesde
riego para las estaciones 2 a 6.
• Parapasarporaltounaestación,oprimalateclaSiguiente.
• Paraborrarperíodosdeduraciónderiegoprogramados
previamente, oprima la tecla
borrar
.
Asignación de días de riego para el programa A
• HagagirareldialaDías de riego en el programa A. La pantalla
mostrará una “A” y el cursor parpadeará debajo de los días de la
semana M, T, W, T, F, S, S (lunes, martes, etc.) [Vea la ilustración 7].
Ilustración 7: Pantalla LCD con días de riego
20
ESPAÑOL

(Todas las estaciones pasan una vez por un ciclo, programa
A sólamente)
•
Para activar cada una de las estaciones asignadas períodos de
riego para el programa A únicamente, oprima la tecla manual,
seguida por la tecla siguiente. Esto activará las estaciones
con períodos de riego asignados únicamente en el programa
A. Para iniciar el riego semiautomático, oprima entrada [Vea la
ilustración 12].
(Todas las estaciones pasan una vez por un ciclo, programa
B sólamente)
•
Para activar cada una de las estaciones asignadas períodos de
riego para el programa B únicamente, oprima la tecla manual,
enseguida oprima la tecla siguiente dos veces. Esto activará
las estaciones con períodos de riego asignados únicamente en
el programa B. Para iniciar el riego semiautomático, oprima
entrada.
Ilustración 12: Riego manual ya sea en
el programa A o en el B únicamente
Uso de la operación manual
El modo de operación manual le permite fijar períodos de duración
en cualquiera de las seis estaciones, de 1 a 99 minutos.
• HagagirareldialaAUTO.
• OprimalateclaMANUAL.LuegooprimaSIGUIENTEtresveces.
La pantalla mostrará un cursor intermitente en la estación 1
junto con -- MINS [Vea la ilustración 13].
Ilustración 13
• Parafijarelnúmerodeminutosquedureelriego,oprimay
mantegaoprimidalatecla+paraavanzarhastaelnúmero
deseado de minutos de riego. Use la tecla - para ir hacia atrás
o en reversa. Oprima
entrada
para empezar el riego.
• Parapasarporaltounaestación,oprima
Siguiente
hasta que
el cursor esté intermitente sobre el número de estación que
desee programar. Por ejemplo, para fijar la estación 3 por cinco
minutos, oprima la tecla
manual
, luego oprima cinco veces la
tecla
Siguiente
para seleccionar el modo de operación manual y
avanzarhastaelriegoparalaestación3;usandolatecla+ola-,
fije en cinco minutos la duración del riego manual, luego oprima
entrada
[Vea la ilustración 14].
23
Ilustración 9: Listo para la operación automática
Sección cuatro
OPERACIÓN
SEMIAUTOMÁTICA Y
MANUAL
El Regulador de Orbit
®
tiene la habilidad de borrar el programa
automático sin cambiar el programa preestablecido.
Uso del modo semiautomático
(Todas las estaciones pasan por un ciclo los dos programas A y B)
• Hagagirareldiala
auto
, luego oprima la tecla MANUAL. La
pantalla mostrará “AB”, “MANUAL” y “TODAS” aparecerá
intermitente [vea la ilustración 10]. Esto indica que todas las
seis (o doce) estaciones en los programas A y B regarán de una
manera semiautomática durante los períodos asignados en
secuencia.
• Paraactivarlosperíodosasignados de riego en los programas
A y B para cada estación, oprima
entrada
.
Ilustración 10: Riego semiautomático para las estaciones
asignadas a los programas A y B
Nota: Los períodos de duración de riego asignados a la estación 1
en el programa A, ocurren primero, luego pasan a la estación 1 en el
programa B, antes de avanzar a la segunda estación y continuarán
alternándose. Sólo las estaciones a las que se les asignaran períodos
de riego, regarán cuando se usen los modos manual o semiautomático
[Vea la ilustración 11].
Ilustración 11: Riego semiautomático designado para los
programas A y B y todas las estaciones
22
ESPAÑOL

Interrupción completa del sistema
Para interrumpir el sistema, haga girar el dial a la posición
apagado
. El Regulador continúa programado pero no regará.
Sección cinco
USO DE LAS
CARACTERÍSTICAS DEL
CONTROL REMOTO
Disposición de las funciones del inalámbrico
Las funciones del control remoto inalámbrico del Regulador
le permiten hacer funcionar el Regulador desde una distancia
máxima de 200 pies (60 metros), usando el transmisor inalámbrico
que se usa con la mano. Usted puede encender todas las
estaciones o una en particular, por cierto número de minutos.
Esta función es útil, particularmente en la solución de problemas,
para hacer ajustes o reparaciones, para realizar riego adicional y
para encender y apagar el sistema de riego.
• Primero,instaleunabateríaalcalinade9voltiosenel
Transmisor de mano [vea la ilustración 16]. Para examinar
la batería, oprima el botón
apagado/reanudado auto
en el
Transmisor. La luz roja del Transmisor se encenderá por
un período de dos segundos, y se escucharán tres sonidos
acústicos. Después de uso continuo (aprox. un año), la batería
se debilitirá, y la luz roja será ténue. Cambie la batería cuando
la luz llegue a este nivel o si empieza a disminuir la distancia
de operación.
Ilustración 16: Instalación de batería de Transmisor
• Paraexaminarelsistemainalámbrico,sostengaelTransmisor
cerca del Regulador (el Regulador debe tener instalado el
transformador) y oprima el botón
apagado/reanudado auto
en el
Transmisor. Si está debidamente alimentado de energía, la
luz roja que está en el lado frontal del Regulador (marcada
FR Activo destellará varias veces, al igual que la luz roja del
Transmisor. NOTA: Si el Transmisor y el Regular no responden
como es debido, examine las fuentes de energía. Tal vez haya
necesidad de programar también el Transmisor al Regulador
(vea Programación del Transmisor).
Operación del Regulador usando las funciones del inalámbrico
La función de inalámbrico le permite realizar ciclos de riego
de programación semiautomática. El programa normal
automático del Regulador y la función de inalámbrico funcionan
independientemente. Sin embargo, el funcionamiento inalámbrico
tiene prioridad sobre cualquier otro programa del Regulador.
(Para activar una estación por un período específico de riego
usando el Transmisor inalámbrico)
• OprimaelbotóndelaestacióndeseadaenelTransmisor
(número 1, 2, 3, etc.). El Transmisor emitirá una sola señal
acústica y la luz roja se encenderá [Vea la ilustración 17].
25
Ilustración 14: Riego manual de la estación 3 por cinco minutos
Nota: Tras oprimir la tecla MANUAL, si no se hace una selección
dentro de 60 segundos, la pantalla vuelve a la hora del día.
Interrupción de la potencia generada por el Regulador
El Regulador tiene varias funciones integradas que le permiten
al usuario interrumpir momentáneamente la potencia eléctrica
generada a las válvulas de la estación.
•
Para interrumpir momentáneamente la potencia eléctrica
generada a las estaciones, oprima el botón
apagado/reanudado
auto
del transmisor inalámbrico que se sostiene con la mano.
Esto es útil cuando se desea hacer una reparación rápida
o un ajuste en el sistema de rociadores. Para reiniciar la
generación de potencia eléctrica, simplemente vuelva a oprimir
una vez más el botón apagado/reanudado auto.
NOTA: El programa volverá a donde debería estar, si la interrupción
no hubiera ocurrido. Por ejemplo, el Regulador no trata de recobrar
ningún riego automático que se perdiera debido a la interrupción.
• Parainterrumpirodescontinuarelriegosemiautomáticoo
manual, oprima una vez la tecla
borrar
. El Regulador volverá al
plan de riego automático original.
Uso del modo de demora de lluvia que el usuario puede
seleccionar
Para detener el riego automático por 24, 48 ó 72 horas, use la
tecla para activar el modo
demora de lluvia
.
• Teniendoen
auto
el dial giratorio, pulse una sola vez la tecla
demora de lluvia
. El Regulador forzará una interrupción de 24
horas de todo riego programado. Después de 24 horas, el
Regulador volverá automáticamente a su programa inicial de
riego.
• Paraaumentarlademoradelluviaa48ó72horas
simplemente oprima de nuevo la tecla
demora de lluvia
hasta
que la hora de demora deseada aparezca en la pantalla.
• Paracancelarelmododedemoradelluvia,oprima
borrar
[Vea
la ilustración 15].
Nota: Mientras se encuentre en el modo de demora de lluvia, el
regulador dejará ver las horas que quedan (contando hacia abajo)
hasta el final de la demora aceptada, alternando con la hora y la
fecha actuales. Además de borrar, no se acepta ninguna otra tecla
mientras el Regulador esté en el modo de demora de lluvia.
Ilustración 15: Pantalla que muestra la demora de lluvia
24
ESPAÑOL

(Notas sobre el uso de las funciones del control remoto inalámbrico)
• Recuerdequelasfuncionesdelinalámbricotienenprioridad
sobre las operaciones normales del Regulador. Aunque el
Regulador vuelva al programa automático, el tiempo que se
pase durante un ciclo por inalámbrico se perderá. Debido
a esto, el interrumpir un programa que esté en actividad
(semiautomático o manual) puede causar que algunas de las
estaciones del programa que esté activado en ese momento no
rieguen.
• Lasfuncionesderiegoporinalámbricono“acumulan”como
lo hacen los programas del Regulador. Un nuevo mandato del
inalámbrico cancelará el mandato que esté funcionando en ese
momento.
• Despuésdeusocontinuo(aprox.unaño),labateríase
debilitirá, y la luz roja será ténue. Cambie la batería cuando la
luz llegue a este nivel o si empieza a disminuir la distancia de
operación.
• SielTransmisoryelReguladornorespondendelamanera
debida, examine las fuentes de alimentación de energía.
Tal vez sea también necesario programar el Transmisor al
Regulador (vea Programación del Transmisor a continuación).
• LadistancianormalparaelfuncionamientodelTransmisores
de 200 pies (60 metros). Esta distancia se reduce cuando se
transmite a través de paredes, arbustos, forros metálicos, etc.
Para que la transmisión sea de mejores resultados, sostenga el
Transmisor sobre la cabeza o frente a usted.
Programación del Transmisor
Tal vez no sea necesario usar este procedimiento para modelos
que se vendan con un Transmisor incluido, ya que el Transmisor y
el Regulador ya han sido programados para funcionar de manera
acoplada. Sin embargo, si usted cambia Transmisor debe codificar
el Transmisor al Regulador.
Para programar el Transmisor:
Mientras sostiene con una mano el Transmisor, oprima y suelte
el botón PROGRAMA DEL TRANSMISOR. El indicado luminoso
rojo del Regulador se encenderá. Oprima el botón APAGADO del
Transmisor. El Transmisor emitirá tres señales acústicas y el indi-
cador luminoso rojo del Regulador parpadeará, indicando que la
codificación del programa se ha completado.
Sección seis
INSTALACIÓN
Ubicación del Regulador
• Seleccioneunlugarjuntoauntomacorriente.Eviteusarun
tomacorriente controlado por un interruptor de encendido/
apagado (On/Off).
• Elreguladornodebeestarexpuestoalainterperienise
debe operar en temperaturas menores de 32 ni mayores de 113
Fahrenheit.(0c+45c).
• Lainstalacióntienemejoresresultadosenungarajeoen
una área protegida. No se debe instalar un Regulador a la
interperie.
Nota: La distancia para el funcionamiento del Transmisor y del
Regulador es de aproximadamente 200 pies (60 metros). Esta
distancia se puede ver afectada por obstáculos como paredes,
27
• Oprimaelbotón
encendido
para el período deseado de
riego (seleccione los períodos de duración de 2, 10, 30 ó 60
minutos). El Transmisor emitirá tres señales acústicas para
confirmar el mandato. La luz roja del Regulador se dejará
ver intermitente varias veces para indicar que ha recibido la
señal del inalámbrico [Vea la ilustración 17]. Durante el riego
inalámbrico, la pantalla del Regulador mostrará la estación
activa que se está regando (una “A” aparecerá sobre el número
de estación), indicará
remoto
y contará en forma descendente el
número de minutos que quedan en esa estación.
• Recuerdequeelbotónde
encendido
se debe oprimir dentro de
10 segundos del botón de la estación deseada (mientras que
todavía esté encendida la luz roja) o tendrá que repetir los
pasos.
• NOTA:Elriegousandoelinalámbricotieneprioridadsobre
cualquier otra función del Regulador (incluyendo los modos
automático, semiautomático o manual). Si la función de
inalámbrico interrumpe un programa de funcionamiento
automático, el riego por inalámbrico ocurrirá, y de ahí en
adelante el Regulador volverá al programa automático. Sin
embargo, cualquier tiempo que pase durante el riego por
inalámbrico se perderá. La función del inalámbrico también
borrará la demora de lluvia o los modos
apagado
del Regulador.
• Parainterrumpirelriegoporinalámbrico,simplementeoprima
en el Transmisor el botón
apagado/reanudado auto.
(Para activar todas las estaciones por un período específico de
riego usando el Transmisor inalámbrico)
• OprimaenelTransmisorelbotón
todas
. El Transmisor emitirá
una vez una señal acústica y la luz roja se encenderá [Vea la
ilustración 17].
• Oprimaelbotón
encendido
del período de riego deseado
(seleccione períodos de 2, 10, 30 ó 60 minutos). El Transmisor
emitirá tres señales acústicas para confirmar el mandato.
La luz roja del Transmisor se verá intermitente varias veces
para indicar que ha recibido la señal del inalámbrico [Vea la
ilustración 17]. Durante el riego por inalámbrico, la pantalla
del Regulador mostrará la estación activa que se está regando
(una “A” aparecerá sobre el número de estación), indicará
remoto
y contará en forma descendente el número de minutos
que quedan en esa estación. Se debe tener en cuenta que
cada estación se activará, a pesar de la programación en el
Regulador.
•
Para interrumpir el riego por inalámbrico, simplemente oprima
el botón
apagado
en el Transmisor
Ilustración 17: Riego usando las funciones del control remoto
inalámbrico
26
ESPAÑOL
Transmisor de
RF de mano
Soporte del transmisor
de RF
Luz piloto roja
Botón del programa
del transmisor
Luz piloto roja
Botones de la estación
Botón “Apagado/
Reanudación automática”
Botón “Todas las
Botones de encendido
para duración
del agua

• TODOSlosalambresdebenunirsepormediodetuercaspara
alambre, soldadura o cinta de vinilo. Para protección adicional
en caso de conexiones a prueba de agua se puede usar un
casquillo aislante de grasa WaterMaster
®
.
• Paraevitardañoseléctricos,sólodebeconectarseunaválvula
a cada estación.
Conexión de alambres de válvula al Regulador
• Quitelatapa,deslizándola.
• Decidacuáldelasválvulasdeseaconectaracuálestación.
Conecte cada alambre de válvula a su propia terminal
de estación (marcadas 1-6 ó 1-12) insertando el alambre
descubierto.
• Talvezhayanecesidaddeabrirlaterminalparapermitir
la inserción o la extracción del alambre. Para hacerlo,
simplemente oprima hacia arriba en el tabulador ubicado en la
parte de arriba de la terminal.
• Conecteelcablecomúnalaterminalmarcada“COM”[Veala
ilustración 20].
Ilustración 20: Conexión de alambres de válvula
Ilustración 21: Conexión de transformador
Conexión del transformador
• Trasquitarlatapa,busquelosdosagujerosdeterminal
marcados “24VAC”. Asegúrese de que el transformador
no esté conectado. Inserte uno de los dos conductores de
alimentación desde el transformador a cada una de las
terminales.
• Conecteeltransformador[Vealailustración21].
ADVERTENCIA: NO CONECTE DOS O MáS REGULADORES JUNTOS
CON UN TRANSFORMADOR.
• Vuelvaacolocarlatapahastaqueelchasquidoindiquequeha
quedado asegurada.
29
automóviles, forros metálicos, etc. Para obtener la máxima distancia
de operación, monte el Regulador en la pared, en un lugar tan alto
como lo permita la conveniencia de operación y funcionamiento.
Montaje del Regulador
• AtornilleuntornilloNo.8aniveldelavista,dejandolacabeza
del tornillo salida de la pared aproximadamente 1/8 de pulgada
(0,32 cm). Si es necesario, use sujetadores de expansión para
argamasa.
• Desliceelojodelacerraduraqueestáenlapartedeatrásdel
regulador sobre el tornillo extendido.
• AtornillecontralapareduntornilloN.8encadaunodelosdos
agujeros que están en la parte inferior de la caja del regulador
[Vea ilustración 18].
• InstaledosbateríasAAyvuelvaaentrarlahoraylafechasegúnse
requiera.
Ilustración 18: Montaje del Regulador
Instalación de las válvulas eléctricas
• Siladistanciaentreelreguladorylasválvulasesdemenos
de 700 pies (213 metros), use alambre para rociadores
WaterMaster
®
o alambre para termostato de cubierta plástica
de calibre 20 para conectar el regulador a las válvulas. Si la
distancia es de más de 213 metros, use alambre de calibre
16. El alambre se puede enterrar en el suelo; sin embargo,
para mayor protección, el alambre se puede pasar por tubo
PVC y luego enterrar en el suelo. Asegúrese de no enterrar
el alambre en ubicaciones donde se pueda dañar debido a
excabaciones que se pudieran hacer en el futuro.
Ilustración 19: Instalación de válvulas
•
Cada válvula tiene dos alambres. Uno debe conectarse como
el alambre común. Los alambres comúnes para todas las
válvulas pueden conectarse juntos a uno de los alambres
comúnes que vayan a la válvula. El otro alambre de válvula
se debe conectar al alambre de la estación específica que
controlará esa válvula [Vea la ilustración 19].
28
ESPAÑOL
Keyhole
Screwholes
No. 8 Screw
Wall

Convertidores automáticos
De construcción plástica anticorrosiva,
convierte en automáticas la mayoría de las
marcas de válvulas de plástico o de bronce.
Casquillos aislantes de grasa
Protege alambres de bajo voltaje contra la
corrosión o cortos.
¿Preguntas?
Sírvase llamar gratuitamente al
1-800-488-6156
Orbit
®
Irrigation Products Inc.
845NorthOverlandRd.•NorthSaltLake,Utah84054
www.orbitonline.com
31
SOLUCIÓN DE PROBLEMAS
Problemas/Posibles causas
Una o más válvulas no encienden:
1. Solenoide defectuoso.
2. Alambre roto o sin conectar.
3. Tubo de control de flujo atornillado, apagando válvula.
4. Programación incorrecta.
Las estaciones se encienden cuando no deberían:
1. La presión de agua es muy alta.
2. Se ha programado más de una hora de inicio.
Una estación ha quedado trabada en encendido y no se apaga:
1. Válvula defectuosa.
2. Partículas de mugre o desecho estancadas en la válvula.
3. Diafragma de la válvula defectuoso.
Todas las válvulas no se encienden:
1. Transformador defectuoso o desconectado.
2. Programación incorrecta.
3. Se quemó el fusible.
El Regulador no enciende:
1. Se quemó el fusible.
2. Transformador no está enchufado en un tomacorriente que
funciona.
Válvulas continúan encendiéndose y apagándose cuando no
están programadas para hacerlo:
1. Se ha programado más de una hora de inicio con programas
superpuestos.
2. Excesiva presión.
Repentinamente se quema un fusible:
1. Corto en conexión o solenoides.
Otros productos y assesorios de calidad
Apagador automático de lluvia
Para un apagador automático de lluvia,
comuníquese con el distribuidor de Orbit
®
para comprar un inter-ruptor de apagado
automático de lluvia modelo 57098. El
apagador de lluvia se conecta fácilmente al
Regulador y evita que se riegue más de lo
necesario durante períodos de lluvia.
Caja de Regulador para proteger contra la
interperie
Permite que se haga la instalación a la
interperie de la mayoría de las marcas de
reguladores que son para montaje interno y
que aparecen en la lista UL.
Válvulas automáticas
Válvulas automáticas de construcción plástica
anticor-rosiva, se tienen disponibles en anti-
sifón o rectas, con voltaje bajo y seguro.
30
ESPAÑOL

pour régler l’heure actuelle, l’heure d’arrosage, les jours
d’arrosage, les heures de démarrages et autres fonctions.
3. Sélecteur rotatif Le sélecteur rotatif est le coeur du
programmateur. Simple commutateur à cadran, il permet de
voir quelle fonction est sélectionnée et/ou le mode d’opération
du programmateur.
4. Bouton de réinitialisation Le bouton de réinitialisation
efface l’heure et la date mais ne retire pas le programme
permanent installé à l’usine. Afin d’empêcher toute
réinitialisation accidentelle, le bouton est placé dans un
enfoncement du panneau et doit être pressé à l’aide d’un objet
pointu tel que la pointe d’un crayon ou d’un stylobille.
Caractéristiques de programmation remarquables
Deux programmes d’arrosage - Résumé
Le programmateur présente l’option d’utilisation de chacun de
ces programmes indépendants ou de tous les deux. Il faut noter
que chaque station peut être réglée indépendamment pour le
programme A ou B ou pour les deux programmes simultanément.
Programme A
Ce programme vous laisse organiser l’arrosage des stations
sélectionnées durant certains jours spécifiques ou un arrosage
tous les deux jours. Le programme A se répète continuellement de
semaine en semaine.
Programme B
Offre deux options: Une option présentant un arrosage durant
les jours pairs ou impairs ou une option présentant des
intervalles d’1 à 28 jours. Cette caractéristique est conçue pour
satisfaire les besoins croissants et les restrictions imposées
par les gouvernements locaux ainsi que pour conserver l’eau.
Le programmateur calcule automatiquement les jours pairs et
impairs (par date) pour chaque mois et effectue les ajustements
nécessaires pour les années bissextiles afin de présenter un
arrosage à jours pairs ou impairs réels jusqu’à l’an 2100.
Empilage des temps de démarrage
Le programmateur a l’”intelligence” d’”empiler” (c’est-à-dire
qu’elle mettra à la suite l’un de l’autre) des temps de démarrage
qui se chevauchent. Si vous entrez deux ou plusieurs temps de
démarrages qui se chevauchent (que ce soit dans un programme
identique ou différent), le programmateur n’activera pas deux
stations simultanément. Dans une situation ou des temps de
démarrages se chevauchent, le programmateur activera la
première station et activera ensuite la(les) station(s) suivante(s)
successivement lorsque l’arrosage de la première station sera
terminé.
Le programmateur n’empilera PAS jusqu’au prochain jour.
Cela empêche le programmateur d’enfreindre le programme
d’arrosage en jours pairs ou impairs.
Modes manuel et semi-automatique
Le programmateur vous offre un certain nombre de modes
manuels et semi-automatiques pour permettre une flexibilité
des arrosages. Vous pouvez outrepasser la programmation
automatique du programmateur de plusieurs manières.
SECTION DEUX
33
SECTION UN
Introduction
Merci pour votre choix du contrôleur pour système d’arrosage
Orbit
®
contrôleur. Les concepteurs d’Orbit
®
ont associé
la simplicité d’interrupteurs mécaniques à la précision
d’équipements électroniques numériques pour vous présenter
un contrôleur tout à la fois facile à programmer et très souple.
Le contrôleur Orbit
®
offre facilité et flexibilité et vous permet
d’utiliser un programme d’arrosage complètement automatique,
semi-automatique ou manuel pour tous vos besoins en arrosage.
Ce contrôleur ajoute également la commodité et la flexibilité d’un
contrôleur à distance sans fil.
Veuillez lire ce manuel complètement avant de commencer à
programmer et utiliser le programmateur. Voici certaines des
caractéristiques de conception les plus remarquables:
Simplicité
En positionnant le commutateur sur l’un des neuf réglages, vous
pouvez réviser la programmation ou effectuer des modifications.
Programmable dans votre fauteuil
Insérer deux piles alcalines AA pour permettre la programmation
du programmateur avant son installation dans son emplacement
permanent.
Contrôle sans fil à distance
Grâce à l’utilisation d’un émetteur, le contrôleur peut être utilisé
par un contrôle sans fil, à une distance allant jusqu’à 60 mètres.
Vous pouvez initier un cycle d’arrosage manuel de 2, 10, 30 ou
60 minutes, pour une station ou pour la totalité des stations. Ce
dispositif est excellent pour l’entretien, les réparations ainsi que
la mise en marche et l’arrêt du système. Le contrôleur permet
l’utilisation d’1 à 6 émetteurs indépendants. Le voyant pratique
DEL sur le devant du contrôleur vérifie les transmissions sans fil.
Fusible
Un fusible protège la source d’alimentation electrique du
régulateur. Si un fusible grille, il peut-être remplacé en ouvrant
le boîtier d’alimentation electrique.
Figure 1: Emplacement des commandes sur le programmateur
1. Affichage digital Un grand LCD (affichage à cristaux liquides)
indique l’heure actuelle ainsi que plusieurs des réglages de
programmation. L’affichage est complètement interactif avec
tous les autres contrôles
.
2. Touches de programmation Le programmateur a sept bouton-
poussoirs pour le réglage et la programmation. Les boutons,
utilisés conjointement au sélecteur rotatif, sont employés
32
FRANCAIS

programmateur, le programme permanent installé en usine activera
chaque station tous les jours pendant 10 minutes. Pour éviter
l’activation accidentelle d’une vanne, il faut soit:
1) positionner le commutateur sur ARRET
2) entrer un programme d’arrosage
Etablir un programme d’arrosage
Pour vous aider à visualiser la meilleure façon de programmer le
programmateur, il serait efficace de faire un plan d’arrosage sur
papier. Cela vous aidera à établir quels jours et à quelles heures
vous désirez arroser.
SECTION TROIS
Programmation
Le programmateur a deux programmes que vous pouvez régler
pour contrôler divers plans d’arrosage. Selon vos besoins, vous
pouvez utiliser soit un programme ou les deux.
Entrer le programme d’arrosage en ordre
Vous avez l’option d’entrer le programme d’arrosage dans l’ordre
que vous désirez. Cette caractéristique facilite la révision et
la modification du plan d’arrosage. Vos réglages peuvent être
changés à tout moment, lorsque vous régler le programme initial,
ou après des années de fonctionnement.
Heures de démarrage pour le programme A ou B
Note: Une heure de démarrage est l’heure à laquelle le programme
commence l’arrosage de la première station, et toutes les autres
stations suivent alors en série. Il n’y a pas d’heures de démarrage
séparés pour chaque station. Les heures de démarrage ne
correspondent pas à des stations spécifiques. Si vous entrez plus
d’une heure de démarrage, toutes les stations programmées pour
fonctionner seront arrosées de nouveau (successivement).
•
La manière selon laquelle vous réglez l’heure de démarrage
est identique pour les deux programmes. Positionner le
commutateur sur Heures de démarrage dans le programme
sélectionné.
L’écran indiquera alors --;--, et un curseur clignotant sur
l’emplacement Démarrage 1 (voir Figure 5).
• Sélectionner l’heure désirée pour le commencement de
l’arrosage pour l’heure de démarrage 1, en utilisant les
touches+et-,ensuitepressersurlatoucherenter.L’affichage
indiquera Démarrage 2. Pour des heures de démarrage
supplémentaires, répéter simplement cette procédure en
utilisantlestouches+et-etpresserensuitesurenter.Ilfaut
se rappeler que chaque heure de démarrage activera toutes les
stations programmées à fonctionner. Il n’existe pas d’heures
de démarrages séparées pour chaque station. Les heures de
démarrages ne correspondent pas à des stations spécifiques.
35
Pour commencer
La programmation du programmateur peut être accomplie par
une série de quelques étapes de base. Avant de commencer la
programmation, il est important d’installer les piles, de régler
l’heure actuelle et d’établir un programme d’arrosage.
Installation des piles
Le programmateur requiert deux piles AA pour maintenir l’heure
et la date en cas d’une perte de courant CA. Dans une installation
typique, des piles complètement chargées devraient fournir un
courant suffisant pour environ une année de fonctionnement.
•
Retirer le couvercle du bornier
•
Insérer deux piles AA dans le compartiment pour
piles.
• Remettre le couvercle du bornier dans sa position fermée.
Des batteries plates ou manquantes peuvent provoquer
l’effacement de l’heure et de la date en cas d’une panne
de courant. Dans ce cas, vous devrez installer des piles
complètement chargées et entrer de nouveau l’heure et la date.
Tous les autres réglages du programme seront maintenus en
mémoire non volatile.
Régler l’heure et la date
S’il s’agit de la première programmation du programmateur, vous
devriez presser sur le bouton, situé dans le petit enfoncement,
nommé Réinitialisation (“Reset”). Lorsque vous appuyez sur ce
bouton, le programme permanent installé en usine n’est pas
affecté (voir figure 2).
Figure 2: Touches de programmation
•
Positionner le commutateur sur Heure/Date.
• 12:00 apparaîtra sur l’écran avec trois flèches pointant sur
l’année (A), le mois (M) et le jour (J) (Voir figure 3).
• Pressersurlatouche+etlamaintenirenfoncéepouravancer
les aiguilles de l’horloge pour indiquer le temps réel. Utiliser
la touche (-) pour reculer les aiguilles de l’horloge. Lorsque
l’heure réelle est indiquée, appuyer sur la touche
enter
pour
enregistrer l’heure.
Pour avancer ou reculer les aiguilles plus rapidement, maintenir
latouche+oulatouche-jusqu’àcequel’affichageseplaceen
mode d’avancement rapide.
• Un curseur clignotant apparaîtra au-dessus de la flèche
représentant l’année (A), le mois (M) ou la date (D) lors de la
programmation (voir figure 4).
• Utiliserlestouches+et-pourindiquerl’annéeactuelle,
ensuite appuyer sur
enter
.
• Utiliserlestouches+et-pourindiquerlemoisactuel,ensuite
appuyer sur
enter
.
• Utiliserlestouches+et-pourindiquerladateactuelle,
ensuite appuyer sur
enter
.
Figure 3: Affichage LCD avec informations
Figure 4
ATTENTION: Si un programme d’arrosage n’est pas entré dans le
34
FRANCAIS
La page est en cours de chargement...
La page est en cours de chargement...
La page est en cours de chargement...
La page est en cours de chargement...
La page est en cours de chargement...
La page est en cours de chargement...
La page est en cours de chargement...
-
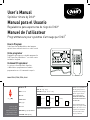 1
1
-
 2
2
-
 3
3
-
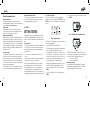 4
4
-
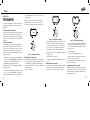 5
5
-
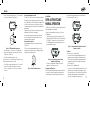 6
6
-
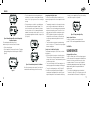 7
7
-
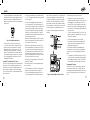 8
8
-
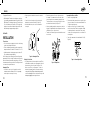 9
9
-
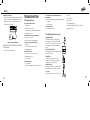 10
10
-
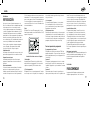 11
11
-
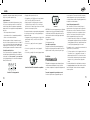 12
12
-
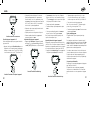 13
13
-
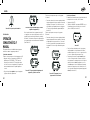 14
14
-
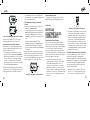 15
15
-
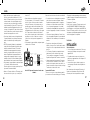 16
16
-
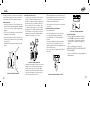 17
17
-
 18
18
-
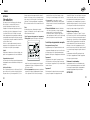 19
19
-
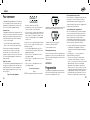 20
20
-
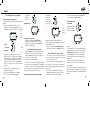 21
21
-
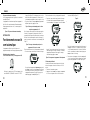 22
22
-
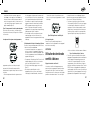 23
23
-
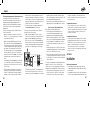 24
24
-
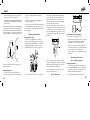 25
25
-
 26
26
-
 27
27


Orbit 57096 Manuel utilisateur
- Taper
- Manuel utilisateur
dans d''autres langues
- English: Orbit 57096 User manual
- español: Orbit 57096 Manual de usuario
Documents connexes
-
Orbit WaterMaster 57692 Installation Manual & Users Manual
-
-
Orbit 96880 Manuel utilisateur
-
-
Orbit 57874 Manuel utilisateur
-
Orbit 57899 Manuel utilisateur
-
-
-
-
Autres documents
-
Melnor XT4110 Guide d'installation
-
Otio T-10 Mode d'emploi
-
Toro TMC-424E Manuel utilisateur
-
 ORBIT IRRIGATION 57860 Le manuel du propriétaire
-
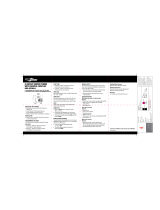 Yardworks 2-outlet Water Timer with Digital Display Quick Manual
-
Rain Bird ESP MODULAR Le manuel du propriétaire
-
RAINBIRD ESP-Modular Le manuel du propriétaire
-
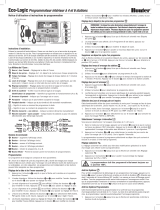 Jardibric Programmateur 1 à 6 voies Mode d'emploi
-
Melnor Industries 2007 Manuel utilisateur
-
Gardena 4040 modular Manuel utilisateur


