
Please read these instructions carefully before using this product, and save this manual for future use.
Vehicle Mounted Computer
Qualcomm Snapdragon 820 Quad core, 2.2 GHz
Android 8.1
FM10Q
Quick Start Guide
Version 1.1
Document Part No. 9152111I102W

2
10.4" Vehicle Mount Computer FM10Q Quick Start Guide
Table of Contents
PREFACE 3
UNPACKING 9
A. STANDARD PACKAGE CONTENT 9
B. OPTIONAL ACCESSORIES 9
COMPONENTS 10
INTEGRATED KEYPAD 13
FUNCTION BUTTONS 13
DOCKING AND UNDOCKING THE DEVICE 15
POWER CABLE INSTALLATION 16
A. WIRING THE POWER CABLE 16
B. CONNECTING THE POWER CABLE FOR TESTING 16
C. CONNECTING THE POWER FOR INSTALLATION ON THE VEHICLE 17
D. POWER CABLE ROUTING 18
POWER ON BEHAVIOR 19
A. POWER CONTROL 19
Power Switch 19
Power Button 19
B. STANDBY AND WAKEUP BEHAVIOR 20
Full ON Mode 20
Standby / Sleep Mode 20
Hibernate Mode 20
OFF Mode 20
IGNITION CONTROL 21
EXTERNAL / VEHICLE REMOTE ANTENNA INSTALLATION 21
CANBUS CABLE INSTALLATION REFERENCE 22
SCREEN BLANKING 23
DEFROSTER (IF EQUIPPED) 24
RAM MOUNT INSTALLATION 26
MOUNTING KIT 1 – NO DRILL SOLUTION 26
MOUNTING KIT 2 – DRILL SOLUTION 27
RAM MOUNT ASSEMBLY 27
MOUNTING KIT 3 – KEYBOARD MOUNTING INSTALLATION 28
KEYBOARD ASSEMBLY 29
APPENDIX 30
APPENDIX A: PRODUCT SPECIFICATIONS 30
APPENDIX B: ORDER INFORMATION 31

3
Preface
Preface
Copyright © 2019 Winmate Inc. All rights reserved.
No part of this manual may be reproduce, copied, translated, or transmitted in any form or any means,
electronic or mechanical, for any purpose, without the written permission of Winmate Inc.
Trademarks
All product names, trademarks or logos mentioned herein are the properties of their respective owners.
Microsoft, Windows, and the Windows logo are either registered trademarks or trademarks of Microsoft
Corporation in the United States and/or other countries. Microsoft products are licensed to OEMs by
Microsoft Licensing, Inc., a wholly owned subsidiary of Microsoft Corporation.
The Bluetooth word mark and logos are registered trademarks owned by Bluetooth SIG, Inc.
All other brand and product names are trademarks or registered trademarks of their respective owners.
NOTE:
Display images shown may vary slightly from actual display. Information in this manual is
subject to change without prior notification.
NOTE :
FM10Q Computer has to be used together with the docking station.
Use the device when located at least 20 cm (7.9 inches) away from the human body.
Disclaimer
Winmate Inc. reserves the right to make any product changes without notice, including circuits and/or
software described or contained in this manual in order to improve design and/or performance. Winmate
Inc. assumes no responsibility or liability for the use of the described product (s), conveys no license or title
under any patent, copyright, or masks work rights to these products, and makes no representations or
warranties that these products are free from patent, copyright, or mask work right infringement, unless
otherwise specified. Applications that are described in this guide are for illustration purposes only. Winmate
Inc. makes no representation or warranty that such application will be suitable for the specified use without
further testing or modification.
Warranty
Winmate Inc. warrants that each of its products is free from material and workmanship defect for a period of
one year starting from the invoice date. If the customer discovers a defect, Winmate Inc. will, at its option,
repair or replace the defective product at no charge to the customer, provided it is returned during the
warranty period, with transportation charges prepaid. The returned product must be properly packaged in its
original packaging to obtain warranty service.

4
10.4" Vehicle Mount Computer FM10Q Quick Start Guide
Advisory Conventions
Four types of advisories are used throughout the user manual to provide helpful information or to alert you to the
potential for hardware damage or personal injury. These are Notes, Important, Cautions, and Warnings. The
following is an example of each type of advisory.
NOTE:
A note is used to emphasize helpful information
IMPORTANT:
An important note indicates information that is important for you to know.
CAUTION/ ATTENTION
A Caution alert indicates potential damage to hardware and explains how to avoid the
potential problem.
Une alerte d’attention indique un dommage possible à l’équipement et explique comment
éviter le problème potentiel.
WARNING!/ AVERTISSEMENT!
An Electrical Shock Warning indicates the potential harm from electrical hazards and how
to avoid the potential problem.
Un Avertissement de Choc Électrique indique le potentiel de chocs sur des
emplacements électriques et comment éviter ces problèmes.
FCC Regulations
This device complies with part 15 of the FCC Rules. Operation is subject to the following two conditions: (1) This
device may not cause harmful interference, and (2) this device must accept any interference received, including
interference that may cause undesired operation.
This device has been tested and found to comply with the limits for a Class B digital device, pursuant to Part 15 of
the FCC Rules. These limits are designed to provide reasonable protection against harmful interference in
residential installation. This equipment generates uses and can radiate radio frequency energy and, if not installed
and used in accordance with the instructions, may cause harmful interference to radio communications. However,
there is no guarantee that interference will not occur in a particular installation. If this equipment does cause
harmful interference to radio or television reception, which can be determined by turning the equipment off and on,
the user is encouraged to try to correct the interference by one or more of the following measures:
•
Reorient or relocate the receiving antenna.
•
Increase the separation between the equipment and receiver.
•
Connect the equipment into an outlet on a circuit different from that to which the receiver is connected.
•
Consult the dealer or an experienced technician for help.
Changes or modifications not expressly approved by the party responsible for compliance could void the user‘s
authority to operate the equipment.
Operation on the 5.15-5.25GHz frequency band is restricted to indoor use only. The FCC requires indoor use for
the 5.15-5.25GHz band to reduce the potential for harmful interference to co-channel Mobile Satellite Systems.
Therefore, it will only transmit on the 5.25-5.35 GHz, 5.47-5.725 GHz and 5.725 –5.850 GHz band when
associated with an access point (AP).

5
Preface
CE Notice (European Union)
This device has been tested and found to conform to the limits set for a Class B product.
•
EN 55022 — “Limits and Methods of Measurement of Radio Interference Characteristics of Information
Technology Equipment”
•
EN 55024 — “Information technology equipment - Immunity characteristics - Limits and methods of
measurement”
•
EN 61000-3-2 — “Electromagnetic compatibility (EMC) - Part 3: Limits - Section 2”
•
EN 61000-3-3 — “Electromagnetic compatibility (EMC) - Part 3: Limits - Section 3”
•
EN 60950 — “Safety of Information Technology Equipment”.
•
EN 55022 Emissions requirements
RF Exposure Information (SAR)
This device is compliance with SAR for general population /uncontrolled exposure limits in ANSI/IEEE C95.1-1999
and had been tested in accordance with the measurement methods and procedures specified in OET Bulletin 65
Supplement C.
This equipment complies with FCC RF radiation exposure limits set forth for an uncontrolled environment. This device
was tested for operations with the device contacted directly to the human body to the back side of the EUT. To
maintain compliance with FCC RF exposure compliance requirements, avoid direct contact to the transmitted antenna
during transmitting.
IC Regulations
Le présent appareil est conforme aux CNR d’Industrie Canada applicables aux appareils radio exempts de licence.
L’exploitation est autorisée aux deux conditions suivantes:
(1)
l’appareil ne doit pas produire de brouillage, et
(2)
l’utilisateur de l’appareil doit accepter tout brouillage radioélectrique subi, même si le brouillage est susceptible d’en
compromettre le fonctionnement.”
This device complies with Industry Canada license-exempt RSS standard(s). Operation is subject to the following two
conditions:
(1)
This device may not cause interference, and
(2)
This device must accept any interference, including interference that may cause undesired operation of the
Device.
This Class B digital apparatus complies with Canadian ICES-003
Cet appareil numérique de la classe B est conforme à la norme NMB-003 du Canada.
The device could automatically discontinue transmission in case of absence of information to transmit, or
operational failure. Note that this is not intended to prohibit transmission of control or signaling information or the
use of repetitive codes where required by the technology.
The device for the band 5150-5250 MHz is only for indoor usage to reduce potential for harmful interference to co-
channel mobile satellite systems; the maximum antenna gain permitted (for devices in the bands 5250-5350 MHz
and 5470-5725 MHz) to comply with the e.i.r.p. limit; and The maximum antenna gain permitted (for devices in the
band 5725-5850 MHz) to comply with the e.i.r.p. limits specified for point-to-point and non-point-to-point operation
as appropriate, as stated in section A9.2(3). In addition, High-power radars are allocated as primary users
(meaning they have priority) of the band 5250-5350 MHz and this radar could cause interference and/or damage to
LE-LAN devices.
The County Code Selection feature is disabled for products marketed in the US/Canada. For product available in
the USA/ Canada markets, only channel 1~11 can be operated. Selection of other channels is not possible.
IC Radiation Exposure Statement
This EUT is compliance with SAR for general population/uncontrolled exposure limits in IC RSS-102 and had been
tested in accordance with the measurement methods and procedures specified in IEEE 1528

6
10.4" Vehicle Mount Computer FM10Q Quick Start Guide
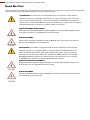
Read Me First
Follow and adhere to all warnings and instructions in this manual. For your safety, please read all safety and operating
instructions before using the product. Keep this manual for future reference.
ATTENTION: Pour réduire le risque d’incendie ou de choc électrique ne pas exposer
l’appareil à la pluie ou à l’humidité. VERIFIER que le cordon électrique est la prise murale
pour un delai d’inactivite prolongé. Pour arrêter complètement l’alimentation de l’appareil,
débranchez le cordon d’alimentation de la prise AC. N’enlever ni le capot arrière ni les pièces
internes de l’appareil. Contactez un personnel qualifié si nécessaire.
SA1965
AVERTISSEMENT ÉLECTRIQUE
Utilisé pour les instructions destinés à alerter l’utilisateur d’un CHOC ÉLECTRIQUE mortel
ou de blessure grave en cas d’utilisation incorrecte de l’unité.
SA1966
AVERTISSEMENT
Utilisé pour les instructions destinés à alerter l’utilisateur d’un risque mortel ou de blessure
grave en cas d’utilisation incorrecte de l’unité.
ATTENTION: Pour réduire le risque d’incendie ou de choc electrique ne pas exposer
l’appareil à la pluie ou à l’humidité FAIRE le cordon électrique est DÉBRANCHÉ DE LA
PRISE MURALE DANS UN DELAI DE PROLONGER INACTIVITÉ. De se désengager
totalement LE POUVOIR DE L’UNITE, S’IL VOUS PLAÎT DEBRANCHER LE CORDON
D’ALIMENTATION DE LA PRISE AC. NE PAS Romove le capot arrière, pas de PIÈCES
À L’INTÉRIEUR. Contactez un personnel qualifié S’il faut le réparer.
SA1965
ELECTRIQUE AVERTISSEMENT
Sert aux instructions destin es alerter l’utilisateur d’un CHOC ÉLECTRIQUE mortel ou de
blessure grave en cas d’utilisation incorrecte de l’unit.
SA1966
AVERTISSEMENT
Sert aux instructions destin es alerter l’utilisateur d’un risque mortel ou de blessure grave en
cas d’utilisation incorrecte de l’unit .

7
Preface
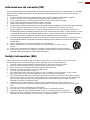
Informations de sécurité (FR)
Suivez et respectez tous les avertissements et instructions figurant sur l’écran. Pour votre sécurité, s’il vous plaît
lire toutes les consignes de sécurité et de fonctionnement avant d’utiliser le device. Gardez ce manuel pour
référence future.
1. Lire avec attention toutes les recommandations et precautions d’emploi avant d’utiliser ce produit.
2. Veuillez conserver ces recommandations et précautions pour référence future.
3. Lire et comprendre tous les avertissements énumérés dans les précautions d’emploi.
4. Suivre toutes les précautions d’emploi pour utiliser ce produit.
5. Utiliser exclusivement un chiffon sec pour nettoyer ce produit.
6. Ne pas placer le produit près de toute source de chaeur telle que radiateurs, arrivées d’air chaud, fourneaux
ou autres appareils générant de la chaleur (incluant les amplificateurs producteurs de chaleur) .
7. Ne pas négliger la sécurité que procure un branchement polarisé ou avec raccordement à la terre, Un
branchement polarisé comprend deux fiches dont l’une est plus large que l’autre. Un branchement à la terre
comprend deux fiches plus une troisième reliée à la terre. Si la fiche secteur fournie ne s’insert pas dans
votre prise de courant. consulter un ‘électricien afin de remplacer votre prise obsolète.
8. Protéger le cordon d’alimentation de tout écrasement ou pincement, particulièrement au niveau des fiches,
des réceptacles utilisés et à l’endroit de sortie de l’appareil. Ne pas casser la fiche de terre du cordon
d’alimentation.
9. Utiliser uniquement les accessoires spécifiés par le constructeur.
10. Utilisez seulement des accessoires spécifiés par le manufacturier ou vendus avec le
produit.
11. Débrancher cet appareil lors d’orages ou s’il n’est pas utilize pendant une longue période.
12. Faire exécuter le service par du personnel qualifié. Une intervention technique est requise lorsque
l’appareil a été endommagé ou n’opère pas normalement.
Safety Information (EN)
Follow and adhere to all warnings and instructions on the screen. For your safety, please read all safety
and operating instructions before using the device. Keep this manual for future reference.
1.
Carefully read all recommendations and precautions for use before using this product.
2.
Retain all recommendations and precautions for future reference as necessary.
3.
Read and be sure to understand all warnings listed in the precautions.
4.
Follow all operating precautions when using this product.
5.
Use only a dry cloth to clean this product.
6.
Do not place the product near any heat sources such as radiators, warm air intakes, stoves or other
heat- generating devices (including amplifiers or other heat producing equipment).
7.
Do not disregard the safety that a polarized or grounded connection can provide. A polarized connection
consists of two plugs, one of which is larger than the other. A grounded connection has two blades and a
third one that is grounded. If the main plug provided cannot be inserted into your outlet, consult an
electrician to replace your obsolete outlet.
8.
Protect the power cord from being crushed or pinched, particularly in the area of the plugs, any
receptacles used, and the point of exit from the apparatus. Do not break off the ground pin of the power
cord.
9.
Use only accessories specified by the manufacturer.
10.
Use only with accessories specified by the manufacturer or sold with the product.
11.
Unplug this apparatus during lightning storms or when it is not being used for long periods.
12.
Refer all servicing to qualified service personnel. A technical intervention is required when the
apparatus has been damaged in any way or does not operate normally.

8
10.4" Vehicle Mount Computer FM10Q Quick Start Guide
About the Adapter
•
Use only the supplied AC adapter (Rating: Input DC 10-60V DC). Use of another type of AC adapter will
result in malfunction and/or danger.
•
Do not use the adapter in a high moisture environment. Never touch the adapter when your hands or feet are
wet.
•
Allow adequate ventilation around the adapter when using it to operate the device or charge the battery. Do
not cover the AC adapter with paper or other objects that will reduce cooling. Do not use the AC adapter
while it is inside a carrying case.
•
Connect the adapter to a proper power source. The voltage requirements are found on the product case
and/or packaging.
•
Do not use the adapter if the cord becomes damaged.
•
Do not attempt to service the unit. There are no serviceable parts inside. Replace the unit if it is damaged or
exposed to excess moisture.
Li-Ion Battery
Your device has UPS battery. When disposing UPS battery, follow local rules and regulations.
WARNING!
Do not dispose the battery with general waste materials.
The following precautions on battery recycling should be observed:
The battery should be disposed properly according to local regulations;
The battery should not be damaged or crushed;
The battery should not be heated or exposed to direct sunlight.
If you are not aware of local regulations on disposing the battery pack, contact our Service Center or sales
representatives for more information.
IMPORTANT:
This hot-swap battery is soft-packed. It may have up to 8% inflation in dimensions under the usage
in normal conditions. The mechanical design of the device reserves the space for this normal
inflation.
WARNING!
If you observe the internal hot-swap battery has been inflated more than normal condition (or the
blotch of panel and touch caused by inflated battery), contact our Service Center or sales
representative for replacing the battery immediately.
IMPORTANT:
The battery is consumable part. Therefore, it is recommended to replace the battery pack every
two years with a new one recommended by Winmate. Contact our Service Center or sales
representatives for more information on replacing the battery pack.

9
Unpacking
Unpacking
a. Standard Package Content
Before using this device, make sure that all the items listed below are present in your package:
Computer FM10Q
Dock + Latch
Locking Key
5 m Power Cable with
Fuse Kit
0.3 m USB Cable
Cable Clamp Kit
Varies by product
specifications
Part No. 98D000A0000A
Part No. 98K000A0006O
Part No. 9483098080K0
Part No. 98K000A0005W
Quick Start
Guide
Wi-Fi Antenna x 1
0.15 m Power Converter
Cable
84W Adapter with
power cable
External Antenna
Fixing Bracket
Part No. 9152111I102W
Part No. 39700000000G
Part No. 94J602G030K2
Part No. 922D084W12V1
Part No. 88111T201203
b. Optional Accessories
Your package may include the following items based on your order:
3 m DC Jack
Power Cable
1.2 m 120 Watt
Adapter (For
Heater Model)
4.2 m Adapter
with Power Cable
1.8 m RS232
Cable
0.3 m Audio
Cable
Part No. 94J0086020K0
Part No. 98PO12120005
Part No. 98K000A0006L
Part No. 94G3094090K2
Part No. 94E215R060K0
3 m USB to
RS232 Cable
2 m IP65 LAN
Cable
WWAN
Antenna x 1
15A, 250V, VDA
Type Fuses
Spare Key for
Vehicle Dock
Part No. 94E3098130K0
Part No. 94I0080080KF
Part No. 39700000000H
Part No. 94JL01L01000
Part No. 9B000000007N
2 m GPS & LTE
Combo Antenna
(VM240)
5 m GPS & LTE
Combo Antenna
(VM9C)
5 m GPS & LTE &
Wi-Fi Magnetic
Combo Antenna
(VM10S)
Mounting Kit 1
No Drill
Mounting Kit 2
Drill
Part No. 39700000000M
Part No. 397SM0000008
Part No. 397SM0000007
Part No. 98K000A0005Y
Part No. 98K000A0006P
Mounting Kit 3
Keyboard Mounting
1.8 m CANBus Y
Cable
Part No. 98K000A0005X
Part No. 94E2150090K0

10
10.4" Vehicle Mount Computer FM10Q Quick Start Guide
Components
Front View
No
Item
Description
1
10.4” Touch Screen
Acts as one of the inputs for the device
2
Power Button
Press and hold the button for 3 second to turn on the device
Power Indicator
Power Indicator
3
Digital Microphone
For voice communication and voice recording
4
Digital Microphone
For voice communication and voice recording
5
Camera
2 Megapixel front camera
6
Light Sensor
and LED
indicators
Light Sensor
Blanking Indicators
Heater Indicators
7
LED indicators
Wi-Fi Indicators
Bluetooth Indicators
UPS Battery Indicators
8
Label
Space to print the label or company logo
9
Speaker
Emits Sound
10
Function button
Programmable Function key that can be configured by using the Win-Set ® Utility

11
Components
Rear View with Vehicle Dock
No
Item
Description
1
VESA Mount Hole
VESA 75, 100, and RAM Mount
2
Release Latch
Press to release the device and the docking
3
Kensington Lock
Connect to a security lock, protecting your device from being stolen
4
Power switch
Set the switch to on (I) to provide the supply power to the device and
it will automatically connect to the ignition system of the vehicle
Top and Bottom View
No
Item
Description
1
Lock
Lock the tablet in place
2
Reading Light
Use to provide illumination in dark environment

12
10.4" Vehicle Mount Computer FM10Q Quick Start Guide
Side View with Vehicle Dock
No
Item
Description
1
COM1 and COM2
Connects a peripheral device such as a printer or scanner with serial port
2
USB 2.0 x 2
Connects USB peripheral devices such as USB Flash drive, mouse,
keyboard, printer, etc.
3
CAN Bus / Audio
Connects to a vehicle, allowing access to wide range of vehicle data
/ Connects headphone or other audio output devices
4
*Service Window
To protect I/O ports
5
LAN Port
Connects to a local area network (LAN) using an Ethernet cable and provide
optional POE with 48V
6
Wide Range Power Input
Connects a 10-60V DC IN wide range power input
7
WWAN Antenna Connector
Connects a WWAN external antenna and allows the device to be remotely
mounted on the vehicle
8
GPS Antenna Connector
Connects a GPS external antenna and allows the device to be remotely
mounted on the vehicle.
9
Wi-Fi Antenna Connector
Connects a Wi-Fi external antenna and allows the device to be remotely
mounted on the vehicle
*Service window covers SD Card Slot/ SIM Card Slot, USB Type-C and DC in power input jack.

13
Integrated Keypad
Integrated Keypad
The integrated keypad contains ten programmable keys, F1~ F10 are user programmable keys. Key
Mapping is configured via the Hot Tab application on the control panel. See Programmable key to remap these
keys.
The default values for these keys are:
Function Key
Default Key Value
F1 + F2
Touch Keypad Lock/ Unlock
F2 + F3
Lamp On/Off
F3 + F4
Volume adjustment
F4 + F5
Brightness adjustment (Panel +Keypad)
Long Press F5
Camera
Press Fn, and then press F6~F10
Function key from F6~F10
*Sign plus “+” means that you have to press both function keys at the same time.
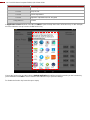
Function Buttons
Winmate® FM10Q Vehicle Mounted Computer comes with preinstalled APP called Winmate® Key Mapping (WKM)
which let users to assign functions of function keys F1 ~ F10.
To set function keys open Winset ,
You can set the application which the favorite you want as a shortcut in corresponding key.
Default Settings:

14
10.4" Vehicle Mount Computer FM10Q Quick Start Guide
Function Key
Description
F1 + F2
Touch Keypad Lock/ Unlock
F2 + F3
Lamp On/Off
F3 + F4
Volume adjustment
F4 + F5
Brightness adjustment (Panel +Keypad)
Long press F5
Camera
In Application Selector window of the F1 click NEW to open the drop-down menu of function keys. In this example,
we have selected to set up functions for F1 function key.
Choose the function key and then select a Default application that will be opened by pressing on the function key
you’ve selected. Press DEL to reset a function of the function key to previous settings.
To disable the function key leave the space empty.

15
Docking and Undocking the Device
Docking and Undocking the Device
Perform the following to dock the device:
1. Align the golden connector and guide pin holes on the device with the golden connector and
guide pins on the docking station
2. Insert the device into the guide pin holes on the docking station
3. Slightly push the upper part of the device towards the docking station until you hear the “click”
sound, including the device is fixed on the docking station.
NOTE
Condition
Result
If the battery is full and power is
connected to the dock.
The battery indicator is off.
If the battery is low and power is
connected to the dock.
The battery indicator is
orange.
Perform the following to undock the device:
1. While holding the device, push the release latch on the docking station and then lift the device to un-
dock it.
1.
2.
3.
1.
2.

16
10.4" Vehicle Mount Computer FM10Q Quick Start Guide
Power Cable Installation
a. Wiring the Power Cable
WARNING!/ AVERTISSEMENT!
This procedure requires a trained service personnel only, improper installation can cause
serious damage to the vehicle or the device.
Cette procédure nécessite un personnel de maintenance qualifié uniquement, une mauvaise
installation peut causer des dommages importants au véhicule ou le dispositif.
b. Connecting the Power Cable for Testing
IMPORTANT:
It is highly recommended to purchase the power cable for testing purpose.
Wiring Instruction
1. Place the device on the vehicle dock and make sure the device is Off.
2. Connect the CN2 to the FM10 vehicle dock by aligning the connector pins and then push it, twist to
fasten the connection.
3. Connect the AC plug to the electrical outlet.
4. Switch the power switch On, located on the back of the vehicle dock.
5. Press the On button, the device is ready for testing.

17
Power Cable Installation
c. Connecting the Power for Installation on the Vehicle
WARNING!/ AVERTISSEMENT!
This power cable should only be used on the 24, 36, or 48 Volt forklifts. Note that, this
power cable cannot work for 12 Volt forklifts.
Ce câble d'alimentation ne doit être utilisé sur les 24, 36, ou 48 chariots élévateurs Volt.
Notez que, ce câble d'alimentation ne peut pas travailler pour 12 chariots élévateurs Volt.
WARNING!/ AVERTISSEMENT!
Select a mounting location and make sure it is not located on the outside the vehicle.
Sélectionnez un emplacement de montage et assurez-vous qu'il ne se trouve pas à l'extérieur
du véhicule.
WARNING!/ AVERTISSEMENT!
Do not perform the installation on a moving or live electric forklift.
Ne pas effectuer l'installation sur un mobile ou un chariot élévateur électrique sous tension.
Wiring Instruction
1. Remove the vehicle battery before connecting the power cable
2. Connect the Green Wire (Ground) to the vehicle’s chassis (grounding), which can also
be negative pole of the battery
3. Place the fuse and fuse holder in-line of the Red (VCC +) and White (ignition) wires as
shown below.

18
10.4" Vehicle Mount Computer FM10Q Quick Start Guide
Fuse Specification :
Two Fuses , 15A, 250Volt, UDA Type Fuses
4. Slide tubing over wires, remove the wires and insert it to the fuse holder, crimp it.
5. Connect the red wire to the vehicle’s positive power source. Connect the black wire to
the vehicle’s negative power source.
6. Connect the white wire to the vehicle’s ignition switch for the ignition function.
7. Secure the power cable to the device using cable clamps and place the device in the
dock.
WARNING!/ AVERTISSEMENT!
Use the proper cable clamps and do not over tighten it to prevent it from break.
Utilisez les pinces appropriées du câble et ne serrez pas pour l'empêcher de pause.
8. Press the power switch on the back of the dock See Power switch.
9. Press the power button on the front of the device See Power Button.
d. Power Cable Routing
There are many cables available for the FM10Q including power cable, CAN Bus cable, or USB cable. To
secure these cables, there are five cable clamps secured the FM10 vehicle dock to prevent the cable strain.
To secure audio, power, and I/O cables perform the following action:
1. Determine the proper strain relief cable clamps; there are different sizes of the clamps depending on
the thickness of the cable. For example, the largest clamp is designed to secure the power cable.
2. Remove the cable clamps from the vehicle dock by releasing the screw. Put the screw and save in it
the secure location.
3. Slide the clamp over the cable.
4. Refasten the cable clamp to the dock, adjust the tension in the cable to allow it to be connected and
disconnected when needed.
5. Repeat this step until all cables are secured to the dock.

19
Power on Behavior
Power on Behavior
The table below shows the Ignition control power scheme on the vehicle installation and office test.
Power On Behavior
Office Test / Evaluation
Vehicle Installation
With Ignition
Without Ignition
Ignition delay
Default ‘0” sec”
Default ‘”0 sec”
Default ‘”0 sec”
Adjustable from 0-120 sec, through application.
Refer to Ignition Control application.
Auto-ON
OFF
ON
ON
Power Button
√
X
X
a. Power Control
Power Switch
Power switch is located on the rear side of the vehicle
dock. When the dock is connected to the external power
and the power switch is ON, the dock delivers power to
the FM10Q and the device can be powered on.
Power Button
Power button is located at the lower right side of the
FM10Q. If the device is OFF, pressing the power
button will start the power up sequence.
NOTE:
• The FM10Q has to be docked in a powered vehicle docking station or UPS battery has to have
a sufficient charge to power the device.
• If no external power available and the UPS battery do not have enough charge, pressing the
power button will cause no action.

20
10.4" Vehicle Mount Computer FM10Q Quick Start Guide
b. Standby and Wakeup Behavior
The FM10Q has four power modes: Full ON, Standby / Sleep, Hibernate, OFF.
Action
Button
Power Button
Backlight
Indicator
Turn On
Press the On button for “2 seconds”
until the battery indicator On (solid red)
and then release the button.
Off
Standby or
Sleep Mode *
Press the On button for “2 seconds”
until the screen On and then release
the button. The battery indicator will Off
after the screen is Off, the system is
already in the standby / sleep mode.
On
Wake up
Press the On button for “2 second” until
the screen On and then release the
button. The battery indicator will On
(solid red).
Off
Turn Off
Press the On button for “4 second” until
the system is turns Off and then
releases the button.
Off
Full ON Mode
When the FM10Q is attached to either vehicle power or an external power supply, or it is operating from the
UPS battery and the power button is pressed, the device is in the “ON” mode. In this mode, the keypad, touch
screen and any attached peripherals will function normally. The display remains ON until the display, standby or
hibernate timer expires.
When the device is in ON mode, the power LED indicators is off.
Standby / Sleep Mode
When the Standby / Sleep timer expires without a primary event occurring, the device transitions to
standby / Sleep mode. Press the power button to wake up the device back to ON mode.
When the device is in Standby / Sleep mode, the power LED indicator is red.
Hibernate Mode
When the device is in Hibernate Mode, all LEDs are off. Press the power button to wake up the device back to
ON mode.
When the device is in Hibernate mode, the power LED indicator is red.
OFF Mode
By default, the FM10Q turns off if the user turns off the device through the system or presses the power button
for 8 seconds with a critical shut down. The FM10Q will also be off when there is no connection to a power
source or the UPS battery is depleted. However the internal RTC will keep maintaining the date and time while
the device is off. When the device is off, the power LED indicator is red.
La page est en cours de chargement...
La page est en cours de chargement...
La page est en cours de chargement...
La page est en cours de chargement...
La page est en cours de chargement...
La page est en cours de chargement...
La page est en cours de chargement...
La page est en cours de chargement...
La page est en cours de chargement...
La page est en cours de chargement...
La page est en cours de chargement...
La page est en cours de chargement...
-
 1
1
-
 2
2
-
 3
3
-
 4
4
-
 5
5
-
 6
6
-
 7
7
-
 8
8
-
 9
9
-
 10
10
-
 11
11
-
 12
12
-
 13
13
-
 14
14
-
 15
15
-
 16
16
-
 17
17
-
 18
18
-
 19
19
-
 20
20
-
 21
21
-
 22
22
-
 23
23
-
 24
24
-
 25
25
-
 26
26
-
 27
27
-
 28
28
-
 29
29
-
 30
30
-
 31
31
-
 32
32


dans d''autres langues
- English: Winmate FM10Q Quick start guide
Documents connexes
-
 Winmate FM10A Manuel utilisateur
-
 Winmate FM07A Manuel utilisateur
-
 Winmate FM07 Manuel utilisateur
-
 Winmate FM07 Manuel utilisateur
-
Winmate M101BK Manuel utilisateur
-
 Winmate M101Q8-LABM Manuel utilisateur
-
 Winmate M101P-ME Manuel utilisateur
-
 Winmate M900P Guide de démarrage rapide
-
 Winmate R10IP8M-RTT2GP Manuel utilisateur
-
 Winmate M101PR Manuel utilisateur


Autres documents
-
KAI YUAN 500lph Water Treatment Machine Water Purifier Price Manuel utilisateur
-
Intermec PEN*KEY 6400 Installation Instructions Manual
-
Motion Computing FWS-DS1 Manuel utilisateur
-
 Quanta Computer HFS-K72A Manuel utilisateur
-
 BrightAI 810-00006 Manuel utilisateur
-
XAC XCL AT-170-R Series Desktop/Mobile Payment Terminal Guide d'installation
-
 Roadpro RPAT859 Manuel utilisateur


