Classé SSP-300 Le manuel du propriétaire
- Catégorie
- Équipement musical supplémentaire
- Taper
- Le manuel du propriétaire

Owner’s Manual
SSP-300
Surround Processor
ENGLISH FRANÇAIS
Manuel du propriétaire
SSP-300
Préamplificateur/processeur Surround

NOTICE
All of us at Classé take extreme care to ensure that your purchase will remain a prized investment. We are proud to inform you that all
Classé components have been officially approved for the European Community (CE) mark.
This means that your Classé product was subjected to the most rigorous manufacturing and safety tests in the world. The CE mark certifies
that your purchase meets or exceeds all European Community requirements for unit-to-unit consistency and consumer safety.
This equipment has been tested and found to comply with the limits for a Class B digital device, pursuant to Part 15 of the FCC Rules.
These limits are designed to provide reasonable protection against harmful interference in a residential installation. This equipment gener
-
ates, uses and can radiate radio frequency energy and, if not installed and used in accordance with the instructions, may cause harmful
interference to radio communications. However, there is no guarantee that interference will not occur in a particular installation. If this
equipment does cause interference to radio or television reception, which can be determined by turning the equipment on and off, the user
is encouraged to try to correct the interference by one or more of the following measures:
• Reorient or relocate the receiving antenna;
• Increase the separation between the equipment and the receiver;
• Connect the equipment into an outlet on a circuit different from that to which the receiver is connected;
• Consult the dealer or an experienced radio/TV technician for help.
CAUTION: Changes or modifications to this equipment not expressly approved by the manufacturer could void the user’s authority to
operate the equipment.
This product incorporates copyright protection technology that is protected by U.S. patents ad other intellectual property rights. Use of this
copyright protection technology must be authorized by Macrovision, and is intended for home and other limited viewing uses otherwise
authorized by Macrovision. Reverse engineering or disassembly is prohibited.
The information contained in the manual is subject to change without notice. The most current version of this manual will be posted on
our web site at http://www.classeaudio.com.
CAUTION
RISK OF ELECTRIC SHOCK
DO NOT OPEN
CAUTION: TO REDUCE THE RISK OF ELECTRICAL SHOCK, DO
NOT REMOVE COVER. NO USER-SERVICEABLE PARTS INSIDE.
REFER SERVICING TO QUALIFIED PERSONNEL.
WARNING: TO REDUCE THE RISK OF FIRE OR ELECTRIC SHOCK,
DO NOT EXPOSE THIS APPLIANCE TO RAIN OR MOISTURE.
Marking by the “CE” symbol (shown left) indicates compliance of this device with the EMC
(Electromagnetic Compatibility) and LVD (Low Voltage Directive) standards of the European
Community.
Classe products are designed to comply with international directives on the Restriction of Hazardous
Substances (RoHS) in electrical and electronic equipment and the disposal of Waste Electrical and
Electronic Equipment (WEEE). The crossed wheelie bin symbol indicates compliance and that the
products must be appropriately recycled or processed in accordance with these directives.
Please record the serial number for your new Classé component here for future reference.
Serial #: __________________
ENGLISH

Important Safety Instructions
1. Read these instructions.
2. Keep these instructions.
3. Heed all warnings.
4. Follow all instructions.
5. Do not use this apparatus near water.
6. Clean only with dry cloth.
7. Do not block any ventilation openings. Install in accordance with the manufacturer’s instructions.
8. Do not install near any heat sources such as radiators, heat registers, stoves, or other apparatus (including amplifiers)
that produce heat.
9. Do not defeat the safety purpose of the polarized or grounding-type plug. A polarized plug has two blades with one
wider than the other. A grounding type plug has two blades and a third grounding prong. The wide blade or the third
prong are provided for your safety. If the provided plug does not fit into your outlet, consult an electrician for replace
-
ment of the obsolete outlet.
10. Protect the power cord from being walked on or pinched particularly at plugs, convenience receptacles, and the point
where they exit from the apparatus.
11. Only use attachments/accessories specified by the manufacturer.
12.
Use only with the cart, stand, tripod, bracket, or table specified by the manufacturer, or sold with the appa-
ratus. When a cart is used, use caution when moving the cart/apparatus combination to avoid injury from
tip-over.
13. Unplug this apparatus during lightning storms or when unused for long periods of time.
14. Refer all servicing to qualified service personnel. Servicing is required when the apparatus has been damaged in any
way, such as power-supply cord or plug is damaged, liquid has been spilled or objects have fallen into the apparatus, the
apparatus has been exposed to rain or moisture, does not operate normally, or has been dropped.
15. Do not expose this apparatus to dripping or splashing and ensure that no objects filled with liquids, such as vases, are
placed on the apparatus.
16. To completely disconnect this apparatus from the AC Mains, disconnect the power supply cord plug from the AC re
-
ceptacle.
17. The mains plug of the power supply cord shall remain readily operable.
18. Do not expose batteries to excessive heat such as sunshine, fire or the like.
The lightning flash with arrowhead symbol within an equilateral triangle is intended to alert the user to the pres
-
ence of uninsulated “dangerous voltage “ within the product’s enclosure that may be of sufficient magnitude to
constitute a risk of electric shock to persons.
The exclamation point within an equilateral triangle is intended to alert the user to the presence of important
operating and maintenance (servicing) instructions in the literature accompanying the product.
WARNING : To reduce the risk of fire or electric shock, do not expose this apparatus to rain or moisture .
ENGLISH

4
ENGLISH
Contents
Welcome to the Classé family ..........................................................................6
Unpacking and Placement ...............................................................................7
unpacking your surround processor .......................................................... 7
placement ................................................................................................ 7
ventilation ................................................................................................ 7
custom installations .................................................................................. 7
serial number ........................................................................................... 7
register your purchase! ............................................................................. 8
warm up/break-in period .......................................................................... 8
please read this manual… ........................................................................ 8
Operating Voltage ............................................................................................9
A Word About Installation ..............................................................................10
Special Design Features .................................................................................11
high-bandwidth video circuitry .............................................................. 11
transcoding ...................................................................................... 11
THX Ultra 2
®
.......................................................................................... 11
Re-Equalization™ ............................................................................ 12
Timbre Matching™ .......................................................................... 12
Adaptive Decorrelation™ ................................................................ 12
Advanced Speaker Array™ ............................................................... 13
THX Ultra 2 Music Mode ................................................................. 13
THX Ultra 2 Cinema Mode .............................................................. 14
Boundary Gain Compensation ......................................................... 14
flexible GUI ........................................................................................... 14
customizable volume control ................................................................. 14
highly refined circuit design ................................................................... 15
extensive listening tests .......................................................................... 15
extraordinary longevity .......................................................................... 16
Initial Setup ...................................................................................................17
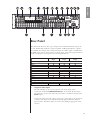
Front Panel .....................................................................................................20
Rear Panel .....................................................................................................23
The Remote Control .......................................................................................31
Understanding Surround Sound .....................................................................33
how many channels? .............................................................................. 33
matrix or discrete? .................................................................................. 33
multichannel formats ....................................................................... 34
post-processing possibilities ................................................................... 34
multichannel formats ....................................................................... 35
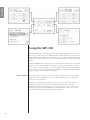
Using the SSP-300 .........................................................................................36
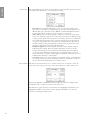
source selection ..................................................................................... 36
mode selection ....................................................................................... 37
video preview ........................................................................................ 37
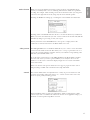
controls .................................................................................................. 37
system trims ..................................................................................... 38
zone control .................................................................................... 38
position select .................................................................................. 39

5
ENGLISH
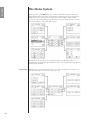
The Menu System ..........................................................................................40
system setup ........................................................................................... 40
volume setup ......................................................................................... 41
rotary ............................................................................................... 41
max volume ..................................................................................... 43
startup volume ................................................................................. 43
mute setup ....................................................................................... 44
input setup ....................................................................................... 44
speaker setup ................................................................................... 47
profiles ............................................................................................ 49
triggers setup ................................................................................... 50
teach IR .................................................................................................. 50
display setup .......................................................................................... 50
brightness ........................................................................................ 51
timeout ............................................................................................ 51
language .......................................................................................... 51
OSD ................................................................................................ 51
temp. display ................................................................................... 52
volume ............................................................................................ 52
Dolby/DTS setup .................................................................................... 52
Dolby Pro Logic II ........................................................................... 53
DTS Neo:6 ....................................................................................... 53
remote Fkeys .......................................................................................... 53
cautionary note on Fkey use ............................................................ 54
status ...................................................................................................... 54
version info ...................................................................................... 54
sensors ............................................................................................. 54
Troubleshooting .............................................................................................55
Care & Maintenance ......................................................................................57
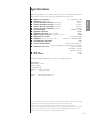
Specifications ................................................................................................58
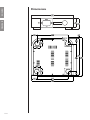
Dimensions .................................................................................................118

6
ENGLISH
Welcome to the Classé family
Congratulations on your purchase of a Classé product. It is the result of many years of
continuous refinement, and we are sure that you will enjoy it for many years to come.
We value our relationship with our customers. Please allow us to stay in touch with
you by returning your warranty card now, before you pack up the shipping carton of
your new product and forget all about it. Doing so will enable us to let you know about
any possible future upgrades or updates that might become available for your Classé
component.
Sending in your warranty card also registers your product with us so that warranty
service can be obtained easily and quickly, even if you have mislaid your original sales
slip.
You will find the warranty registration card at the end of the separate warranty policy
booklet, enclosed.
Please take a few minutes to fill out the warranty registration card and
drop it in the mail. Or if you prefer you may register your purchase
online at www.classeaudio.com.

7
ENGLISH
Unpacking and Placement
unpacking your
surround processor
Carefully unpack your surround processor according to the supplied instructions, and
remove all accessories from the carton.
Important! Keep all packing materials for future transport of your Classé product.
Shipping your new component in anything other than its purpose-
designed packing material may result in damage that is not covered by
the warranty.
placement As with any surround processor, it is best to place the SSP-300 centrally within your
system, since it is the hub to which all other components are connected. It should also
be located at a convenient height for both visibility and use, since you generally interact
with your surround processor more than any other component (changing inputs,
adjusting volume, etc.).
Note that adequate clearance for the AC cord and connecting cables must be
left behind the SSP-300. We suggest leaving eight inches (20 cm) of free space
behind your surround processor to allow all cables sufficient room to bend
without crimping or undue strain.
Classé recommends that the unit not be placed directly on the top surface of a power
amplifier (or any other heat source).
ventilation Your Classé surround processor generates a certain amount of heat in the course of
normal operation. Be sure to allow three inches of clearance above it and three inches
to each side to allow heat dissipation through air circulation. Avoid placement on soft
surfaces that would restrict airflow (such as plush carpeting).
custom installations Drawings are included in this manual to facilitate special installations and custom
cabinetry (see the section Dimensions). An optional, purpose-designed rack mount kit is
available for this product. Contact your Classé dealer for more information.
serial number The serial number for your surround processor is found on the rear of the unit. Please
note and record this number on the page entitled Important Safety Instructions for your
future reference.

8
ENGLISH
register your purchase! Having found the serial number, now would be a good time to fill out the registration
card. Please register your purchase so we can advise you of updates and other items of
interest.
It will take only a minute or so. Please complete the card now, before you forget.
warm up/break-in period Your new Classé surround processor will deliver outstanding performance immediately.
However, you should expect to hear it improve somewhat as it reaches its normal
operating temperatures and its various components “break-in.” It has been our
experience that the greatest changes occur within the first 300 hours, as the surround
processor reaches thermal equilibrium and the capacitors fully form. After this initial
break-in period, the performance of your new product should remain quite consistent
for years to come.
The only exception to this rule is if the unit is unplugged for an extended period of time,
allowing it to cool down. Depending on the degree of cooling involved, you should
expect a brief warm-up period before the surround processor’s sound quality is at its best.
Unless your surround processor was allowed to become quite chilled, subsequent thermal
re-stabilization should not take long. Fortunately, you should never have to repeat the
initial 300 hour break-in period.
please read this manual… Please take a few minutes to review this manual, and to familiarize yourself with your
new surround processor. We understand that you are anxious to plug everything in and
get started. However, reading this manual and following the advice it gives will ensure
that you get all the benefits you deserve from having purchased such a fine piece of
equipment.

9
ENGLISH
Operating Voltage
The SSP-300 surround processor is set at the factory (internally) for 100V, 120V, 230V,
or 240V AC mains operation, as appropriate for the country in which it is to be sold.
(230V only in European Union countries, in compliance with CE regulations.) The
voltage setting may not be changed by the user.
Make sure that the label on the rear panel of your surround processor indicates the
correct AC operating voltage for your location. Attempting to operate your surround
processor at an incorrect voltage may damage the unit.
Warning: The voltage setting of your surround processor may not be changed by
the user. There are no user-serviceable parts within the unit. Please refer
any problems to an authorized Classé service center..
If the AC mains voltage indicated on your surround processor is incorrect, please contact
your local, authorized Classé dealer or distributor.
The SSP-300 can easily be powered by a normal 15-ampere AC mains line. If other
devices are also powered from the same AC line, their additional power consumption
should be taken into account.
The SSP-300 includes protection circuitry that will prevent the surround processor from
operating at dangerously high or low voltages.
• At startup: the AC mains voltage must be within a range of approximately -15%
to +10% of its nominal value at startup, or the surround processor will not turn
on. For example, a 120V unit requires the AC mains to be between approximately
95V–135V in order to turn on.
• Overvoltage during operation: if the AC mains voltage surges by roughly 10%
or more during operation, the surround processor will enter protection mode and
shut down. The standby LED (Light-Emitting Diode) will flash to indicate the
protection mode has been engaged. An error message will be displayed on the
LCD touchscreen.
• Under-voltage during operation: if the AC mains voltage sags by 15% or
more, the surround processor will continue to play (since this does not present a
particular danger to the surround processor), but note that it may not be able to
achieve its usual standard of performance under these compromised conditions.
The standby LED will flash to indicate the condition.

10
ENGLISH
A Word About Installation
Every effort has been made to make the Classé SSP-300 simple and straightforward to
install and use.
Still, we have no way to evaluate other variables such as the size and shape of your room,
its acoustics, and the associated equipment you have chosen to use with your surround
processor. All of these factors influence the ultimate performance of your system.
For this reason, we strongly encourage you to have your system
installed and calibrated by your dealer, whose experience, training,
and specialized equipment can make a profound difference in the final
performance of the system.

11
ENGLISH
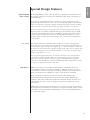
Special Design Features
high-bandwidth
video circuitry
Modern high definition video sources provide truly stunning picture quality. However,
the technical requirements of passing these remarkable signals along to the display are
quite challenging.
In recognition of the degradations that normally occur when passing these pristine
signals through circuitry that is often not up to task, many videophiles connect all their
video sources directly to their video displays. Unfortunately, doing so means switching
inputs separately on the audio and the video gear, which is tedious to say the least.
Your new Classé surround processor incorporates professional-quality video circuitry
that has both the extraordinary bandwidth and the requisite dynamic range to handle
even the most demanding video signals in the HDTV standard. This preserves simple
everyday operation of the system, since now all video and audio signals are routed
through a single controller. Just as importantly, it does so without any compromise in
picture quality.
transcoding The SSP-300 will receive standard, interlaced composite, S-video, and component
signals and transcode (convert) them to provide all of those formats simultaneously to
its various video outputs. It will convert signals “up” or “down” as needed to ensure that
all outputs are active, all the time, regardless of input signal. (Note, however, that the SSP-
300 does not change frame rates or broadcast standards, e.g., we do not convert from 60 fps
NTSC to 50 fps PAL or vice versa.)
Also, progressive input signals cannot be routed to the remote zone, since the remote
zone receives a composite signal. (There is no such thing as a progressive composite
signal.) If you have a progressive source, we suggest connecting both its progressive
output (for use in the main zone, without any further signal processing) and its S-video
or composite output (for use in the remote zone).
THX Ultra 2
®
THX
®
is an exclusive set of standards and technologies established by the world-
renowned film production company, Lucasfilm Ltd. THX grew from George Lucas’
personal desire to make your experience of the film soundtrack, in both movie theaters
and in your home theater, as faithful as possible to what the director intended.
Movie soundtracks are mixed in special movie theaters called dubbing stages,
and are designed to be played back in movie theaters with similar equipment and
conditions. This same soundtrack is usually then transferred directly onto DVD and
other distribution formats, and is not changed for playback in a small home theater
environment.
THX engineers developed patented technologies to accurately translate the sound from
the movie theatre environment into the home, correcting the tonal and spatial errors that
occur. With your SSP-300, when the THX indicator is on, the following THX features
are automatically added:

12
ENGLISH
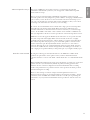
Re-Equalization™ The tonal balance of a standard film soundtrack will be excessively bright and harsh
when played back over high quality audio equipment in the home because film
soundtracks were designed to be played back in large movie theatres using very different
professional equipment. Re-Equalization restores the correct tonal balance for watching a
movie soundtrack in a small, home environment.
Timbre Matching™ The human ear alters our perception of a sound based on the direction from which
the sound is coming. Thus two identical sounds arriving from different directions
sound somewhat different to us (based on the asymmetrical shape of our ears). In film
soundtracks, this can introduce discontinuity as sounds pan from the front to the rear of
the room, even if the speakers themselves are quite well-matched.
The Timbre Matching feature filters the information going to the surround speakers
so that they more closely match the tonal characteristics of the sound coming from the
front speakers. This ensures seamless panning between the front and surround speakers.
Adaptive Decorrelation™ In a movie theater, there is an array of perhaps a dozen surround speakers so that
the surround information is literally all around you. This creates a diffuse surround
soundfield that envelopes you, drawing you into the action on the screen rather than
distracting you from it.
By contrast, in a home theater you often use only two speakers, located to the sides and
somewhat behind you. Even in more elaborate “7.1 channel” systems, you still have only
two speakers to the sides and two speakers to the rear – quite different than the surround
array for which the soundtrack was mixed. This difference can make the surround
speakers sound like headphones, lacking spaciousness and envelopment. The surround
soundfield also tends to collapse into the closest speaker as you move away from the
middle seating position.
Adaptive Decorrelation
™
– another THX technology – slightly changes each surround
channel’s time and phase relationship with respect to the other surround channels. This
expands the listening position and helps create – even with only two surround speakers
– the same spacious surround experience as in a movie theater.

13
ENGLISH
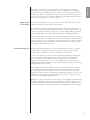
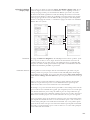
Advanced Speaker Array™ The people at THX have also found a solution to a problem that dogged high
performance multichannel systems for years: the apparent conflict between optimal
music and movie setups.
You see, movies are mixed in highly standardized environments, with even spaced
surround speakers in an array designed to provide a diffuse, enveloping soundfield. Their
goal is to draw you into the movie on the screen. If the surround sound tempts you to
look over your shoulder, the system has failed: it has reminded you that you are safe in
your living room rather than “in” the movie you are watching.
By contrast, most multichannel music is mixed with a single pair of surround speakers
aimed directly at the listener from behind. Many music mixers deliberately place
particular instruments or musicians in these locations, and want you to feel as though
you are “in the middle of the band.” Thus, a diffuse, non-localizable soundfield is not
what you might like for the most accurate reproduction of the musical producer’s intent.
THX Ultra 2 solves this apparent dilemma by the innovative use of a special surround
array that can provide either highly diffuse surround sound (for movies) or highly
localizable surround sound (for music), without having to reposition any loudspeakers.
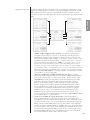
The Advanced Speaker Array™ places a pair of surround speakers to the sides of the
listener, and another pair directly behind the listener (and as close to each other as
practical). Through the use of sophisticated digital signal processing (DSP), this array
can create the audible illusion of either many speakers surrounding you on all sides, or
only a single pair of speakers behind you and spread apart as you might normally expect.
THX Ultra 2 Music Mode By using the technology in ASA (described above), the THX Ultra 2 Music mode
optimizes the performance of the speakers in the system for multichannel music
– whether found on a concert video DVD, a DVD-Audio disc, or a multichannel SACD
disc.
When in THX Ultra 2 Music mode, ASA creates the illusion of a single pair of surround
speakers located at ±30° from directly behind the primary listening position. This
simulates the most common configuration found in multichannel music recording
studios, and provides the best-possible recreation of the experience the music producer
had when mixing the recording.
There are other changes as well (for example, the Re-Equalization circuit is not
employed, since the music was not mixed with large movie theaters in mind) – but the
bottom line is that the THX Ultra 2 Music mode does a terrific job of optimizing the
performance of your system for multichannel music reproduction, with the touch of a
button.

14
ENGLISH
THX Ultra 2 Cinema Mode As you might expect, the THX Ultra 2 Cinema mode does a similarly terrific job of
optimizing the system for accurate reproduction of movie soundtracks.
When in THX Ultra 2 Cinema mode, ASA creates a diffuse soundfield that emulates the
much larger array of surround speakers found in a state of the art commercial theater.
Of course, Re-EQ, Adaptive Decorrelation, and Timbre-Matching are all employed to
compensate for the differences between an excellent commercial theater and your room
at home. Once again, a single selection can fully optimize your system for a significantly
different task: reproducing movies as they were intended to be experienced.
Boundary Gain
Compensation
Most speakers are designed to sound their best when placed out well away from the
walls. This placement usually offers the best imaging and overall performance.
However, this placement is often not practical in multi-purpose rooms that are used for
home entertainment. Speakers end up pushed back close to the walls so as to make more
room for the people who live in the house. Unfortunately, this change in placement
reinforces frequencies from the mid-bass down to the deepest bass. While few people
would object to having a little extra deep bass, the boosted mid-bass makes male vocals
sound “chesty,” “congested” or “boomy.”
flexible GUI The LCD touchscreen on the front panel of your new component supports an
extremely flexible and versatile graphical user interface (GUI) while maintaining a clean,
uncluttered appearance. The SSP-300 provides a range of controls that might otherwise
require dozens of buttons and knobs on the front panel. Despite this power and
flexibility, it remains simple to operate in day-to-day use.
In fact, in some ways it is even simpler to operate than a more conventional design
might be. For example, if you are not using one or more of the inputs on your SSP-
300, you can delete the unnecessary buttons from the operational menu. Doing so
prevents anyone from trying to select a nonexistent source component, with the resulting
confusion stemming from the lack of any sound. (Of course, you can easily restore the
button if you subsequently add another source component and need that input.)
customizable
volume control
The volume control on your new Classé surround processor is controlled by
sophisticated software that allows you to fine-tune its response to suit your preferences.
Ideally, a volume control would allow you to reach the volume you desire quickly, and
would also provide extremely fine control once you are close to the “perfect” volume. Of
course, these characteristics are in conflict with each other: one requires the volume to
change by quite a lot for a given amount of turning of the knob, while the other requires
small, incremental changes for the same turn of the knob.

15
ENGLISH
The volume control system on your SSP-300 solves this problem by responding
differently based on the specific circumstances (e.g. how quickly you are turning the
knob and where in the volume range you are). After extensive testing, we feel we have
created factory default settings that most people will find intuitive and a real pleasure to
use. However, if you feel you would like to fine-tune its performance further in order to
suit your particular preference, you may easily do so.
highly refined
circuit design
All Classé analog amplification stages are based on circuits that have been extensively
optimized over many years of continuous development.
By starting with excellent circuit designs and working with them over the years, we are
able to discover the many small refinements that add up to superlative performance, in
a variety of applications. Altering a voltage here, or using a slightly different part there,
may make all the difference between solid and absolutely outstanding performance.
This level of refinement only comes with a great deal of experience, and is not available
to those who flit from one trendy notion to the next. It accounts in no small measure for
both the consistency of sonic performance among Classé products (as they are all based
on similar analog gain stages), and for the consistently excellent reviews these products
receive from owners and reviewers alike.
extensive listening tests Excellent measured performance is to be expected in world-class products, and Classé
products deliver that performance. However, experience has shown that technical
excellence alone is insufficient to guarantee subjectively musical results.
For this reason, all Classé products are laboriously fine-tuned during the development
process by carefully controlled listening tests. Our ears are still some of the finest
laboratory test instruments available, and nicely complement more traditional
engineering test equipment. In the course of optimizing the circuitry for a product,
hundreds of decisions are made based on the subjective impression given by substituting
one high quality part for another.
As an example, we may listen to half a dozen 0.1% tolerance film resistor components
of the same value, from several different companies. Standard tests may show them
all to provide identical results in terms of noise, distortion, and so forth. Yet, almost
invariably, one selection yields some small improvement in the subjective reaction to the
performance of the product under development. Less often, even a single such change
can result in a surprisingly large improvement.
Multiply those various improvements by the dozens or even hundreds of such decisions
that must be made before the product can be finalized for production, and you have a
remarkable improvement, indeed – all based on careful listening tests, which we view as
a necessary complement to the solid engineering you might rightly expect from Classé.

16
ENGLISH
extraordinary longevity Another benefit of having worked with highly refined circuit designs so extensively over
many years is that we have vast experience in what works well over the long term.
By using only the highest quality parts to begin with, and then using them in an
informed way as a result of both accelerated aging experiments and actual long-term
experience, we are able to design and manufacture products which we are confident will
stand the test of time.
We are confident that your new Classé surround processor will give you many years of
trouble-free reliability and musical enjoyment, just as previous Classé products have
given their owners.

17
ENGLISH
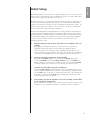
Initial Setup
We understand that you may be anxious to begin enjoying your new surround processor.
Our best advice: take advantage of the considerable experience your Classé dealer offers
to make sure you get all the performance you deserve.
However, if you want to set up your new system yourself, this section is designed to get
the system up and running quickly. Following the steps outlined below will not fully
optimize your system, since doing so involves optimizing everything in the system – not
merely your surround processor. But we can get you off to a good start, assuming that
the rest of the system is approximately as it should be.
Your new SSP-300 is delivered with default factory settings which this section will use
to make your initial task simpler. Please note that these default settings cannot deliver
all the performance and functionality that the SSP-300 offers in your particular system.
For a full understanding of the capabilities of your new surround sound preamplifier/
processor, you should still read the rest of this manual – particularly the section
describing the menu system.
1 Plug everything into the AC mains, but make sure everything is off or in
standby.
By plugging everything into the wall, you ensure that every component is
grounded and lessen the chances of a static discharge damaging delicate
electronics. However, it is important that everything be turned off before you
begin, especially the power amplifiers. You do not want a transient from making a
connection to be amplified by your power amplifiers and sent to the speakers.
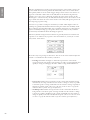
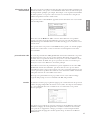
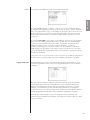
2 Connect your source components to the SSP-300.
By default, the
INPUT1 button is associated with the LINE1 analog audio
connection. INPUT2 button with LINE2, INPUT3 button with LINE3, etc.
Analog audio sources such as tuners should be connected to any available LINE
connectors. Make a note of where you are connecting your various sources.
3 Connect your SSP-300 to your power amplifier(s).
Connect the Main Outputs of the SSP-300 to the corresponding inputs on your
various amplifier channels, being careful not to mix them up. In particular, make
sure the SUB output is sent only to an appropriate subwoofer – the extremely low
frequencies often sent from the SUB output could damage a small speaker that
was not designed for those frequencies.
4 After making sure that the amplifiers are off or in standby, connect them
to the appropriate loudspeakers.
Pay close attention to the phase of the speaker connections. Always connect red (+)
terminals to red (+) terminals, and black (–) terminals to black (–) terminals.

18
ENGLISH
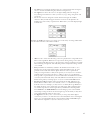
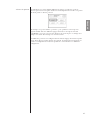
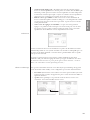
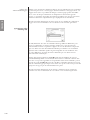
5 Now you are ready to power up your new SSP-300 and its associated
amplifiers.
Note that the initial power up takes approximately 90 seconds, during which time
the blue LED on the standby button will flash.
After approximately 45 seconds the LCD screen will display “initializing, please
wait….” Once this period is complete the LED light will remain on while the
LCD screen goes into standby mode.
A simple touch of the LCD screen will wake up the SSP-300 from its standby
mode. The LCD touchscreen will now display a blue screen titled “initializing” for
a further 15 seconds.
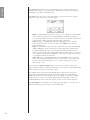
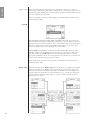
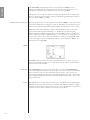
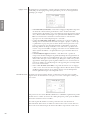
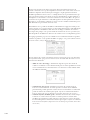
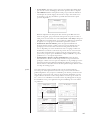
6 Connect the supplied calibration microphone to the MIC input on the
rear of the SSP-300, and use the auto-calibrate function of the SSP-300
to finish your initial setup.
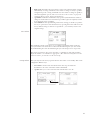
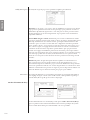
The auto-calibrate function of the SSP-300 can be found by touching the
following on-screen “buttons” in the LCD display, in this order:
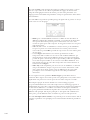
• Path: MENU/system setup/speakers/position 1/autocalibration
• touch auto levels (and wait for the autocalibration to finish)
• touch auto delays
Hold the microphone upright at arm’s length so that it is approximately where
your head would be when seated at your preferred listening position, and pointed
at the ceiling.
Pink noise (at a low level) will automatically begin from the left front
speaker and rise slowly in volume. The SSP-300 generates this noise, listens
through the microphone, then increases the signal level gradually until the
Sound Pressure Level at the listening position is 75 dB. The SSP-300 will
test every speaker in the same sequence as described above and set their
levels to 75 dB.
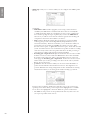
SPECIAL NOTE FOR SUBWOOFER
We have observed that, depending on the acoustics of your listening space,
the subwoofer distance auto-calibration may fail or return unreasonable
results. If this happens try one of the following solutions: If the subwoofer
level was very soft during the first pass of the auto-calibration process,
increase it a bit to make the signal more audible. Try raising the crossover
frequency of the subwoofer (in the Audio Setup menu) or turning the
subwoofer filter off (which will make the selected crossover frequency
irrelevant). If all these measures fail, you will have to enter the subwoofer
distance manually through the Distance Setup menu.
Note: at this time you will only need to enter the manual level and
distance values for the subwoofer. All other speaker values will remain
accurate.
To optimize speaker setup we suggest entering all speaker levels and
distances manually.

19
ENGLISH
7 Please take a moment to read the rest of this manual.
It is important that you become familiar with the full capabilities of your new
surround processor if you are to get maximum value from your purchase.
(Alternatively, you may prefer to have your dealer perform a comprehensive
installation of the system, leaving the technical details to the professionals.)
For example: the default settings of the bass management system in the SSP-300
are to divert any bass below 80 Hz, in any channel, to the subwoofer output. This
is a reasonably safe choice, since few loudspeakers that are likely to be used with
equipment of the SSP-300’s caliber are going to be stressed by these settings.
However, these settings may not be optimal for your particular loudspeaker
system. Your dealer can assist you in determining the best configuration of the bass
management system for your specific situation.

20
ENGLISH
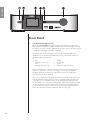
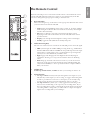
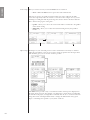
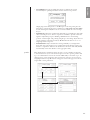
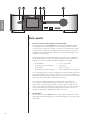
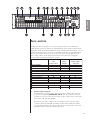
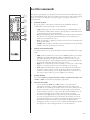
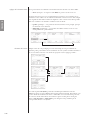
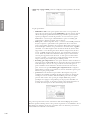
Front Panel
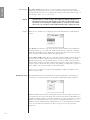
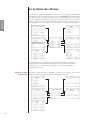
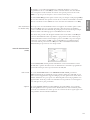
1 Standby button & LED indicator
The front panel Standby button will toggle the surround processor between its
fully operational status and a standby mode that leaves the surround processor off,
yet ready to respond to system commands via any of the supported control options
(e.g. IR input, DC trigger, CAN Bus, or RS-232).
The current state of the surround processor is indicated by the LED on the
standby button on the front panel. When the unit is powered and switched on,
this LED indicates the following:
• On = standby
• Flashing (on power-up) =
initialization
• Off = operate
• Flashing (after power-up) = AC mains voltage out of range
If you are planning not to use the surround processor for an extended period
of time, e.g. vacation or other travel, we suggest you disconnect it from the
AC mains. Please be certain that the surround processor is in standby
prior to
disconnecting it from the AC mains.
Also, it is a good practice to physically disconnect any and all valuable electronics
from the AC mains during electrical storms, as a lightning strike anywhere near
your home can put a tremendous surge on the AC mains that will easily jump
across a simple power switch. The resulting surge (which may be many thousands
of volts) can damage any piece of electronics, no matter how well designed and
protected. The best protection in the case of severe electrical storms is simply to
remove the electronics from any connection with the power grid.
La page est en cours de chargement...
La page est en cours de chargement...
La page est en cours de chargement...
La page est en cours de chargement...
La page est en cours de chargement...
La page est en cours de chargement...
La page est en cours de chargement...
La page est en cours de chargement...
La page est en cours de chargement...
La page est en cours de chargement...
La page est en cours de chargement...
La page est en cours de chargement...
La page est en cours de chargement...
La page est en cours de chargement...
La page est en cours de chargement...
La page est en cours de chargement...
La page est en cours de chargement...
La page est en cours de chargement...
La page est en cours de chargement...
La page est en cours de chargement...
La page est en cours de chargement...
La page est en cours de chargement...
La page est en cours de chargement...
La page est en cours de chargement...
La page est en cours de chargement...
La page est en cours de chargement...
La page est en cours de chargement...
La page est en cours de chargement...
La page est en cours de chargement...
La page est en cours de chargement...
La page est en cours de chargement...
La page est en cours de chargement...
La page est en cours de chargement...
La page est en cours de chargement...
La page est en cours de chargement...
La page est en cours de chargement...
La page est en cours de chargement...
La page est en cours de chargement...
La page est en cours de chargement...
La page est en cours de chargement...
La page est en cours de chargement...
La page est en cours de chargement...
La page est en cours de chargement...
La page est en cours de chargement...
La page est en cours de chargement...
La page est en cours de chargement...
La page est en cours de chargement...
La page est en cours de chargement...
La page est en cours de chargement...
La page est en cours de chargement...
La page est en cours de chargement...
La page est en cours de chargement...
La page est en cours de chargement...
La page est en cours de chargement...
La page est en cours de chargement...
La page est en cours de chargement...
La page est en cours de chargement...
La page est en cours de chargement...
La page est en cours de chargement...
La page est en cours de chargement...
La page est en cours de chargement...
La page est en cours de chargement...
La page est en cours de chargement...
La page est en cours de chargement...
La page est en cours de chargement...
La page est en cours de chargement...
La page est en cours de chargement...
La page est en cours de chargement...
La page est en cours de chargement...
La page est en cours de chargement...
La page est en cours de chargement...
La page est en cours de chargement...
La page est en cours de chargement...
La page est en cours de chargement...
La page est en cours de chargement...
La page est en cours de chargement...
La page est en cours de chargement...
La page est en cours de chargement...
La page est en cours de chargement...
La page est en cours de chargement...
La page est en cours de chargement...
La page est en cours de chargement...
La page est en cours de chargement...
La page est en cours de chargement...
La page est en cours de chargement...
La page est en cours de chargement...
La page est en cours de chargement...
La page est en cours de chargement...
La page est en cours de chargement...
La page est en cours de chargement...
La page est en cours de chargement...
La page est en cours de chargement...
La page est en cours de chargement...
La page est en cours de chargement...
La page est en cours de chargement...
La page est en cours de chargement...
La page est en cours de chargement...
La page est en cours de chargement...
La page est en cours de chargement...
La page est en cours de chargement...
-
 1
1
-
 2
2
-
 3
3
-
 4
4
-
 5
5
-
 6
6
-
 7
7
-
 8
8
-
 9
9
-
 10
10
-
 11
11
-
 12
12
-
 13
13
-
 14
14
-
 15
15
-
 16
16
-
 17
17
-
 18
18
-
 19
19
-
 20
20
-
 21
21
-
 22
22
-
 23
23
-
 24
24
-
 25
25
-
 26
26
-
 27
27
-
 28
28
-
 29
29
-
 30
30
-
 31
31
-
 32
32
-
 33
33
-
 34
34
-
 35
35
-
 36
36
-
 37
37
-
 38
38
-
 39
39
-
 40
40
-
 41
41
-
 42
42
-
 43
43
-
 44
44
-
 45
45
-
 46
46
-
 47
47
-
 48
48
-
 49
49
-
 50
50
-
 51
51
-
 52
52
-
 53
53
-
 54
54
-
 55
55
-
 56
56
-
 57
57
-
 58
58
-
 59
59
-
 60
60
-
 61
61
-
 62
62
-
 63
63
-
 64
64
-
 65
65
-
 66
66
-
 67
67
-
 68
68
-
 69
69
-
 70
70
-
 71
71
-
 72
72
-
 73
73
-
 74
74
-
 75
75
-
 76
76
-
 77
77
-
 78
78
-
 79
79
-
 80
80
-
 81
81
-
 82
82
-
 83
83
-
 84
84
-
 85
85
-
 86
86
-
 87
87
-
 88
88
-
 89
89
-
 90
90
-
 91
91
-
 92
92
-
 93
93
-
 94
94
-
 95
95
-
 96
96
-
 97
97
-
 98
98
-
 99
99
-
 100
100
-
 101
101
-
 102
102
-
 103
103
-
 104
104
-
 105
105
-
 106
106
-
 107
107
-
 108
108
-
 109
109
-
 110
110
-
 111
111
-
 112
112
-
 113
113
-
 114
114
-
 115
115
-
 116
116
-
 117
117
-
 118
118
-
 119
119
-
 120
120


Classé SSP-300 Le manuel du propriétaire
- Catégorie
- Équipement musical supplémentaire
- Taper
- Le manuel du propriétaire
dans d''autres langues
- English: Classé SSP-300 Owner's manual
Documents connexes
-
Classé SSP-600 Le manuel du propriétaire
-
Classé SSP-800 / CT-SSP Le manuel du propriétaire
-
Classé SSP-600 Le manuel du propriétaire
-
-
-
-
Classé CAP-2100 Le manuel du propriétaire
-
-
Classé CDP-100 Le manuel du propriétaire
-
Autres documents
-
Sony SA-FT7ED Le manuel du propriétaire
-
-
Arcam AV8 Manuel utilisateur
-
Yamaha DSP-Z9 Manuel utilisateur
-
-
-
-
-
-
RCA RCU1010RF Manuel utilisateur