Elinchrom Rotalux Manuel utilisateur
- Catégorie
- La caméra clignote
- Taper
- Manuel utilisateur
Ce manuel convient également à

Elinchrom SA Rotalux 10.2020 (73320)
USER MANUAL P.02
GEBRAUCHSANLEITUNG P.09
MANUEL D’UTILISATION P.17
MANUALE D’USO P.25
MANUAL DE INSTRUCCIONES P.33
GEBRUIKSAANWIJZING P.41
РУКОВОДСТВО ПОЛЬЗОВАТЕЛЯ P.49
安 全ガイド P.57
用户手册 P.65
Rotalux
is a registered trademark of Elinchrom LTD, RENENS, SWITZERLAND
EN
DE
FR
IT
ES
NL
RU
JP
CN

User Manual
2
Introduction
Dear Photographer,
Thank you for buying the Elinchrom Rotalux Softbox. All Elinchrom products are
manufactured using the most advanced technology. Carefully selected compo-
nents are used to ensure the highest quality and the equipment is submitted to
many tests both during and after manufacture. We trust that it will give you many
years of reliable service.
Please read the instructions carefully, before use, for your safety and to obtain
maximum benefit from many features.
Your Elinchrom-Team
Characteristics
The easy mounting Rotalux system is probably the most widely copied of all
Softbox systems. However, it is easier to copy a design than a quality and they
remain the best units in their class.
What continues to make the Elinchrom units unique are the optional sets of
deflectors – gold, silver, frosted and translucent that enable the softness / hard-
ness and colour to be modified; fitting centrally over the flashtube at your chosen
distance. Folding down like an umbrella, they are easily transported or just kept
clean, in their included carrying bag.
Rotalux Speedring with improved mechanics and extremely lightweight, only
370 g. Improved finish of the Rotalux reflector tissue with grey piping for better
light efficiency. 360° revolving system.
Folds down like an umbrella, without dismounting the softbox.
Carrying bag for a folded Rotalux is included. Optional Hooded Diffusers to
control the light spread, are available for all Rotalux.
Optional Rotagrids for direct lighting are available for the Rotalux 70x70 cm,
60x80 cm and the 90x110 cm.

User Manual
3
Lighttools™ offers a wide range of grids in different sizes and angles for Rotalux
softboxes.
Speedrings adapter for other flash brands such as * Broncolor
®
, Profoto
®
,
Bowens
®
, Hensel
®
, AlienBees
®
, Comet
®
, Photona
®
are available.
Security Advise
The maximum modelling lamp wattage for all Rotalux softboxes is limited to
300W. Ensure that the Rotalux is correctly assembled and locked to the flash
unit.
The unit, the flash tube and accessories may become very hot during and after
use! To avoid injuries, handle with isolating cloth or wait until parts have cooled
down.
Even though we use fire retardant materials the fabric should never get in contact
with the hot flash tube or the modelling lamp.
The metal speedring and the locking knob for the revolving system may heat up
enormously when the flash unit is used at maximum power levels of flash and
modelling lamp. Please wait until the parts have cooled down, before packing
away.
Always switch the flash unit off before fitting or exchanging reflectors and soft-
boxes.
Ensure that the ventilation system of flash units is working correctly.
Double check that the internal fabric diffuser is correctly fitted and does not make
contact with the hot flash tube and the modelling lamp.
Lower the modelling lamp power and reduce the number of flashes per minute,
when small size softboxes are used. The reflective surface is very close to the
modelling lamp/ flashtube. The fabric can be damaged by excessive heat.
*Broncolor
®
, Profoto
®
, Bowens
®
, Hensel
®
, AlienBees
®
, Comet
®
, Photona
®
are protected trademarks that do not
belong to Elinchrom LTD.

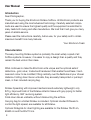
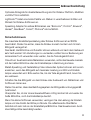
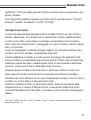
STRIP
Red Marks
35 x 100
50 x 130
SQUARE
Blue Marks
70 x 70, 100 x 100,
60 x 80, 90 x 110
OCTA
All
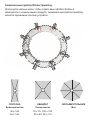
Rotalux Universal Speedring
Use the color marks to build your Rotalux softbox depending on your
product model. The universal speedring is the same for all units.

5
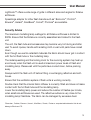
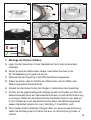
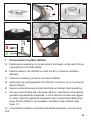
1.A 1.B
1.C
1.FG
1.C
1.E
1.D 1.D
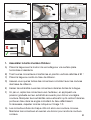
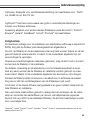
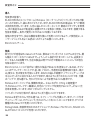
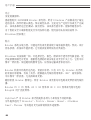
1. Assembling the Rotalux Softbox:
A) Place the speedring with the locking knob at the top on a firm horizontal
surface.
B) Pull out each of the rod sockets and move them into the 90° vertical position
and release.
C) Place the speedring in the centre of the reflection fabrics.
D) Ensure that the slots of the rod sockets coincide with the seams of the
reflection fabrics.
E) Insert the bare ends of the rods into the sockets of the Speedring.
F) One at a time bend rods opposite outwards, applying gradual pressure on
the capped end to give slight curvature. Manipulate the respective capped
ends to fit into the cloth pockets at the coinciding corners of the reflection
fabrics. If necessary, readjust as shown in the picture 1.D.
G) The rods fixed at both ends, have now a convex curve. Hold the rod and
twist each to make the curve concave.

User Manual
6
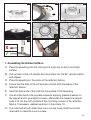
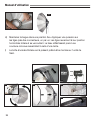
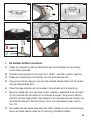
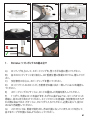
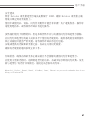
H) Hold down the Speedring in a fixed position. One at a time apply pressure
on the rods near the rod socket. The rod sockets return to the previous
horizontal position and lock. The reflection fabrics now acquires a concave
tent-like curvature.
I) The Rotalux Softbox is now ready to be mounted on the flash unit.
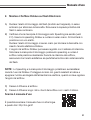
2.B
2.E
2.E
2.D
2.C
2.A
1.I
1.H

User Manual
7
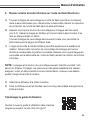
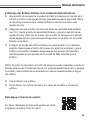
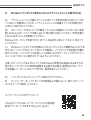
Download the user manual
Please get the user manual in other languages
at this link: http://bc.gs/41
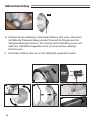
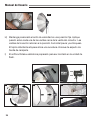
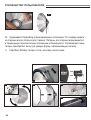
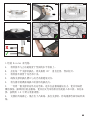
2. Mounting the Rotalux Softbox on the Elinchrom flash-unit:
A) Turn the locking ring of the flash unit (mounted on the tripod), anti clockwise
to unlock the bayonet. Remove the protective cap from the flash unit anti
clockwise.
B) Ensure that the locking knob on the Speedring is tightened (see 2.C). Insert
the Rotalux speedring and turn clockwise. It clicks into place.
Turn the locking ring clockwise to lock the bayonet with the Rotalux
Speedring attached.
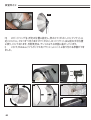
C) The angle of the Rotalux softbox can be adjusted with the revolving system.
Unlock the locking knob of the Speedring and turn the softbox into the
desired position. Make sure that the Speedring is locked in the bayonet of
the flash unit whilst turning the softbox.
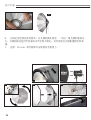
NOTE : The Speedring and the locking knob may become hot when the Rotalux
is in use. Protect your hands with heat resistant gloves and switch off the unit and
disconnect it from the mains, when you need to adjust the softbox angle.
D) Attach the diffuser to the softbox.
E) Fix the diffuser with the Velcro tapes along the softbox sides and edges.


Elinchrom SA Rotalux 03.01.2017 (73320)
GEBRAUCHSANLEITUNG
Rotalux
is a registered trademark of Elinchrom LTD, RENENS, SWITZERLAND

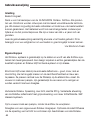
Gebrauchsanleitung
10
Einleitung
Lieber Fotograf,
Vielen Dank, dass Sie sich für den Kauf der Elinchrom Rotalux Softbox entschie-
den haben. Alle Produkte von Elinchrom werden unter Verwendung der neuesten
Technologie hergestellt. Es werden sorgfältig ausgewählte Komponenten verwen-
det, um die höchste Qualität zu gewährleisten und die Ausrüstung wird während
und nach der Herstellung vielen Tests unterzogen. Wir hoffen, dass sie Ihnen viele
Jahre zuverlässige Dienste leistet.
Bitte lesen Sie zu Ihrer Sicherheit und für den größtmöglichen Nutzen vieler Funk-
tionen vor dem Gebrauch sorgfältig die Anweisungen.
Ihr Elinchrom-Team
Merkmale
Das einfach zu befestigende Rotalux-System ist wahrscheinlich das am häufigs-
ten kopierte aller Softbox-Systeme. Allerdings ist es leichter, Design zu kopieren
als Qualität und sie bleiben die besten Geräte ihrer Art.
Was die Geräte von Elinchrom nach wie vor einzigartig macht, sind die optiona-
len Deflektoren – gold, silber, matt und transparent, mit denen Weichheit/Härte
und Farbe geändert werden können und die zentral in der von Ihnen gewün-
schten Entfernung über die Blitzröhre passen. Da sie sich wie ein Regenschirm
umklappen lassen, können sie problemlos transportiert oder in der enthaltenen
Tragetasche sauber gehalten werden.
Rotalux Speedring mit verbesserter Mechanik und extrem leicht, nur 370g.
Verbesserte Oberfläche des Rotalux-Reflektor-Gewebes mit grauer Paspel für
bessere Lichtausbeute. 360° drehbares System.
Lässt sich ohne Demontage der Softbox wie ein Regenschirm umklappen.
Tragetasche für zusammengeklappten Rotalux ist im Lieferumfang enthalten.
Optionale Diffusortücher zur Kontrolle der Lichtstreuung sind für alle Rotalux
erhältlich.

Gebrauchsanleitung
11
Optionale Rotagrids für direkte Beleuchtung sind für Rotalux 70x70cm, 60x80xm
und 90x110cm erhältlich.
Lighttools™ bietet eine breite Palette von Waben in verschiedenen Größen und
Winkeln für Rotalux-Softboxen an.
Speedring-Adapter für andere Blitzmarken wie *Broncolor
®
, Profoto
®
, Bowens
®
,
Hensel
®
, AlienBees
®
, Comet
®
, Photona
®
sind erhältlich.
Sicherheitshinweis
Die maximale Einstelllampenleistung aller Rotalux Softboxen ist auf 300W
beschränkt. Stellen Sie sicher, dass die Rotalux korrekt montiert und mit dem
Blitzgerät verriegelt ist.
Das Gerät, die Blitzröhre und Zubehör können während und nach dem Gebrauch
sehr heiß werden! Um Verletzungen zu vermeiden, sollten Sie zur Bedienung ein
isolierendes Tuch verwenden oder warten, bis die Teile abgekühlt sind.
Obwohl wir feuerhemmende Materialien verwenden, sollte das Gewebe niemals
mit der heißen Blitzröhre oder der Einstelllampe in Berührung kommen.
Metall-Speedring und Feststellknopf des rotierenden System können sich enorm
erwärmen, wenn das Blitzgerät auf maximaler Leistung von Blitz und Einstell-
lampe verwendet wird. Bitte warten Sie, bis die Teile abgekühlt sind, bevor Sie
sie verstauen.
Schalten Sie das Blitzgerät vor dem Einbau oder Austausch von Reflektoren und
Softboxen immer aus.
Stellen Sie sicher, dass das Belüftungssystem der Blitzgeräte ordnungsgemäß
funktioniert.
Überprüfen Sie, ob der innere Gewebediffusor richtig montiert ist und weder die
heiße Blitzröhre, noch die Einstelllampe berührt.
Wenn Sie kleine Softboxen verwenden, verringern Sie die Leistung der Einstell-
lampe und die Anzahl der Blitze pro Minute. Die reflektierende Oberfläche
befindet sich sehr nah an der Einstelllampe/Blitzröhre. Das Gewebe kann durch
übermäßige Hitze beschädigt werden.

STREIFEN
Rote Markierungen
RECHTECK
Blaue Markierungen
OCTA
Alle
Rotalux Universal Speedring
Verwenden Sie die Farbmarkierungen, um Ihre Rotalux-Softbox je nach Produkt-
modell zu bauen. Der universelle Speedring ist bei allen Geräten gleich.
35 x 100
50 x 130
70 x 70, 100 x 100,
60 x 80, 90 x 110

13
1.A 1.B
1.C
1.FG
1.C
1.E
1.D 1.D
1. Montage der Rotalux Softbox:
A) Legen Sie den Speedring mit dem Feststellknopf nach oben auf eine feste
Unterlage.
B) Ziehen Sie jede der Stabbuchsen heraus, verschieben Sie diese in die
90°-Vertikalstellung und geben Sie sie frei.
C) Platzieren Sie den Speedring in der Mitte des Reflexionsgewebes.
D) Stellen Sie sicher, dass die Schlitze der Stabbuchsen mit den Nähten des
Reflexionsgewebes übereinstimmen.
E) Stecken Sie die blanken Enden der Stangen in die Buchsen des Speedrings.
F) Knicken Sie die gegenüberliegenden Stangen einzeln nach außen und üben Sie
dabei stufenweise Druck auf das bedeckte Ende aus, um eine leichte Krümmung
zu erzeugen. Stellen Sie die entsprechenden bedeckten Enden so ein, dass sie
in die Tuchlaschen in den übereinstimmenden Ecken des Reflexionsgewebes
passen. Bei Bedarf justieren Sie, wie in Abbildung 1.D ersichtlich, nach.
G) Die an beiden Enden befestigten Stangen haben nun eine konvexe Krümmung.
Halten Sie die Stange fest und drehen Sie jede, um die Krümmung konkav zu
machen.

Gebrauchsanleitung
14
H) Drücken Sie den Speedring in einer festen Stellung nach unten. Üben Sie in
der Nähe der Stangeneinfassung einzeln Druck auf die Stangen aus. Die
Stangeneinfassungen kehren in die vorherige Horizontalstellung zurück und
rasten ein. Das Reflexionsgewebe nimmt nun eine konkave, zeltartige
Krümmung an.
I) Die Rotalux-Softbox kann nun auf dem Blitzgerät angebracht werden.
2.B
2.E
2.E
2.D
2.C
2.A
1.I
1.H

Gebrauchsanleitung
15
Das Benutzerhandbuch herunterladen
Sie erhalten das Benutzerhandbuch in anderen
Sprachen über diesen link: http://bc.gs/41
2. Montage der Rotalux Softbox am Elinchrom-Blitzgerät:
A) Drehen Sie den Sicherungsring des Blitzgeräts (auf dem Stativ montiert)
gegen den Uhrzeigersinn, um das Bajonett zu entriegeln. Entfernen Sie die
Schutzkappe vom Blitzgerät gegen den Uhrzeigersinn.
B) Vergewissern Sie sich, dass der Feststellknopf auf dem Speedring angezogen
ist (siehe 2.C). Fügen Sie den Rotalux-Speedring ein und drehen Sie im
Uhrzeigersinn. Er rastet ein.
Drehen Sie den Sicherungsring im Uhrzeigersinn, um das Bajonett mit dem
angebrachten Rotalux Speedring einzurasten.
C) Der Winkel der Rotalux Softbox kann mit dem Drehsystem angepasst werden.
Entriegeln Sie den Feststellknopf des Speedrings und drehen Sie die Softbox
in die gewünschte Position. Stellen Sie sicher, dass der Speedring in das
Bajonett des Blitzgerätes eingerastet ist, während Sie die Softbox drehen.
ANMERKUNG: Der Speedring und der Feststellknopf können heiß werden,
wenn das Rotalux in Gebrauch ist. Schützen Sie Ihre Hände mit hitzebeständi-
gen Handschuhen und schalten Sie das Gerät aus und trennen Sie es von der
Stromversorgung, wenn Sie den Winkel der Softbox einstellen wollen.
D) Bringen Sie den Diffusor an der Softbox an.
E) Befestigen Sie den Diffusor mit Klettverschlussklebeband an den Seiten und
Rändern der Softbox.


Elinchrom SA Rotalux 03.01.2017 (73320)
MANUEL D’UTILISATION
Rotalux
is a registered trademark of Elinchrom LTD, RENENS, SWITZERLAND

Manuel d’utilisation
18
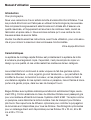
Introduction
Cher photographe,
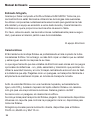
Nous vous remercions d’avoir acheté la boîte à lumière Elinchrom Rotalux. Tous
les produits Elinchrom sont fabriqués en utilisant la technologie la plus avancée.
Des composants soigneusement sélectionnés sont utilisés afin d’assurer une
qualité maximale, et l’équipement est soumis à de nombreux tests, durant sa
fabrication et après celle-ci. Nous sommes certains qu’il vous rendra de nom-
breuses années de service fiable.
Veuillez lire attentivement les instructions, avant toute utilisation, pour votre sécu-
rité et pour obtenir le maximum des nombreuses fonctionnalités.
Votre équipe Elinchrom
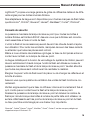
Caractéristiques
Le système de montage rapide Rotalux est probablement le système de boîte
à lumière le plus largement copié. Cependant, il est plus simple de copier un
design qu’une qualité, et ces unités restent les meilleures de leur catégorie.
Les unités Elinchrom continuent à rester uniques du fait des gammes option-
nelles de déflecteurs — doré, argenté, givré et translucide — qui permettent de
modifier la douceur, la dureté et la couleur, en les plaçant au centre du flash à
une distance réglable. En les repliant comme un parapluie, ils sont faciles à trans-
porter et à garder propre, dans leur sac de transport fourni.
Bague Rotalux avec système mécanique amélioré et extrêmement léger, seule-
ment 370 g. Finition améliorée du tissu du réflecteur Rotalux avec passepoil gris
pour une meilleure efficacité lumineuse. Système rotatif à 360 °.Se replie comme
un parapluie, sans démonter la boîte à lumière. Sac de transport pour Rotalux
plié fourni. Des capuchons de diffusion optionnels pour contrôler la propagation
de la lumière sont disponibles pour tous les Rotalux. Des Rotagrids optionnelles
pour un éclairage direct sont disponibles pour les Rotalux 70 x 70 cm, 60 x 80
cm et 90 x 110 cm.

Manuel d’utilisation
19
Lighttools™ propose une large gamme de grilles de différentes tailles et de diffé-
rents angles pour les boîtes à lumière Rotalux.
Des adaptateurs de bague sont disponibles pour d’autres marques de flash telles
que Broncolor
®
, Profoto
®
, Bowens
®
, Hensel
®
, AlienBees
®
, Comet
®
, Photona
®
.
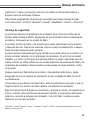
Conseils de sécurité
La puissance maximale de lampe de mise au point pour toutes les boîtes à
lumière Rotalux est limitée à 300 W. Assurez-vous que la Rotalux est correcte-
ment assemblée et fixée à l’unité de flash.
L’unité, le flash et les accessoires peuvent devenir très chauds durant et après
leur utilisation ! Pour éviter les accidents, manipulez-les avec des tissus isolants
ou attendez que toutes les pièces aient refroidi.
Même si nous utilisons des matériaux ignifuges, le tissu ne doit jamais entrer en
contact avec le flash ou la lampe de mise au point.
La bague métallique et le bouton de verrouillage du système de rotation peuvent
devenir extrêmement chauds lorsque l’unité de flash est utilisée au niveau de
puissance maximale du flash et de la lampe de mise au point. Veuillez attendre
que toutes les pièces aient refroidi avant de remballer le matériel.
Éteignez toujours l’unité de flash avant de placer ou de changer les réflecteurs et
la boîte à lumière.
Assurez-vous que le système de ventilation des unités de flash fonctionne cor-
rectement.
Vérifiez soigneusement que le tissu du diffuseur interne est correctement fixé et
qu’il n’entre pas en contact avec le flash et la lampe de mise au point.
Abaissez la puissance de la lampe de mise au point et réduisez le nombre de
flashs par minute lorsque des boîtes à lumière de petite taille sont utilisées. La
surface réfléchissante est très proche de la lampe de mise au point et du flash.
Le tissu peut être endommagé par une chaleur trop importante.
*Broncolor
®
, Profoto
®
, Bowens
®
, Hensel
®
, AlienBees
®
, Comet
®
, Photona
®
sont des marques protégées qui
n’appartiennent pas à Elinchrom LTD.

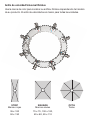
STRIP
Marques rouges
SQUARE
Marques bleues
OCTA
Toutes
Bague universelle Rotalux
Utilisez les marques de couleur pour assembler votre boîte à lumière Rotalux
selon le modèle de votre produit. La bague universelle est identique pour toutes
les unités.
35 x 100
50 x 130
70 x 70, 100 x 100,
60 x 80, 90 x 110
La page charge ...
La page charge ...
La page charge ...
La page charge ...
La page charge ...
La page charge ...
La page charge ...
La page charge ...
La page charge ...
La page charge ...
La page charge ...
La page charge ...
La page charge ...
La page charge ...
La page charge ...
La page charge ...
La page charge ...
La page charge ...
La page charge ...
La page charge ...
La page charge ...
La page charge ...
La page charge ...
La page charge ...
La page charge ...
La page charge ...
La page charge ...
La page charge ...
La page charge ...
La page charge ...
La page charge ...
La page charge ...
La page charge ...
La page charge ...
La page charge ...
La page charge ...
La page charge ...
La page charge ...
La page charge ...
La page charge ...
La page charge ...
La page charge ...
La page charge ...
La page charge ...
La page charge ...
La page charge ...
La page charge ...
La page charge ...
La page charge ...
La page charge ...
La page charge ...
La page charge ...
-
 1
1
-
 2
2
-
 3
3
-
 4
4
-
 5
5
-
 6
6
-
 7
7
-
 8
8
-
 9
9
-
 10
10
-
 11
11
-
 12
12
-
 13
13
-
 14
14
-
 15
15
-
 16
16
-
 17
17
-
 18
18
-
 19
19
-
 20
20
-
 21
21
-
 22
22
-
 23
23
-
 24
24
-
 25
25
-
 26
26
-
 27
27
-
 28
28
-
 29
29
-
 30
30
-
 31
31
-
 32
32
-
 33
33
-
 34
34
-
 35
35
-
 36
36
-
 37
37
-
 38
38
-
 39
39
-
 40
40
-
 41
41
-
 42
42
-
 43
43
-
 44
44
-
 45
45
-
 46
46
-
 47
47
-
 48
48
-
 49
49
-
 50
50
-
 51
51
-
 52
52
-
 53
53
-
 54
54
-
 55
55
-
 56
56
-
 57
57
-
 58
58
-
 59
59
-
 60
60
-
 61
61
-
 62
62
-
 63
63
-
 64
64
-
 65
65
-
 66
66
-
 67
67
-
 68
68
-
 69
69
-
 70
70
-
 71
71
-
 72
72


Elinchrom Rotalux Manuel utilisateur
- Catégorie
- La caméra clignote
- Taper
- Manuel utilisateur
- Ce manuel convient également à
dans d''autres langues
- italiano: Elinchrom Rotalux Manuale utente
- English: Elinchrom Rotalux User manual
- español: Elinchrom Rotalux Manual de usuario
- Deutsch: Elinchrom Rotalux Benutzerhandbuch
- русский: Elinchrom Rotalux Руководство пользователя
- Nederlands: Elinchrom Rotalux Handleiding
- 日本語: Elinchrom Rotalux ユーザーマニュアル
Documents connexes
-
Elinchrom 110531 Manuel utilisateur
-
-
Elinchrom 73320 Manuel utilisateur
-
-
-
-
Elinchrom Litemotiv 120 & 190 Manuel utilisateur
-
-
 Elinca Digital RX Manuel utilisateur
-

Autres documents
-
Profoto AcuteB 600 Mode d'emploi
-
König KN-STUDIO80 spécification
-
Profoto PCA5537 Manuel utilisateur
-
-
Broncolor Litepipe for HMI F400 Le manuel du propriétaire
-
-
-
-
-
Lastolite Cubelite™ LiteTable Manuel utilisateur